
There is a moment in nearly every woodworking project when the rough boards finally become something real—and then the finish has to reveal what you have done.
A good finishing routine brings out the grain, softens the light across the surface, and makes the piece feel complete. A rushed one can expose every scratch, glue mark, dusty corner, and uneven edge you thought you had already left behind.
If you are looking for a manageable project to practice on, the free beginner woodworking plans anyone can build this weekend can give you a practical place to start.
The finishing supplies themselves are less complicated than they first appear. You do not need a shelf full of mysterious cans. You need a small group of products and tools that each have a clear job—and that are compatible with one another.
This guide walks through the 17 most useful woodworking finishing supplies for beginners, from the first sanding pass to the last safe cleanup step. It covers shelves, boxes, tables, desks, painted furniture, and other common indoor projects.
Outdoor work needs products labeled for exterior use, because weather, sunlight, moisture, and temperature changes ask much more of a finish than an indoor room does.
Quick answer: the 17 supplies that make finishing less intimidating
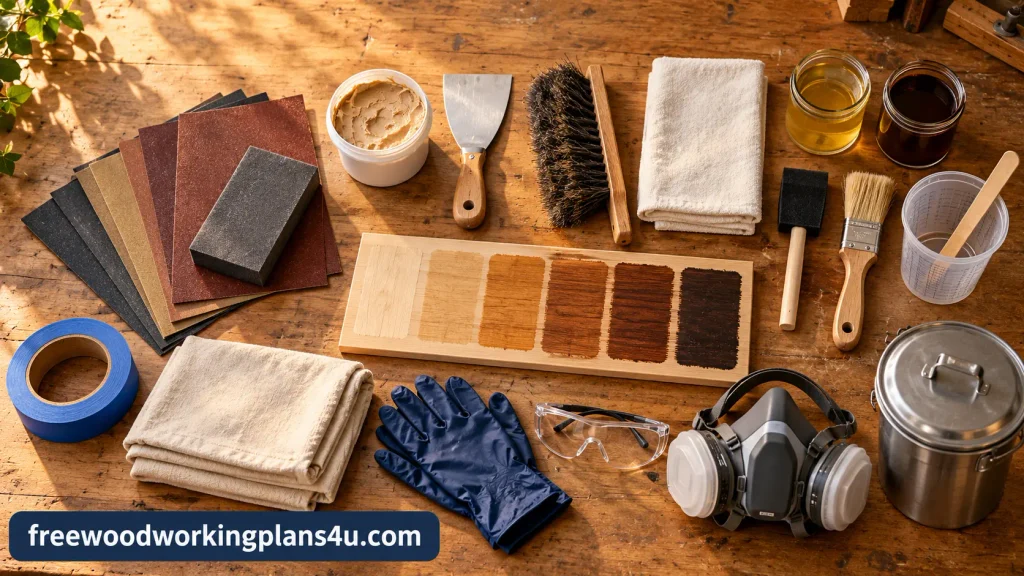
If you are standing in a hardware store wondering where to begin, think in four groups: prepare the wood, create the appearance, protect the surface, and work safely. Most first projects call for sandpaper, a way to keep sanding flat, dust-removal supplies, a test board, one appearance product, a compatible topcoat, an applicator, and basic protective equipment.
Here is the complete list before we get into the details:
| No. | Supply | What it does | How often you need it |
|---|---|---|---|
| 1 | Sandpaper in several grits | Smooths and prepares the surface | Nearly every project |
| 2 | Sanding block | Keeps hand-sanding flat and controlled | Strongly recommended |
| 3 | Wood filler | Repairs small holes, dents, and gaps | When the wood needs it |
| 4 | Putty knife or scraper | Spreads filler and removes residue | When filler or glue is present |
| 5 | Vacuum and soft brush | Removes sanding dust from the project | Nearly every project |
| 6 | Lint-free cloth or tack cloth | Collects the last fine particles | Nearly every project |
| 7 | Test board or scrap wood | Shows the real result before the project is at risk | Strongly recommended |
| 8 | Stain, dye, paint, or clear finish | Creates the look you want | Choose the appropriate option |
| 9 | Conditioner, sanding sealer, or primer | Controls absorption or improves adhesion | Product- and project-dependent |
| 10 | Protective topcoat | Adds resistance to wear, moisture, and handling | Usually |
| 11 | Brush, foam applicator, or finishing cloth | Spreads the product across the wood | Nearly every project |
| 12 | Mixing container and stir stick | Holds and gently mixes the finish | Often useful |
| 13 | Painter’s tape and drop cloth | Protects nearby surfaces and the floor | Strongly recommended |
| 14 | Nitrile gloves | Keeps finishing products off your skin | Strongly recommended |
| 15 | Eye protection | Protects against dust and splashes | Strongly recommended |
| 16 | Ventilation and suitable respiratory protection | Reduces exposure to dust and vapors | Depends on the product, always plan for it |
| 17 | Cleanup supplies and safe rag storage | Cleans tools and reduces fire risk | Nearly every project |
The central decision is not which brand has the most impressive label. It is whether the products belong to one sensible finishing plan. A stain may need a clear topcoat. A painted surface may need a compatible protective layer. An oil-based product may need a different cleanup method from a water-based one. When the instructions on the can and general advice disagree, the product label and safety information for that exact product take priority.
Before you buy anything, decide what the finish has to do
Finishing becomes much easier when you begin with the finished object in mind. Will the piece sit quietly on a shelf, or will hands, cups, shoes, and weekly cleaning constantly meet its surface? Do you want to see pale natural grain, a deep stained color, or a solid painted finish? Are you working with pine, oak, maple, walnut, or a reclaimed board with a history of its own?
Those answers narrow the field quickly.
The three jobs of a finish
Every finishing schedule has three connected parts:
- Preparation removes scratches, dents, glue residue, raised fibers, and dust.
- Appearance adds color, preserves the natural wood, or covers it with paint.
- Protection helps the surface withstand handling, moisture, abrasion, and cleaning.
The sequence matters. A beautiful topcoat cannot hide poor sanding forever. Color often makes glue residue and scratches more visible. A weak protective finish can leave a lovely tabletop looking tired after a short period of daily use.
That is why it helps to think of finishing as a system rather than a single bottle. Each stage affects the next one.
1. Sandpaper in several grits
Sandpaper is where the finish begins, even though it does not look like a finishing product. It removes milling marks, levels small imperfections, refines the surface, and gives the next product a consistent base to work with.
Which sanding grits should a beginner keep nearby?
A practical starter assortment usually includes:
- 80 grit for significant defects or rough surfaces. It cuts quickly, so use it with care.
- 120 grit for continuing the smoothing process after coarse sanding.
- 180 grit for many final-preparation jobs before stain or clear finish.
- 220 grit for appropriate between-coat sanding or finer hand-sanding.
The exact stopping point depends on the wood species and the product instructions. Sanding a surface as fine as possible is not automatically an improvement. Very fine sanding can close the surface and change how some stains absorb, leaving color paler or less even than expected.
The scratch pattern tells the truth
Move to a finer grit only after the previous grit has done its job. A 220-grit sheet will not reliably erase deep 80-grit scratches. Use light at a low angle across the board; ordinary overhead lighting can make a surface appear perfect right up until the stain exposes every missed mark.
Keep the abrasive moving and avoid pressing hard enough to create hollows. The paper should do the cutting. Your job is to guide it.
2. A sanding block
A sanding block gives the abrasive a flat support. That simple bit of control makes a visible difference on shelves, cabinet parts, box lids, and broad tabletop surfaces.
When you sand with loose paper wrapped around your fingers, the pressure concentrates beneath your fingertips. Edges become rounded, flat areas develop shallow dips, and the surface may carry an uneven pattern of scratches. A firm commercial block works well, but a flat homemade block can also be perfectly serviceable for a first project.
Use a lighter touch than instinct suggests. Heavy pressure wears you out and often makes the surface less even, not more.
3. Wood filler
Wood filler is for the small things you would rather not see in the final surface: nail holes, shallow dents, tiny voids, and narrow gaps. It can rescue an otherwise good project, but it cannot replace accurate joinery or careful sanding.
When does filler make sense?
Apply it before the final sanding stages, once you know which defects are genuinely worth repairing. Let it dry completely, then sand it flush with the surrounding wood. If the repair is deep, follow the filler’s instructions about application depth and drying time rather than covering it immediately with finish.
Why a filled spot may change color
Filler and solid wood rarely absorb stain in exactly the same way. A repaired area may appear lighter, darker, or more opaque after coloring. If the project will be stained, test that exact filler with that exact stain on scrap wood. For very visible repairs, a color-matched filler or a painted finish may give a calmer, more consistent surface.
4. A putty knife or scraper
A putty knife presses filler into a defect and removes the excess before it dries. A scraper can also lift dried glue, raised fibers, and small surface irregularities that would otherwise catch the light.
Choose a blade you can control without digging into the wood. Keep it clean as you work. A crumb of dried filler caught beneath the edge can scratch a broad face in one unpleasant stroke.
5. A vacuum and soft brush
Dust is easy to underestimate because it is quiet. It settles into pores, corners, routed details, and the wet film of a topcoat. Once it is trapped, it becomes roughness, tiny specks, or a dull patch that you can feel with your fingertips.
Vacuum the project and the area around it. A soft brush helps clear profiles, inside corners, and joints without grinding particles back into the wood. Do not rely on simply blowing the dust away; compressed air can keep fine particles floating or move them straight onto the surface you just prepared.
Recommended guide: Woodworking Dust Collection Systems Explained: The Complete Guide to Cleaner Air, Safer Workshops & Better Performance
6. A lint-free cloth or tack cloth
After vacuuming, a lint-free cloth can pick up the fine particles that remain. A tack cloth is designed for this purpose, but use it gently and according to the product instructions. Some tack cloths can leave residue when pressed too hard or used on surfaces for which they were not intended.
The surface should feel clean—not sticky. If the cloth is already carrying a layer of dust, it is no longer cleaning the board; it is giving the dust a second tour.
Keep a fresh cloth available for later stages. The cloth that wiped the floor or collected sanding dust should not be the one used immediately before a clear topcoat.
7. A test board or piece of scrap wood
A test board is not a luxury. It is the place where uncertainty becomes information.
Use a scrap piece that resembles the actual project, then copy the complete process: the same wood species, sanding schedule, filler, conditioner, color product, topcoat, and applicator. A color sample alone is not enough. The topcoat can warm the wood, deepen the color, change the sheen, or reveal an incompatibility you could not see after the first product.
What can a test board tell you?
It can show:
- what the color really looks like on your wood;
- how strongly the surface absorbs the product;
- whether the grain becomes blotchy;
- how the sheen changes after protection is added;
- whether two products react badly together;
- how long the finish takes to dry and cure.
The scrap is a small price for not discovering the wrong result on the best face of your project.
8. One appearance product: stain, dye, paint, or clear finish
Choose the appearance product from the result backward. Do not choose it simply because the name sounds advanced or because another woodworker used it on a different species.
Stain for color with visible grain
Stain changes or deepens the color while generally allowing the grain to remain visible. Pine, oak, maple, and walnut can respond very differently to the same stain. A sample is part of the process, not an optional extra.
Dye for transparent, vivid color
Dye can create a strong transparent color and may behave differently from a pigment-based stain. It is capable of beautiful results, but it deserves careful testing because absorption and application technique matter.
Paint for complete color coverage
Paint hides more of the underlying wood and can be forgiving when repairs or mismatched boards remain visible. Primer may be needed for adhesion, stain blocking, or a more even final color.
Clear finish for a natural appearance
A clear finish protects the wood without adding an intentional stain color. Some clear products warm or darken the surface slightly. Water-based versions often keep the wood lighter, but the test board—not the marketing photograph—will tell you what to expect.
9. Conditioner, sanding sealer, or primer
These products are often mentioned together, but they solve different problems.
- Pre-stain conditioner can help some softwoods absorb stain more evenly.
- Sanding sealer can make sanding between coats easier and can influence absorption.
- Primer prepares a surface for paint, improves adhesion, and may help block stains or discoloration.
- Grain filler fills the pores of open-grain wood when a very level surface is part of the desired look.
You may need one of them—or none. More products do not automatically produce a more professional finish. Every additional layer adds another compatibility question, another drying period, and another opportunity for confusion. Use one when the wood, the appearance goal, or the product instructions give you a clear reason.
10. A protective topcoat
The topcoat is the part of the finishing schedule that has to live with the finished project. It faces fingerprints, water rings, friction, dusting, cleaning, and the ordinary abuse that comes from being useful.
Water-based polyurethane
Water-based polyurethane is a common beginner choice for indoor projects. It generally dries relatively quickly, often preserves a lighter wood appearance, and may clean up with water when the label specifies that method.
Oil-based polyurethane
Oil-based polyurethane can add warmth and substantial protection. It commonly takes longer to dry and calls for careful ventilation and product-specific solvent cleanup.
Penetrating oils and hardwax oils
These finishes can leave wood feeling natural and close to the hand. Maintenance and durability vary considerably by product and by use, so read the label with the project in mind. A finish that feels wonderful on a decorative box may not be the right choice for a kitchen table.
Shellac and lacquer
Shellac and lacquer have important places in woodworking, but beginners should pay close attention to flammability, ventilation, application technique, and cleanup. Spraying lacquer requires an appropriate setup and safety practice; it is not simply brushing on a thicker version of the same thing.
Wax
Wax can add a soft feel and a pleasing sheen. On a heavily used surface, however, it is generally not a replacement for a durable protective topcoat.
Choose protection according to the project’s real life. The most attractive sheen on the shelf is not necessarily the finish that will age best under daily use.
11. The right brush, foam applicator, or finishing cloth
The applicator is part of the finish. It controls how much product reaches the wood, how evenly it spreads, and how many marks remain when the surface dries.
- Synthetic brushes are commonly used with many water-based products.
- Natural-bristle brushes are often paired with some oil-based products.
- Foam brushes can be useful on small, flat surfaces and for disposable applications.
- Lint-free cloths suit wipe-on oils, stains, and certain other products.
The product label remains the final authority because formulations differ. Whatever applicator you use, resist the urge to keep brushing once the finish begins to set. A surface that was smooth a minute ago can develop drag marks because you tried to improve it after it had already started leveling.
12. A mixing container and stir stick
A clean container gives you more control over the amount you are applying and keeps the original can from becoming a dusty workbench. A stir stick can redistribute settled ingredients without introducing unnecessary bubbles.
If the label says to stir, stir. If it says not to shake, do not shake; bubbles can become visible in the dried film. Never pour contaminated leftovers back into the original container. Dust, pigment, or traces of another product can change the next application.
If you decant a finish, label the temporary container and keep it closed whenever you are not actively using it.
13. Painter’s tape and a drop cloth
A protected work area gives you room to concentrate. You should not be trying to catch a drip on the floor, shield a hinge, and keep a brush moving at the same time.
Painter’s tape protects adjoining surfaces and creates clean boundaries. A drop cloth protects the floor and reduces the dust that gets stirred up around the project. Put the workpiece on a stable surface, remove unnecessary clutter, and keep foot traffic away while the finish dries.
14. Nitrile gloves
Nitrile gloves keep stain, dye, solvent, and finish off your skin and make cleanup less stressful. Replace a torn glove. Avoid touching your phone, door handles, or clean tools with contaminated hands.
Gloves are not universal chemical armor. For stronger solvents or unfamiliar products, check the product’s safety information to confirm that the glove material is suitable.
15. Eye protection
Fine dust, scraped filler, and liquid splashes all have an unpleasant way of finding the face. Eye protection matters during sanding, scraping, brushing, spraying, and cleanup—even when the project is small.
Use protection that fits securely and does not interfere with the work. If you are spraying, use eye protection appropriate for spray application; ordinary reading glasses are not a substitute.
16. Ventilation and suitable respiratory protection
Dust and vapors are separate hazards. Opening a window may improve airflow, but it does not turn every enclosed room into a suitable finishing area.
Read the label and safety data for the exact product. Use respiratory protection rated for the hazard when it is required, and do not mistake a basic dust mask for protection designed for organic vapors. Keep children, pets, food, and ignition sources away from the work area.
Good preparation includes deciding where the piece will dry before you open the can. A finish needs time, space, and a reasonably clean environment.
17. Cleanup supplies and a safe place for used rags
Cleanup depends on the product. Some water-based finishes specify soap and water. Some oil-based products call for mineral spirits or another solvent. Follow the label rather than relying on memory or a guess based on the color of the liquid.
Pay particular attention to oil-soaked rags. Under the wrong conditions, they can heat up and ignite. Do not leave them crumpled in a corner or inside a pile of workshop rubbish.
Follow the product instructions and local disposal guidance; common safe practices include spreading rags flat to dry in a controlled location or placing them in an approved, covered metal container intended for oily waste.
The finish is not finished when the brush leaves the board. It is finished when the tools, rags, and workspace have been handled safely.
Recommended reading: Beginner Woodworking Safety Checklist: 47 Things to Check Before You Make Your First Cut
Match the supplies to the project in front of you
The right beginner kit changes with the wood, the desired look, and the amount of wear the finished piece will receive.
| Project | A practical beginner approach | Supplies to emphasize |
|---|---|---|
| Pine shelf | Sand carefully, test the color, condition if needed, then protect it | Sandpaper, conditioner, brush, topcoat |
| Small wooden box | Smooth the surface, use stain or oil, and add suitable protection | Fine grits, lint-free cloth, test board |
| Hardwood tabletop | Spend time on preparation and choose a durable protective finish | Sanding block, dust control, compatible topcoat |
| Painted furniture | Repair, sand, prime, paint, and protect when appropriate | Filler, scraper, primer, synthetic brush, topcoat |
| Outdoor project | Use a product specifically labeled for exterior exposure | Exterior-rated finish and moisture-aware preparation |
Pine and other softwoods
Softwoods can take stain unevenly. A conditioner may help, but the test board decides whether it actually improves your result. A clear finish is often a simpler first route when you like the pale wood and want to avoid adding another absorption variable.
Oak and other open-grain hardwoods
The pores in oak may be exactly what gives the project its character. If you want a glass-smooth, level appearance, grain filler may be worth considering. If you like the texture, there is no reason to fill it merely because the product exists.
Tables and desks
These surfaces receive hands, cups, spills, and repeated wiping. Prioritize a topcoat suited to that level of use. Thin coats and proper curing usually matter more than trying to create protection in one heavy application.
Outdoor woodworking
Indoor finishes are not automatically ready for rain and sunlight. Choose a product labeled for exterior use and think about moisture, ultraviolet exposure, temperature swings, and future maintenance. Outdoor finishing is a long-term protection decision, not only a color choice.
A beginner finishing workflow that leaves fewer surprises
Step 1: Inspect the completed wood before opening a can
Run your eyes and fingertips over the project. Look for dents, scratches, glue squeeze-out, open joints, torn fibers, and edges that are rougher than they appear. Finish tends to emphasize these things rather than politely hiding them.
Step 2: Repair and sand in a logical progression
Fill the defects that deserve filling, allow the product to dry, and sand through the grits without skipping the work of the previous one. Keep design-critical edges crisp, but soften fragile edges that could chip during use.
Step 3: Remove dust from the project and the room
Vacuum the workpiece. Brush out corners. Clean the surrounding area. Wipe with a suitable lint-free cloth, then give airborne dust time to settle before you open the finish.
Step 4: Test the complete finishing schedule
Do not test only the stain. Test the sanding, conditioner, color, topcoat, and applicator in the order you plan to use them. Look at the sample once it is dry and again after it has cured.
Step 5: Apply the appearance product without chasing perfection mid-coat
Work in manageable sections and follow the recommended application method. Keep a wet edge when the instructions call for one, but stop working the surface when the product begins to set. Many brush marks begin as an attempt to remove a brush mark that was not there a moment earlier.
Step 6: Build protection with thin, controlled coats
Respect the product’s temperature range, ventilation needs, drying time, and instructions about sanding between coats. A thick coat can run, trap bubbles, stay tacky, and cure unevenly.
Step 7: Let the project cure before asking it to work
Dry and cured are not always the same thing. A surface may feel dry while remaining vulnerable to pressure, moisture, or abrasion. Wait for the label’s recommended curing period before putting the piece into hard service.
Five mistakes that turn a promising finish into a repair job
1. Choosing the finish before deciding what you want to see
“Glossy” is not a complete plan. It does not tell you whether the finish suits a tabletop, a shelf, a toy chest, or an outdoor chair. Start with the wood, the look, and the use.
2. Skipping the test board because the project is small
Small projects are often the ones with the least spare material. The label color is not the finished color on every species. Testing is quicker than sanding a wrong finish back off a box lid.
3. Applying too much product
Heavy coats look reassuring while they are wet. Later, they may reveal runs, bubbles, tackiness, and uneven curing. Controlled coats are less dramatic—and usually much more forgiving.
4. Finishing over glue or dust
Glue blocks absorption. Dust roughens the surface. Both become harder to ignore once color or clear finish catches the light.
5. Treating the label as a suggestion
Drying time, compatible undercoats, cleanup methods, ventilation, and safe disposal vary from one finish to another. Generic advice can help you understand the categories; the exact product instructions govern the work.
Recommended reading: How to Check Woodworking Plans for Mistakes Before You Cut Any Wood: The 15-Point Pre-Build Audit
What should a beginner buy first?
For one small indoor project, a sensible first kit is modest:
- a small assortment of sandpaper;
- a sanding block;
- a vacuum or soft brush;
- clean, lint-free cloths;
- scrap wood for a test board;
- one appearance product—or a clear finish if you like the natural wood;
- one compatible protective topcoat when the project needs it;
- the brush, foam applicator, or cloth recommended for that product;
- painter’s tape and a drop cloth;
- nitrile gloves and eye protection;
- the correct cleanup supplies.
Add wood filler, a putty knife, conditioner, primer, grain filler, specialty solvents, or extra applicators when the project gives you a reason to use them. A smaller kit is easier to understand, easier to store, and less likely to leave you staring at six half-used cans wondering which one belongs on the piece.
Questions beginners tend to ask just before the first coat
“What finish would you choose for a first woodworking project?”
A clear water-based finish is often a straightforward starting point for a small indoor project. It can provide protection, usually has relatively simple cleanup when the label specifies water cleanup, and often keeps the wood looking light. The best choice still depends on the species, the desired appearance, the project’s use, ventilation, and the exact product instructions.
“Do I really need both stain and polyurethane?”
No. Stain changes the color; polyurethane is a protective topcoat. You can use them together, but a clear finish alone may be all you need when you already like the natural wood. Test the combination before it reaches the project.
“Which sandpaper grit should I stop at before staining?”
Many projects land around 180 grit, but there is no universal stopping number. The wood species, starting condition, stain, and manufacturer’s instructions all matter. Remove the scratches from the previous grit, clean the surface, and let a test board settle the question.
“Is a foam brush actually good enough?”
For many small, flat applications, a foam brush can do a perfectly respectable job and is inexpensive to replace. It is not the right applicator for every formulation or surface. Follow the label and resist repeated brushing after the coating starts to set.
“Should I use pre-stain conditioner on pine?”
It may reduce uneven absorption on pine and other softwoods, but it is not automatically necessary. Test conditioned and unconditioned samples with the intended stain. Choose the one that gives you the more even, attractive result.
“Can polyurethane go over stain?”
Often it can, provided the stain is fully dry and the products are compatible. Drying time varies, and some products require additional preparation. Read both labels and test the complete combination before applying it to the finished project.
“How long do I wait between coats?”
Use the drying and recoating time printed on the exact product. Temperature, humidity, airflow, coat thickness, and finish type all affect the timing. A surface that feels dry may still be soft underneath.
“How do I clean the brush afterward?”
Use the cleanup method specified on the label. Water-based products may call for soap and water; some oil-based products require mineral spirits or another solvent. Clean tools in a ventilated area and handle used rags and waste safely.
Before the first coat: a practical check
Make sure you have:
- repaired the defects you intend to repair;
- removed glue squeeze-out;
- sanded through the scratches left by the previous grit;
- chosen the appearance and protective products;
- tested the complete system on scrap wood;
- cleaned the project and the surrounding work area;
- prepared gloves, eye protection, and ventilation;
- read the product’s drying, curing, cleanup, and disposal instructions;
- made a safe plan for used rags and solvent waste.
Products / Tools / Resources
Products worth keeping on hand
- Assorted sandpaper: Choose several grits rather than relying on one sheet. A small range gives you control from rough correction through final preparation.
- Wood filler: Keep it for genuine defects, and test it with stain if the repair will remain visible.
- One appearance product: Stain, dye, paint, or a clear finish—choose according to the look you want.
- One compatible topcoat: Match the protection to the project’s handling, moisture, and cleaning demands.
- Conditioner, primer, or grain filler: Buy these when the wood or finish schedule calls for them, not simply because they are available.
- Product-specific cleanup materials: Read the label before beginning so the correct cleaner is already in the workshop.
Tools that make the work calmer
- A firm sanding block for keeping broad surfaces flat.
- A vacuum with a soft brush attachment for removing dust from the project and its details.
- Lint-free cloths for clean application and final dust removal.
- A quality brush, foam brush, or finishing cloth matched to the chosen product.
- Clean containers and stir sticks for controlled, low-contamination application.
- Painter’s tape and a drop cloth for protecting the work area and reducing distractions.
- Scrap wood for a test board. It is one of the cheapest and most useful tools in the entire process.
Safety and reference resources
- The exact product label and safety data sheet for every finish, stain, dye, paint, and solvent used.
- Suitable nitrile gloves, eye protection, ventilation, and respiratory protection for the hazard involved.
- An approved method for storing or disposing of oil-soaked rags.
- The site’s related guides on basic woodworking skills, beginner woodworking equipment, dust collection, workshop safety, lumber selection, woodworking hardware, beginner projects, and step-by-step woodworking plans.