
Featured Snippet
Cabinet door woodworking plans provide the measurements, construction methods, and step-by-step guidance needed to build durable, professional-quality cabinet doors. Whether you’re making simple Shaker doors, elegant raised-panel designs, or sleek modern slab doors, success begins with choosing the right materials, understanding proven joinery techniques, and following an organized building process. This guide walks you through every stage—from selecting lumber and milling components to finishing and installation—so you can build cabinet doors that look custom made and perform beautifully for years.
Introduction: Why Great Cabinet Doors Change Everything
Stand in any kitchen, workshop, laundry room, or built-in library, and your eyes will almost always settle on the cabinet doors first.
Not the cabinet boxes.
Not the countertops.
Not even the hardware.
The doors define the character of the entire space. They create the first impression, establish the style, and quietly communicate the quality of everything behind them. Two kitchens can share the exact same cabinet boxes, yet feel worlds apart simply because the doors are different.
That’s the remarkable thing about cabinet doors.
They’re practical, yes. They open and close thousands of times over their lifetime. They protect what’s stored inside. They withstand steam, changing humidity, fingerprints, and daily wear. Yet they’re also one of the most visible expressions of craftsmanship in a home.
For many woodworkers, building cabinet doors marks an important milestone.
It’s the moment when projects move beyond simple boxes and shelves into true fine woodworking. Suddenly, precision matters more than ever. Tiny gaps become obvious. Grain direction becomes intentional. A fraction of a millimeter can separate a flawless fit from a frustrating afternoon in the workshop.
That might sound intimidating at first.
In reality, cabinet doors aren’t difficult because they’re complicated. They’re challenging because they reward careful preparation. Every accurate measurement, every square cut, every patiently adjusted router setup contributes to a result that looks effortless when it’s finished.
And that’s exactly how experienced cabinetmakers work.
They don’t rely on luck.
They follow a repeatable process.
This guide is built around that same philosophy.
Rather than rushing toward the finished product, we’ll work through the entire journey in logical stages. You’ll learn how to choose the right door style, select lumber that stays stable over time, create strong joinery, assemble perfectly square frames, apply furniture-quality finishes, install hardware with precision, and keep your cabinet doors looking beautiful for decades.
Whether you’re building a single bathroom vanity, updating a kitchen, creating custom built-ins, or equipping an entire workshop, the principles remain the same.
Master them once, and you’ll use them for every cabinet project that follows.
Table of Contents
- Understanding Cabinet Door Construction
- Why Cabinet Door Construction Matters
- The Four Main Components of a Cabinet Door
- Frame-and-Panel vs. Slab Cabinet Doors
- Floating Panels Explained
- Common Cabinet Door Joinery Methods
- Cabinet Door Proportions and Design Basics
- Choosing the Perfect Cabinet Door Style
- Why Style Matters
- Shaker Cabinet Doors
- Raised-Panel Cabinet Doors
- Flat-Panel Cabinet Doors
- Slab Cabinet Doors
- Glass Cabinet Doors
- Beadboard Cabinet Doors
- Louvered Cabinet Doors
- Arched Cabinet Doors
- Mission-Style Cabinet Doors
- Farmhouse Cabinet Doors
- Contemporary European Styles
- Rustic Cabinet Doors
- Matching Cabinet Door Styles to Your Home
- Choosing a Style That Matches Your Skill Level
- Timeless Designs vs. Trends
- Choosing the Best Wood for Cabinet Doors
- Why Stable Lumber Matters
- Hardwood vs. Softwood
- Maple
- White Oak
- Cherry
- Walnut
- Birch
- Ash
- Alder
- Pine
- MDF
- Plywood
- Understanding Grain Direction
- Quarter-Sawn vs. Plain-Sawn Lumber
- Moisture Content
- Matching Wood to the Finish
- Buying Quality Lumber
- Measuring and Planning Cabinet Doors
- Understanding Cabinet Construction
- Face Frame Cabinets
- Frameless Cabinets
- Overlay Cabinet Doors
- Partial Overlay vs. Full Overlay
- Inset Cabinet Doors
- Understanding Reveals
- Measuring Cabinet Openings
- Checking for Square
- Calculating Overlay Dimensions
- Calculating Inset Door Dimensions
- Rail and Stile Width
- Sizing the Center Panel
- Planning for Wood Movement
- Planning Hinge Placement
- Single vs. Double Cabinet Doors
- Creating an Accurate Cut List
- Labeling Components
- Dry Layout Before Joinery
- Essential Tools for Cabinet Door Building
- Building a Workshop Around Precision
- Measuring and Layout Tools
- Tape Measure
- Combination Square
- Marking Knife vs. Pencil
- Table Saw
- Choosing the Right Saw Blade
- Crosscut Sled
- Router
- Router Table
- Essential Router Bits
- Jointer
- Thickness Planer
- Miter Saw
- Drill Press
- Random Orbital Sander
- Clamps
- Dust Collection
- Moisture Meter
- Digital Angle Gauge
- Safety Equipment
- Specialty Tools
- Milling Lumber for Precision Cabinet Doors
- Inspecting Rough Lumber
- Understanding Common Lumber Defects
- Bow
- Cup
- Twist
- Crook
- Checks and End Splits
- Acclimating Lumber
- Professional Milling Sequence
- Flattening One Face
- Jointing One Edge
- Planing to Thickness
- Ripping to Width
- Crosscutting to Length
- Grain Direction
- Bookmatching
- Organizing Components
- Preventing Tear-Out
- Milling Extra Parts
- Final Dimension Checks
- Dry Layout
- Building Strong Cabinet Door Frames
- Why Joinery Matters
- Understanding Rails and Stiles
- Cope-and-Stick Joinery
- Setting Up Router Bits
- Making Test Cuts
- Mortise-and-Tenon Joinery
- Loose Tenons
- Dowel Joinery
- Pocket-Hole Joinery
- Cutting Grooves
- Routing Decorative Profiles
- Preventing Tear-Out During Routing
- Dry Fitting the Frame
- Checking for Square
- Batch Production
- Organizing Components
- Professional Joinery Habits
- Assembling Cabinet Doors
- Final Dry Fit
- Choosing the Right Glue
- PVA Glue
- Water-Resistant PVA
- Polyurethane Glue
- Applying Glue Correctly
- Floating Panel Installation
- Frame Assembly Sequence
- Checking Panel Orientation
- Applying Clamping Pressure
- Choosing the Right Clamps
- Balancing Clamp Pressure
- Checking for Square
- Checking for Flatness
- Cleaning Glue Squeeze-Out
- Allowing Glue to Cure
- Troubleshooting Assembly Problems
- Common Assembly Mistakes
- Efficient Multi-Door Assembly
- Professional Assembly Habits
- Sanding and Surface Preparation
- Why Surface Preparation Matters
- Inspecting the Cabinet Door
- Removing Glue Residue
- Choosing Sandpaper Grits
- Proper Sanding Technique
- Random Orbital Sanding
- Hand Sanding
- Sanding with the Grain
- Protecting Crisp Edges
- Removing Router Burn Marks
- Raising the Grain
- Preparing for Paint
- Preparing for Stain
- Dust Removal
- Inspecting Under Different Lighting
- Final Surface Inspection
- Common Sanding Mistakes
- Finishing Cabinet Doors
- Choosing the Right Finish
- Clear Finishes
- Polyurethane
- Oil-Based Polyurethane
- Water-Based Polyurethane
- Hardwax Oil
- Lacquer
- Conversion Varnish
- Painted Cabinet Doors
- Priming
- Staining Cabinet Doors
- Gel Stain vs. Traditional Stain
- Choosing the Right Sheen
- Brushing vs. Spraying
- Applying Thin Coats
- Sanding Between Coats
- Creating a Dust-Free Finishing Area
- Allowing the Finish to Cure
- Common Finishing Problems
- Installing Cabinet Doors
- Preparing the Cabinets
- Organizing Cabinet Doors
- Choosing the Right Hinges
- Concealed European Hinges
- Drilling Hinge Cup Holes
- Mounting Hinges
- Supporting Large Cabinet Doors
- Creating Consistent Reveals
- Adjusting Concealed Hinges
- Aligning Double Cabinet Doors
- Soft-Close Hinges
- Installing Knobs and Pulls
- Using a Hardware Jig
- Preventing Tear-Out While Drilling
- Checking Door Operation
- Troubleshooting Installation Problems
- Final Inspection
- Cleaning After Installation
- Maintaining Cabinet Doors for Long-Term Performance
- Why Maintenance Matters
- Proper Cleaning Techniques
- Cleaners to Avoid
- Managing Moisture
- Controlling Seasonal Humidity
- Protecting Against Sunlight
- Inspecting Hardware
- Adjusting Hinges
- Repairing Minor Scratches
- Refreshing Clear Finishes
- Caring for Painted Cabinet Doors
- Repairing Small Dents
- Refinishing Cabinet Doors
- Replacing a Damaged Center Panel
- Recognizing Early Warning Signs
- Solving Common Cabinet Door Problems
- Cabinet Doors That Age Beautifully
- Frequently Asked Questions
- Bonus: Professional Cabinetmaker’s 15-Point Pre-Installation Checklist
- Products / Tools / Resources
Part 1: Understanding Cabinet Door Construction Before You Cut a Single Board
There’s a temptation every woodworker feels at the beginning of a project.
You walk into the shop, admire a stack of hardwood, switch on the table saw, and imagine how satisfying that first cut will be.
Resist it.
The strongest cabinet doors are built long before the first board touches a blade.
They’re built through understanding.
When you know why each component exists and how every piece works with the others, your decisions become clearer. Measurements make sense. Joinery choices become obvious. Even troubleshooting becomes easier because you understand how the entire structure behaves as one unit.
That’s why experienced cabinetmakers spend time studying the anatomy of a cabinet door before they ever begin cutting parts.
The Four Parts Every Traditional Cabinet Door Depends On
At first glance, a cabinet door seems simple.
Look closer, though, and you’ll discover a carefully balanced system where every component has a specific job.
Most traditional cabinet doors consist of four primary elements:
- Two vertical stiles
- Two horizontal rails
- A center panel
- Joinery that locks the frame together
Remove or weaken any one of those elements, and the entire door begins to lose strength.
Understanding how they work together is the first step toward building cabinet doors that stay straight, operate smoothly, and still look beautiful years from now.
Stiles: The Structural Backbone
The stiles are the long vertical pieces that run from the top of the door to the bottom.
Think of them as the backbone of the entire assembly.
They’re responsible for much more than defining the height of the door. Stiles carry most of the structural load, support the hinges, and absorb the repeated stress of opening and closing.
Every time someone reaches for a cabinet handle, that force travels directly into the stiles.
Because of this, selecting straight, stable stock is critical.
Boards with excessive twist, internal tension, or unpredictable grain can create problems that become more noticeable over time. A carefully chosen piece of hardwood, on the other hand, provides a strong foundation that keeps the entire door aligned.
Professionals rarely compromise here.
If the stiles are excellent, everything that follows becomes easier.
Rails: Locking the Frame Together
Connecting the stiles are the rails.
These horizontal members complete the frame and prevent the door from racking or flexing during everyday use.
Although rails often receive less attention than stiles, they play an equally important role.
Well-made rails distribute stress across the frame while maintaining accurate spacing between the vertical members. Their length also determines the final width of the cabinet door, making careful measurement essential before any joinery is cut.
Many larger cabinet doors include an additional center rail.
Besides adding visual balance, this extra component strengthens the frame and divides larger panels into more manageable sections.
The Center Panel: Beauty with a Purpose
Ask someone what catches their eye on a cabinet door, and they’ll almost certainly mention the panel.
It’s the largest visible surface, after all.
Yet its purpose goes far beyond appearance.
Traditional cabinet doors use what’s known as a floating panel.
Instead of being glued rigidly into place, the panel sits inside grooves cut into the surrounding frame. This clever design allows solid wood to expand and contract naturally as humidity changes throughout the year.
Without that freedom to move, seasonal wood movement could split the panel, crack joints, or distort the entire door.
It’s one of woodworking’s oldest solutions—and one of its smartest.
Why Floating Panels Matter
Wood is alive long after the tree has been cut.
Not biologically, but physically.
It continues responding to its environment by absorbing and releasing moisture.
That movement may seem small, but over the width of a cabinet panel it can be significant enough to cause serious damage if ignored.
Floating panels solve this problem beautifully.
The panel remains securely captured inside the frame while still having just enough room to expand during humid seasons and shrink slightly when conditions become drier.
This simple detail explains why antique cabinet doors built centuries ago often remain perfectly functional today.
Frame-and-Panel Construction: A Design That Has Stood the Test of Time
Walk through a historic home, visit a furniture museum, or examine handcrafted cabinetry from generations past, and you’ll notice the same construction method appearing again and again.
Frame-and-panel doors have survived because they work.
Rather than relying on large, solid boards that are prone to movement, the design divides responsibilities. The frame provides strength. The panel provides visual interest. Together, they create a door that’s remarkably stable without sacrificing beauty.
It’s a system refined over hundreds of years, and modern cabinetmakers continue to use it because very few alternatives perform as well.
Slab Doors: Simplicity with a Different Philosophy
Not every cabinet door follows traditional construction.
Modern kitchens often feature slab doors made from a single flat panel.
Their clean lines fit contemporary interiors perfectly.
They’re also faster to manufacture because they eliminate complex joinery and decorative routing.
That simplicity comes with trade-offs, however.
Large solid-wood slab doors require careful material selection to reduce the risk of warping, while engineered materials such as MDF or plywood are often chosen for greater stability.
If your goal is a minimalist aesthetic, slab doors can be an excellent option.
If you enjoy classic woodworking techniques, frame-and-panel construction remains difficult to surpass.
The Joinery That Holds Everything Together
Beautiful lumber alone doesn’t create a strong cabinet door.
Strength comes from the joints.
Every corner depends on accurate joinery that resists years of repeated movement.
Several methods have earned the trust of woodworkers over time:
- Cope-and-stick joints
- Mortise-and-tenon joints
- Loose-tenon joinery
- Dowel construction
- Pocket-hole joinery for selected applications
Each has advantages, and you’ll explore them in detail later in this guide.
For now, it’s enough to understand one important principle:
A perfectly finished cabinet door can never compensate for weak joinery hidden beneath the surface.
Strength Comes from Precision, Not Force
Many beginners assume strong joints require heavy clamping pressure or generous amounts of glue.
Experienced cabinetmakers know otherwise.
The strongest joints are created by precision.
When parts fit accurately, glue forms a thin, consistent bond across the mating surfaces. Excessive force isn’t necessary because the joinery already aligns itself naturally.
It’s one of those quiet lessons that transforms the way you approach woodworking.
Instead of forcing pieces together, you begin building them so accurately that they almost seem eager to fit.
Cabinet Door Proportions Matter More Than You Think
Even people with no woodworking experience instinctively recognize when a cabinet door looks “right.”
That’s because balanced proportions create visual harmony.
Rails that are too narrow can appear fragile.
Oversized stiles may make the door feel heavy.
Panels that are poorly proportioned can overwhelm the surrounding frame.
Professional cabinetmakers often spend as much time refining proportions as they do selecting wood species.
It’s an investment that pays off every time someone walks into the room.
One Design, Countless Possibilities
Once you understand the anatomy of a cabinet door, countless design variations become possible.
The same construction principles can produce:
- Classic Shaker doors
- Raised-panel cabinet doors
- Flat-panel designs
- Glass-front cabinets
- Beadboard styles
- Mission furniture
- Farmhouse cabinetry
- Contemporary minimalist kitchens
The appearance changes dramatically.
The underlying engineering remains remarkably consistent.
That’s part of what makes cabinet making such a rewarding skill.
Learn the fundamentals once, and they continue serving you across project after project.
Build Knowledge Before You Build Doors
Every exceptional cabinet door begins the same way—not with machinery, but with understanding.
When you recognize how stiles support the frame, why rails resist twisting, how floating panels accommodate wood movement, and why precision matters more than brute force, every decision in the workshop becomes more confident.
That foundation will guide every step that follows.
In the next part, we’ll explore the most popular cabinet door styles, discover what makes each one unique, and help you choose a design that fits both your woodworking experience and the space you’re creating.
Part 2: Choosing the Perfect Cabinet Door Style for Your Project
Before a single board is milled or a router bit begins to spin, there’s another decision that deserves your full attention.
It’s not about wood.
It’s not about tools.
It’s about style.
The design you choose shapes everything that follows. It influences your material selection, determines the joinery you’ll use, affects how much time you’ll spend in the workshop, and ultimately defines how the finished room feels every time you walk into it.
Cabinet doors are more than functional panels attached to hinges.
They’re the visual language of a space.
A clean-lined Shaker door whispers simplicity and craftsmanship. A raised-panel door adds warmth and tradition. A slab door delivers quiet confidence with modern precision. Each tells a different story before anyone notices the countertop, backsplash, or flooring.
That’s why experienced cabinetmakers don’t simply ask, “What can I build?”
They ask, “What feeling do I want this room to create?”
Answer that question first, and the right cabinet door style usually reveals itself.
Why Cabinet Door Style Matters More Than Most People Realize
Imagine placing ornate raised-panel doors in an ultra-modern apartment.
Now picture sleek slab doors inside a centuries-old farmhouse.
Neither choice is technically wrong, yet both feel slightly out of place.
Cabinet doors anchor the personality of a room. They bridge architecture, furniture, lighting, and décor into one cohesive design.
A thoughtfully chosen style creates harmony.
A mismatched one quietly competes for attention.
That doesn’t mean you must follow design trends or imitate magazine kitchens. Timeless cabinetry almost always outlives what’s fashionable today.
The best cabinet door style is the one that fits both the space and the way you live.
Shaker Cabinet Doors: The Gold Standard of Timeless Design
If one cabinet door style has earned universal respect among woodworkers, it’s the Shaker door.
Its appeal lies in what it doesn’t do.
There are no elaborate carvings, dramatic curves, or excessive ornamentation. Just clean lines, balanced proportions, and honest craftsmanship.
A typical Shaker door consists of:
- Straight rails
- Straight stiles
- A recessed center panel
- Crisp square edges
That simplicity makes it remarkably versatile.
You’ll find Shaker doors in:
- Traditional kitchens
- Modern homes
- Farmhouse interiors
- Scandinavian-inspired spaces
- Workshops
- Laundry rooms
- Built-in bookcases
From a woodworking perspective, they’re also one of the best styles for beginners.
Because the design is uncomplicated, success depends on precision rather than decorative complexity. Well-cut joinery and accurate measurements become the stars of the project.
It’s easy to understand why Shaker doors remain one of the most requested cabinet styles generation after generation.
Raised-Panel Cabinet Doors: Classic Elegance That Never Goes Out of Style
Raised-panel doors make a statement.
The center panel sits proud of the surrounding frame, creating depth, shadow, and visual richness that instantly catches the eye.
These doors have long been associated with:
- Traditional kitchens
- Formal dining rooms
- Luxury cabinetry
- Fine furniture
- Historic homes
The layered appearance adds character without feeling overwhelming.
Creating raised panels requires additional tooling and careful router setup, making this style slightly more advanced than a basic Shaker door. Yet the extra effort often pays off in a dramatic, furniture-quality appearance.
Rich hardwoods such as cherry, walnut, and oak showcase raised-panel profiles particularly well, allowing the changing light to accentuate every contour.
Flat-Panel Cabinet Doors: Clean Lines with Lasting Versatility
At first glance, flat-panel doors appear similar to Shaker doors.
The difference lies in the center panel.
Instead of being raised, the panel remains flat within the surrounding frame.
The result is subtle, balanced, and incredibly adaptable.
Flat-panel doors complement a wide range of interiors, including:
- Transitional homes
- Contemporary kitchens
- Craftsman-style houses
- Scandinavian designs
- Minimalist workspaces
For many woodworkers, flat-panel construction strikes an ideal balance between simplicity and sophistication.
The design feels refined without becoming visually busy.
Slab Cabinet Doors: Modern Simplicity at Its Best
Sometimes the boldest design is the one that removes every unnecessary detail.
That’s the philosophy behind slab cabinet doors.
Constructed from a single flat surface, slab doors eliminate frames, panels, and decorative profiles entirely.
The uninterrupted face creates an uncluttered appearance that pairs beautifully with:
- Modern kitchens
- Contemporary apartments
- Industrial interiors
- European-inspired cabinetry
Because every surface remains visible, precision becomes even more important.
There are no decorative elements to distract from uneven edges or imperfect finishing.
Slab doors reward careful craftsmanship with striking simplicity.
Glass Cabinet Doors: Adding Light Without Sacrificing Storage
Not every cabinet is meant to hide its contents.
Glass-front cabinet doors introduce openness while preserving the protection of enclosed storage.
They’re especially effective for displaying:
- Fine china
- Decorative dishes
- Collectibles
- Cookbooks
- Glassware
- Handmade pottery
Several glass options are available, including:
- Clear glass
- Frosted glass
- Reeded glass
- Seeded glass
- Textured glass
The surrounding frame can be as simple or as elaborate as the room requires.
Adding glass also creates visual variety, especially when mixed with solid cabinet doors throughout a kitchen or dining area.
Beadboard Cabinet Doors: Casual Charm with Character
There’s something unmistakably welcoming about beadboard.
The narrow vertical grooves add texture without overwhelming the design, making beadboard cabinet doors feel relaxed and inviting.
They’re especially popular in:
- Farmhouse kitchens
- Cottage interiors
- Coastal homes
- Mudrooms
- Laundry rooms
Although beadboard appears decorative, it still relies on the same structural principles as traditional frame-and-panel construction.
Only the center panel changes.
Everything else remains reassuringly familiar.
Louvered Cabinet Doors: Where Ventilation Meets Style
Some cabinets need airflow as much as storage.
Louvered doors solve both problems beautifully.
Horizontal slats allow air to circulate while maintaining privacy, making them ideal for:
- Laundry cabinets
- Utility rooms
- Linen storage
- Pantry cabinets
- HVAC enclosures
Because each slat requires accurate spacing and precise alignment, louvered doors demand more patience than many other cabinet styles.
The finished result, however, combines practicality with architectural elegance.
Arched Cabinet Doors: Softening the Straight Lines
Most cabinet doors rely on rectangles.
Arched doors introduce graceful curves that immediately draw attention.
Whether featuring a gentle cathedral arch or a more dramatic profile, these doors bring movement to spaces dominated by straight lines.
They’re often chosen for:
- Traditional kitchens
- Luxury cabinetry
- Furniture pieces
- Entertainment centers
- Decorative built-ins
Building arched cabinet doors requires careful layout and accurate shaping, but they reward that extra effort with unmistakable visual appeal.
Mission-Style Cabinet Doors: Built on Honest Craftsmanship
Mission furniture celebrates structure rather than hiding it.
Mission-style cabinet doors reflect that philosophy with:
- Straight lines
- Thick rails and stiles
- Flat panels
- Strong proportions
- Minimal ornamentation
White oak remains a classic material choice, highlighting the natural beauty of the wood without unnecessary embellishment.
Mission cabinetry feels substantial, practical, and timeless.
It’s a style rooted in craftsmanship rather than decoration.
Farmhouse Cabinet Doors: Warm, Relaxed, and Endlessly Inviting
Farmhouse design has evolved over the years, yet one quality remains constant.
It feels welcoming.
Farmhouse cabinet doors often combine elements from several styles, including:
- Shaker construction
- Beadboard panels
- Distressed finishes
- Warm painted colors
- Natural wood accents
The result is cabinetry that feels lived in rather than overly polished.
It invites everyday use while maintaining classic appeal.
Contemporary European Styles: Precision Through Simplicity
European-inspired cabinetry embraces restraint.
Instead of decorative detailing, it relies on:
- Perfect alignment
- Tight reveals
- Clean geometry
- Smooth surfaces
- Minimal hardware
Many European kitchens feature slab doors paired with concealed hinges and integrated handles, creating an uninterrupted visual flow.
This style demands exceptional accuracy because every line remains visible.
When executed well, the effect is effortlessly sophisticated.
Rustic Cabinet Doors: Celebrating the Natural Beauty of Wood
Rustic cabinetry doesn’t chase perfection.
Instead, it celebrates authenticity.
Knots, grain variation, subtle texture, and handcrafted details become features rather than flaws.
Popular wood choices include:
- Pine
- Hickory
- White oak
- Reclaimed lumber
- Alder
Rather than hiding natural character, rustic cabinet doors allow it to become part of the design itself.
Every board tells a slightly different story.
Matching Cabinet Door Styles to Your Home
One of the easiest ways to narrow your choices is to consider the architecture around you.
As a general guide:
Modern homes often suit:
- Slab doors
- Flat-panel designs
- Minimalist styles
Traditional homes pair beautifully with:
- Raised-panel doors
- Arched designs
- Decorative profiles
Farmhouses naturally complement:
- Shaker doors
- Beadboard panels
- Painted cabinetry
Craftsman homes frequently feature:
- Mission-style doors
- Flat panels
- White oak cabinetry
The goal isn’t rigid adherence to design rules.
It’s creating a sense of balance throughout the space.
Choosing a Style That Matches Your Skill Level
Your experience in the workshop matters just as much as your design preferences.
If you’re building your first cabinet doors, begin with projects that emphasize precision rather than complexity.
Excellent beginner-friendly choices include:
- Shaker doors
- Flat-panel doors
- Simple slab doors
Once you’re comfortable with milling, routing, and assembly, you can confidently move on to:
- Raised panels
- Arched frames
- Glass inserts
- Louvered designs
Every completed project builds skills that make the next one easier.
Timeless Designs Outlast Trends
Kitchen trends come and go.
One decade favors ornate detailing.
The next embraces ultra-minimalism.
Yet certain cabinet door styles continue appearing year after year because they simply work.
Shaker doors.
Flat-panel designs.
Mission-inspired cabinetry.
These styles have remained relevant for generations because they’re built on proportion, craftsmanship, and restraint rather than fashion.
If you’re investing significant time into building custom cabinet doors, timeless design is often the safest investment.
Years from now, you’ll likely appreciate choosing lasting craftsmanship over short-lived trends.
Every Great Cabinet Door Begins with the Right Style
Choosing a cabinet door style isn’t simply about appearance.
It’s about defining the entire direction of your project.
The style you select influences your lumber, your joinery, your finishing process, and even the atmosphere of the finished room. When that decision aligns with both your woodworking skills and your design vision, everything that follows feels more intentional.
Now that you’ve explored the most popular cabinet door styles and understand what makes each one unique, it’s time to focus on the material that brings those designs to life.
In the next part, we’ll dive into selecting the best wood for cabinet doors, compare hardwoods and softwoods, explore grain patterns, stability, durability, and finishing characteristics, and help you choose lumber that not only looks exceptional on day one but continues performing beautifully for decades.
Part 3: Choosing the Best Wood for Cabinet Doors That Stay Beautiful for Years
Long before the first joint is cut or the first panel slides into its groove, every cabinet door begins with a single decision.
What wood will you trust to become part of your home?
It sounds like a simple choice.
Walk through a hardwood supplier and you’ll find stacks of maple, oak, walnut, cherry, birch, ash, alder, and pine—each beautiful in its own way. At first, it’s tempting to choose the board with the prettiest grain or the lowest price tag.
Experienced cabinetmakers see something different.
They look beyond appearance. They think about stability, movement, hardness, workability, finishing characteristics, and how the wood will age after years of opening, closing, cooking, cleaning, and changing seasons.
That’s because the best cabinet doors don’t just look good when they’re finished.
They still look good ten or twenty years later.
Choosing the right wood is one of the biggest reasons why.
Good Cabinet Doors Start with Stable Lumber
Every tree grows under different conditions.
Some develop tight, even grain.
Others twist toward sunlight, survive storms, or grow quickly in rich soil.
Those differences remain long after the tree becomes lumber.
Wood isn’t perfectly predictable.
Even after drying, it continues responding to humidity by expanding and contracting across its width. That’s completely natural. The goal isn’t to stop wood from moving—that’s impossible.
The goal is to choose species that move predictably and prepare them correctly before construction begins.
Stable lumber creates stable cabinet doors.
That’s a lesson every experienced woodworker learns sooner or later.
Hardwood or Softwood: Which Is Better?
One of the first questions beginners ask is whether cabinet doors should be made from hardwood or softwood.
The answer depends on the project, but for most cabinetry, hardwood is the preferred choice.
Hardwoods generally offer:
- Greater durability
- Better dent resistance
- Longer service life
- More attractive grain
- Improved stability
- Excellent finishing characteristics
Softwoods still have their place, especially for painted projects or rustic furniture, but they typically dent more easily and require extra care during construction.
Understanding the strengths of each material helps you choose wisely rather than automatically.
Maple: The Reliable Favorite
If there were an all-around champion for cabinet doors, maple would be difficult to beat.
It’s clean.
It’s durable.
It machines beautifully.
Its subtle grain allows paint to look exceptionally smooth while also accepting clear finishes that preserve its bright, contemporary appearance.
Maple is especially popular for:
- Shaker cabinet doors
- Painted kitchens
- Modern cabinetry
- Bathroom vanities
- Utility cabinets
Its density helps resist everyday wear, making it an excellent choice for high-traffic kitchens where cabinet doors are opened countless times each day.
Because of its fine grain, maple also produces crisp routed profiles with very little tear-out when sharp tools are used.
White Oak: Strength with Character
White oak has earned a reputation that spans centuries.
Its combination of strength, stability, and unmistakable grain makes it a favorite among furniture builders and cabinetmakers alike.
Unlike maple’s quiet appearance, white oak proudly displays its personality.
The bold grain creates warmth and texture while remaining refined enough for both traditional and contemporary interiors.
White oak works exceptionally well for:
- Mission furniture
- Craftsman cabinetry
- Farmhouse kitchens
- Built-in bookcases
- Luxury custom cabinets
Quarter-sawn white oak is particularly prized because its dramatic ray flecks create one of woodworking’s most recognizable visual patterns.
Cherry: A Wood That Becomes More Beautiful with Time
Cherry possesses something many other woods cannot offer.
It changes gracefully.
Freshly milled cherry often appears lighter than expected, but exposure to light gradually deepens the color into the rich reddish-brown tone that has made it famous.
Few woods age as elegantly.
Cherry is ideal for:
- Traditional kitchens
- Fine furniture
- Luxury cabinetry
- Formal dining rooms
- Heirloom projects
It machines easily, sands beautifully, and develops a finish that feels warm rather than glossy.
For woodworkers who appreciate natural aging, cherry remains one of the finest choices available.
Walnut: Rich, Sophisticated, and Instantly Recognizable
Few woods command attention quite like walnut.
Its naturally dark heartwood creates a sense of luxury without requiring stain.
The grain ranges from straight and understated to dramatically figured, giving every board its own character.
Walnut shines in:
- High-end kitchens
- Executive offices
- Built-in cabinetry
- Contemporary furniture
- Custom entertainment centers
Despite its elegant appearance, walnut is pleasant to work with.
It cuts cleanly, responds well to hand tools, and finishes beautifully with clear protective coatings that allow its natural color to remain the focal point.
Birch: Affordable and Versatile
Birch often surprises people.
It resembles maple in many ways but usually comes at a lower price.
Its smooth texture and subtle grain make it a practical option for painted cabinets and lighter wood finishes.
Birch performs well in:
- Budget-conscious projects
- Utility rooms
- Painted cabinetry
- Children’s furniture
- Workshop storage
While it can occasionally absorb stain unevenly, careful sanding and the use of a wood conditioner produce consistently attractive results.
Ash: Bold Grain with Excellent Strength
Ash combines durability with striking visual texture.
Its pronounced grain resembles oak while offering a slightly lighter appearance.
Woodworkers appreciate ash because it:
- Machines easily
- Sands quickly
- Accepts stain well
- Resists wear
- Maintains structural integrity
Ash is especially well suited to projects where the grain itself becomes part of the overall design.
Alder: Soft Appearance with Easy Workability
Alder occupies an interesting middle ground.
It’s technically a hardwood, yet considerably softer than maple or oak.
That softness makes it easy to machine and enjoyable for beginners.
Its warm color and subtle grain create a welcoming appearance, particularly in rustic or farmhouse settings.
Because alder accepts stain readily, it’s often used to imitate more expensive hardwoods while maintaining a distinctive character of its own.
Pine: Rustic Charm with Practical Trade-Offs
Pine has been used in woodworking for generations.
It’s affordable, readily available, and unmistakably charming.
Knots, grain variation, and warm color give pine a relaxed personality that suits:
- Farmhouse cabinetry
- Cottage interiors
- Workshop furniture
- Cabin projects
Pine also dents more easily than hardwoods.
For that reason, many builders reserve it for spaces where a naturally aged appearance adds rather than detracts from the finished project.
MDF: The Smooth Surface Behind Painted Cabinetry
Medium-density fiberboard doesn’t possess natural grain.
That’s precisely why many cabinetmakers use it.
Its perfectly smooth surface produces exceptionally clean painted finishes with no seasonal grain movement.
MDF is commonly chosen for:
- Painted slab doors
- Contemporary cabinetry
- Budget-friendly kitchens
- Decorative routed panels
Although heavy and susceptible to water damage if left unfinished, MDF remains one of the most practical materials for painted cabinet doors.
Plywood: Stability Through Engineering
While solid wood dominates traditional frame-and-panel construction, plywood deserves recognition.
Made from multiple layers with alternating grain direction, plywood offers impressive dimensional stability.
It’s frequently used for:
- Cabinet boxes
- Flat panels
- Contemporary slab doors
- Shop cabinetry
High-quality hardwood plywood combines attractive veneers with exceptional resistance to seasonal movement.
Grain Direction Changes Everything
Two boards from the same tree can behave very differently.
Why?
Grain direction.
Straight grain offers predictable movement and easier machining.
Highly figured grain creates dramatic beauty but often requires greater care when routing or planing.
When selecting stock for rails and stiles, prioritize:
- Straight grain
- Minimal twist
- Consistent growth rings
- Few defects
Reserve highly figured boards for panels where their beauty can become the centerpiece of the cabinet door.
Quarter-Sawn vs. Plain-Sawn Lumber
The way lumber is cut influences both appearance and stability.
Plain-Sawn Lumber
Offers:
- Traditional grain patterns
- Greater board width
- Lower cost
Most cabinet projects successfully use plain-sawn stock.
Quarter-Sawn Lumber
Provides:
- Increased dimensional stability
- Straighter grain
- Reduced seasonal movement
- Distinctive ray flecks in white oak
Although more expensive, quarter-sawn lumber often rewards the investment with exceptional long-term performance.
Moisture Content Matters More Than Species
Even the finest walnut or maple can fail if it hasn’t reached the proper moisture content.
Freshly milled lumber often contains far too much water for furniture construction.
Before building cabinet doors, verify that the wood has acclimated to your workshop.
A moisture meter makes this process simple.
As a general guideline, furniture-grade lumber should be appropriately dried and allowed time to adjust to the environment where it will be machined.
Patience here prevents frustration later.
Matching Wood to the Finish
Different species respond differently to paint, stain, and clear finishes.
For painted cabinet doors, excellent choices include:
- Maple
- Birch
- Poplar
- MDF
For stained cabinetry:
- White oak
- Cherry
- Walnut
- Ash
- Alder
For clear finishes:
- Walnut
- Cherry
- White oak
- Maple
Choosing a finish that complements the natural character of the wood almost always produces better results than trying to force one species to imitate another.
Buying Lumber Like an Experienced Cabinetmaker
A lumberyard can feel overwhelming at first.
Rows of boards stretch in every direction, each one slightly different.
Rather than choosing the first attractive board you see, slow down.
Inspect every candidate carefully.
Look for:
- Straightness
- Flat faces
- Minimal twist
- Tight grain
- Clean edges
- Few knots
- Consistent color
Take your time.
The quality of your finished cabinet doors depends heavily on decisions made before the first cut.
Professionals understand that selecting lumber is part of the woodworking process—not something separate from it.
Great Cabinet Doors Begin Long Before the Workshop Gets Loud
Every remarkable cabinet door starts as an ordinary board.
The difference lies in choosing the right one.
When you understand how each species behaves, recognize the importance of grain direction, appreciate the value of stable lumber, and match your wood to the finish you envision, you’re no longer simply buying material.
You’re choosing the future performance of your project.
The wood you select today will determine how your cabinet doors look, feel, and function years from now.
In the next part, we’ll shift from selecting lumber to planning with precision. You’ll learn how to measure cabinet openings accurately, calculate overlays and reveals, create reliable cut lists, and avoid the small measuring mistakes that can turn an otherwise perfect cabinet door into an expensive piece of firewood.
Part 4: Measuring and Planning Cabinet Doors with Precision Before You Make the First Cut
There’s an old saying in woodworking that deserves to be taken seriously:
Measure twice. Cut once.
Experienced cabinetmakers might quietly amend it.
Measure carefully. Plan thoroughly. Cut confidently.
Because in cabinet making, measuring isn’t simply about numbers. It’s about understanding how every component relates to the finished piece. A difference of just one or two millimeters can leave a door rubbing against its neighbor, create uneven reveals, or prevent soft-close hinges from working properly.
Ironically, the saw is rarely responsible for cabinet doors that don’t fit.
The measuring tape usually is.
The encouraging news is that careful planning removes much of the uncertainty. Once your measurements are accurate and your cut list is complete, the rest of the project becomes far more predictable.
Think of this stage as creating a roadmap.
The better the plan, the smoother the journey.
Start by Understanding Your Cabinet
Before measuring a single opening, take a close look at the cabinet itself.
Not every cabinet is built the same way.
Some have traditional face frames.
Others use frameless European construction.
Some doors sit on top of the cabinet frame.
Others fit neatly inside the opening.
Knowing which system you’re working with determines every measurement that follows.
Trying to calculate cabinet door dimensions without understanding the cabinet structure is like building a house before checking the foundation.
Everything depends on getting this first step right.
Face Frame Cabinets
Face frame cabinets remain one of the most common styles in North America.
A solid wood frame surrounds the front of the cabinet box, creating additional strength while providing mounting points for hinges.
Cabinet doors may be designed as:
- Partial overlay
- Full overlay
- Inset
Each option changes the final door dimensions.
Never assume measurements from one project will automatically transfer to another.
Frameless Cabinets
Frameless cabinets eliminate the front frame entirely.
Instead, cabinet doors attach directly to the cabinet box.
This construction offers:
- Increased storage space
- Clean contemporary appearance
- Wider drawer openings
- Minimal visible structure
Because there is no face frame, precise hinge placement becomes even more important.
Small measuring errors are often more noticeable on frameless cabinetry.
Overlay Cabinet Doors
Overlay doors extend beyond the cabinet opening.
How much they overlap depends on the design.
There are two primary approaches.
Partial Overlay
With partial overlay construction, each door covers only part of the surrounding frame.
This leaves sections of the face frame visible between adjacent doors.
Advantages include:
- Traditional appearance
- Straightforward measurements
- Lower hardware costs
- Timeless design
Partial overlay remains popular in many classic kitchens and utility spaces.
Full Overlay
Full overlay cabinet doors cover nearly the entire face frame.
Only narrow reveals remain visible between neighboring doors.
The result feels:
- Contemporary
- Elegant
- Spacious
- Custom built
Because gaps are intentionally small, measuring accuracy becomes especially important.
Even tiny inconsistencies quickly become noticeable.
Inset Cabinet Doors
Inset doors represent one of the highest levels of cabinet-making precision.
Rather than covering the cabinet opening, the door fits neatly inside it.
The result is refined and furniture-like.
It also demands exceptional accuracy.
Inset construction requires:
- Perfectly square openings
- Consistent reveals
- Precise hinge placement
- Careful fitting
Building inset cabinet doors is immensely satisfying, but it’s often best attempted after gaining confidence with overlay construction.
What Is a Reveal?
One word appears constantly in professional cabinet shops.
Reveal.
A reveal is the intentionally visible gap surrounding a cabinet door.
It allows:
- Smooth opening
- Seasonal wood movement
- Visual balance
- Clearance for hardware
Consistent reveals create the clean, polished appearance associated with custom cabinetry.
Inconsistent reveals immediately attract attention, even if viewers can’t explain why something feels slightly off.
Good cabinetmaking often comes down to details like this.
Measuring Cabinet Openings Correctly
Always measure the actual cabinet.
Never rely solely on construction drawings or previous estimates.
For every opening, record:
- Width
- Height
- Depth when necessary
Measure each dimension more than once.
Older cabinets may have settled slightly over time, causing opposite corners to differ.
When measurements don’t agree, trust the cabinet—not the assumption that it should be perfectly square.
Check for Square Before Designing the Door
A cabinet opening may appear perfectly rectangular while actually being slightly out of square.
The easiest way to verify is by measuring both diagonals.
If the diagonal measurements match, the opening is square.
If they differ, adjustments may be necessary when sizing inset doors or fine-tuning reveals.
Many experienced cabinetmakers perform this check automatically before beginning any project.
Calculating Overlay Dimensions
Overlay doors require careful planning rather than guesswork.
The final door size depends on:
- Cabinet opening
- Desired overlay
- Hinge type
- Clearance between adjacent doors
Writing these values down before cutting any material helps eliminate confusion later.
Whenever possible, create a simple drawing with every dimension clearly labeled.
Visual planning often catches mistakes long before the table saw does.
Calculating Inset Door Dimensions
Inset doors demand a different approach.
Because the door fits inside the opening, clearance must be included from the beginning.
Allowing space around all four sides ensures:
- Smooth operation
- Seasonal expansion
- Consistent reveals
- Easier installation
It’s always safer to leave room for final fitting than to discover the finished door is too large after the finish has already been applied.
Determining Rail and Stile Width
The width of your rails and stiles influences far more than appearance.
It affects:
- Structural strength
- Panel size
- Visual balance
- Hardware placement
Narrow frames create a lighter appearance.
Wider frames feel more substantial.
Most cabinetmakers choose proportions that complement both the cabinet size and the surrounding room rather than relying on one fixed dimension for every project.
Consistency matters just as much as the actual measurements.
Calculating the Center Panel Size
The center panel isn’t measured independently.
Its dimensions are determined by the surrounding frame.
When calculating panel size, remember that the edges slide into grooves cut inside the rails and stiles.
That additional material must be included in your calculations.
At the same time, the panel needs enough freedom to expand and contract naturally.
A floating panel should fit securely without becoming trapped inside the frame.
Planning for Wood Movement
This is where thoughtful planning separates durable cabinet doors from disappointing ones.
Solid wood changes with the seasons.
Ignoring that fact almost guarantees future problems.
Instead of trying to prevent movement, successful cabinetmakers design around it.
They:
- Use floating panels.
- Select stable lumber.
- Avoid gluing panels into grooves.
- Leave appropriate clearance.
- Allow the frame to perform as intended.
Wood movement isn’t the enemy.
Ignoring it is.
Planning Hinge Placement Early
Many beginners wait until the cabinet door is finished before thinking about hinges.
Professionals do the opposite.
They consider hardware while designing the door.
Planning hinge placement early helps determine:
- Rail width
- Stile dimensions
- Overlay requirements
- Mounting clearances
Every hardware decision influences the woodworking that comes before it.
Thinking ahead prevents unpleasant surprises during installation.
Single Doors or Double Doors?
Larger cabinet openings usually require a decision.
Should you build one wide door or two narrower ones?
Each option has advantages.
Single Door
- Fewer hinges
- Simpler installation
- Continuous appearance
Double Doors
- Reduced weight
- Easier operation
- Better long-term stability
- More balanced proportions
For wider cabinets, double doors often provide the most practical solution while maintaining visual harmony.
Create a Complete Cut List Before Milling
Few habits save more time than creating an accurate cut list.
Before cutting lumber, list every component.
Include:
- Quantity
- Length
- Width
- Thickness
- Material
- Notes
A thorough cut list reduces waste, speeds production, and makes it much easier to build multiple cabinet doors with consistent dimensions.
Professional cabinet shops rarely begin machining without one.
Label Every Component
Once milling begins, rails and stiles can quickly become difficult to distinguish.
Develop a simple labeling system.
Mark:
- Left stile
- Right stile
- Top rail
- Bottom rail
- Center rail
- Matching panel
Many cabinetmakers also draw a large triangle across the assembled components before separating them.
That triangle makes reassembly almost effortless later in the project while preserving grain orientation.
Dry Layout Before Cutting Joinery
Arrange every component on a flat surface before moving to routers or saws.
A dry layout allows you to confirm:
- Grain flow
- Panel orientation
- Attractive color matching
- Proper proportions
- Overall appearance
Small adjustments made now are simple.
After joinery has been cut, those same changes become much more difficult.
Think Like a Cabinetmaker, Not Just a Builder
Planning isn’t the exciting part of woodworking.
Machines are louder.
Freshly cut hardwood smells better.
Watching a cabinet door come together is unquestionably more satisfying.
Yet the projects that impress people most usually owe their success to the quiet planning that happened beforehand.
Experienced cabinetmakers know this.
They don’t rush toward the first cut.
They pause, measure again, review the drawings one more time, and mentally walk through the entire project before switching on a single machine.
That discipline pays dividends throughout every stage of construction.
Precision Begins Long Before the First Board Is Cut
By now, you’ve selected a cabinet door style, chosen the right lumber, and created a detailed plan based on accurate measurements rather than assumptions.
You’ve calculated overlays, accounted for reveals, planned for seasonal wood movement, organized your cut list, and prepared every component before cutting begins.
That careful preparation removes much of the guesswork from the build.
The workshop suddenly becomes a place of execution rather than experimentation.
In the next part, we’ll turn our attention to the tools themselves. You’ll learn which hand tools and power tools are truly essential, which specialty tools make cabinet door construction easier, how to set up your workshop for accuracy and safety, and where investing in quality equipment delivers the biggest improvement in both efficiency and results.
Part 5: Essential Tools for Building Cabinet Doors with Accuracy and Confidence
Every woodworker remembers the moment they realized it wasn’t the tool that made the difference.
It was how accurately that tool could be used.
Beginners often believe professional cabinet doors require a workshop filled with expensive machinery. Walk into a custom cabinet shop and it’s easy to understand why. Industrial table saws hum quietly in the background. Massive jointers flatten rough lumber in seconds. Spray booths produce flawless finishes that seem impossible to replicate at home.
It’s impressive.
It’s also a little misleading.
The truth is that beautiful cabinet doors have been built for centuries—long before modern machines existed.
What matters isn’t owning every tool on the market.
What matters is understanding which tools genuinely improve accuracy, which ones simply save time, and which ones are worth investing in as your skills grow.
A thoughtfully equipped workshop doesn’t just make woodworking easier.
It makes good habits repeatable.
Build Your Workshop Around Precision, Not Quantity
One of the biggest mistakes new woodworkers make is buying tools before understanding what those tools actually solve.
A crowded workshop doesn’t automatically produce better work.
A well-organized one usually does.
Every tool should earn its place by improving one of three things:
- Accuracy
- Efficiency
- Safety
If a tool doesn’t contribute meaningfully to one of those goals, it probably isn’t essential—at least not yet.
Professional cabinetmakers often rely on surprisingly simple equipment every single day because those tools deliver consistent, predictable results.
Measuring Tools: The Foundation of Every Successful Project
Cabinet making is a game of precision.
If measurements are inaccurate, nothing that follows can fully compensate.
That’s why reliable measuring tools deserve priority over almost everything else.
Your essential measuring kit should include:
- Tape measure
- Combination square
- Engineer’s square
- Precision ruler
- Marking gauge
- Sliding bevel
- Digital calipers
These tools quietly influence every stage of construction, from laying out joinery to checking final door alignment.
They’re used constantly—and for good reason.
Tape Measure: Simple but Critical
A quality tape measure is more than a convenience.
It’s one of the most frequently used tools in the workshop.
Look for features such as:
- Easy-to-read markings
- Durable blade
- Secure locking mechanism
- Smooth retraction
- Consistent accuracy
Many experienced cabinetmakers stick with the same tape measure for years because familiarity reduces mistakes.
Consistency matters.
Combination Square: The Workshop’s Most Trusted Companion
If one hand tool rarely leaves a cabinetmaker’s bench, it’s the combination square.
It checks:
- Ninety-degree angles
- Forty-five-degree angles
- Blade height
- Fence setup
- Machine alignment
- Layout lines
It’s equally useful on the table saw, router table, workbench, and assembly table.
Few tools deliver as much value for their size.
Marking Knife vs. Pencil
Most beginners reach for a pencil.
Experienced woodworkers often reach for a marking knife.
Why?
A knife creates an incredibly precise reference line while severing wood fibers at the same time.
Benefits include:
- Greater accuracy
- Cleaner cuts
- Reduced tear-out
- Improved joinery
Pencils still have their place for rough layout work, but final joinery often benefits from the precision of a knife.
The Table Saw: The Heart of the Workshop
For many cabinetmakers, the table saw becomes the center of nearly every project.
It’s used for:
- Ripping lumber
- Crosscutting
- Cutting joinery
- Sizing panels
- Trimming rails
- Cutting stiles
Accuracy matters far more than horsepower.
A well-tuned table saw consistently produces straight, repeatable cuts that simplify every step that follows.
Before beginning cabinet doors, verify:
- Blade alignment
- Fence accuracy
- Miter slot parallelism
- Blade squareness
Small adjustments here prevent much larger problems later.
Choosing the Right Saw Blade
Even an exceptional table saw performs poorly with the wrong blade.
For cabinet doors, invest in high-quality carbide blades designed for fine woodworking.
Common choices include:
- Combination blades
- Rip blades
- Crosscut blades
- Fine plywood blades
Sharp blades reduce:
- Tear-out
- Burning
- Excessive sanding
- Motor strain
Many woodworking problems disappear simply by replacing a dull blade.
Crosscut Sled: Accuracy You Can Trust
A crosscut sled transforms an ordinary table saw into an incredibly accurate cutting system.
Advantages include:
- Perfect ninety-degree cuts
- Safer operation
- Improved repeatability
- Better support for small parts
Because cabinet doors rely on perfectly square rails and stiles, many woodworkers consider a crosscut sled indispensable.
Router: The Cabinet Door Specialist
Few tools are more closely associated with cabinet doors than the router.
It performs countless tasks, including:
- Cutting grooves
- Shaping decorative profiles
- Creating cope-and-stick joints
- Chamfering edges
- Flush trimming
- Pattern routing
A quality router opens the door to an enormous range of cabinet styles.
It’s one of the most versatile investments a woodworker can make.
Why a Router Table Makes Such a Difference
Although handheld routers are useful, cabinet door construction becomes significantly easier with a router table.
The added stability improves:
- Safety
- Precision
- Repeatability
- Profile consistency
Large workpieces remain supported while the cutter stays perfectly aligned.
That’s especially valuable when producing multiple cabinet doors that must match exactly.
Essential Router Bits for Cabinet Doors
You don’t need dozens of router bits.
A carefully selected collection covers most cabinet projects.
Useful choices include:
- Straight bits
- Rabbeting bits
- Flush trim bits
- Round-over bits
- Chamfer bits
- Cove bits
- Cope-and-stick sets
- Raised-panel bits
Quality bits produce cleaner cuts while remaining sharp much longer than inexpensive alternatives.
Jointer: Creating One Perfect Reference Surface
Cabinet doors demand flat lumber.
A jointer creates that foundation.
Its primary jobs include:
- Flattening one face
- Straightening one edge
- Removing twist
- Eliminating cup
Once a perfectly flat reference surface exists, every other machining operation becomes more accurate.
Skipping this step often leads to frustration later during assembly.
Thickness Planer: Bringing Every Board to Uniform Thickness
After jointing, boards move to the planer.
The planer ensures consistent thickness throughout every component.
Uniform thickness matters because:
- Joinery fits properly.
- Rails align with stiles.
- Panels sit evenly.
- Sanding becomes easier.
Even slight variations become visible once cabinet doors are assembled.
Miter Saw: Fast, Accurate Crosscuts
While many crosscuts happen on the table saw, a quality miter saw remains valuable for rough dimensioning.
It’s especially useful when:
- Breaking down long boards
- Cutting rough stock
- Preparing manageable lengths
- Batch processing lumber
Final precision cuts, however, are often completed on the table saw using a crosscut sled for maximum accuracy.
Drill Press: Precision Beyond Hand Drilling
Although handheld drills are extremely useful, certain operations benefit from the consistency of a drill press.
Ideal applications include:
- Hinge cup holes
- Dowel joinery
- Hardware installation
- Repeatable drilling
- Perpendicular holes
Accurate drilling becomes particularly important during cabinet door installation.
Random Orbital Sander: Smooth Without Leaving Marks
Every cabinet door eventually reaches the sanding stage.
A random orbital sander speeds the process while minimizing visible scratch patterns.
It’s excellent for:
- Flattening surfaces
- Removing machining marks
- Preparing for finishing
- Between-coat sanding
Let the machine do the work.
Excessive downward pressure often creates uneven sanding rather than faster results.
Clamps: Your Silent Assembly Partners
There’s a familiar joke among woodworkers.
You never own enough clamps.
While lighthearted, there’s truth behind it.
Cabinet doors require clamps that apply even pressure without twisting the frame.
Useful options include:
- Parallel clamps
- Bar clamps
- Pipe clamps
- Corner clamps
- Spring clamps
Good clamps don’t force parts together.
They simply hold accurately fitted joints in position while the glue cures.
Dust Collection: Cleaner Air, Better Results
Fine woodworking creates fine dust.
Cabinet door construction involves repeated cutting, routing, sanding, and shaping—all of which produce airborne particles.
Effective dust collection improves:
- Shop cleanliness
- Machine performance
- Finish quality
- Visibility
- Personal health
Even a compact dust collection system makes the workshop noticeably more pleasant to work in.
Moisture Meter: The Tool Beginners Often Overlook
Beautiful lumber can still create disappointing cabinet doors if it contains too much moisture.
A moisture meter quickly verifies whether wood has acclimated to your workshop.
Using one helps prevent:
- Warping
- Shrinkage
- Joint movement
- Panel problems
It’s a relatively inexpensive tool that often prevents expensive mistakes.
Digital Angle Gauge: Tiny Adjustments, Big Results
Modern digital angle gauges make machine setup surprisingly simple.
They’re useful for:
- Table saw blade alignment
- Bevel cuts
- Router bit setup
- Miter saw calibration
Small improvements in setup often translate directly into tighter joinery and cleaner assemblies.
Safety Equipment Is Part of the Tool Collection
Professional cabinetmakers value their eyesight, hearing, and lungs as much as their tools.
Protect yourself with:
- Safety glasses
- Hearing protection
- Dust mask or respirator
- Push sticks
- Push blocks
- Featherboards
Good habits developed early tend to last throughout a woodworking career.
Learn more: Build a Safer Workshop: The Ultimate Beginner-to-Pro Woodworking Safety Equipment Roadmap
Specialty Tools Worth Considering Later
As your skills and projects grow, additional tools may become worthwhile.
Examples include:
- Domino joiners
- Biscuit joiners
- Drum sanders
- Sliding table saws
- Hollow chisel mortisers
- Wide-belt sanders
These machines improve efficiency rather than making quality craftsmanship possible.
Many outstanding cabinet doors have been built without them.
Buy Quality Once, Then Learn It Well
One carefully chosen tool almost always outperforms several inexpensive alternatives.
Rather than filling your workshop quickly, build it gradually.
Learn each tool thoroughly before moving to the next.
Confidence grows through familiarity.
Over time, your workshop evolves into something more valuable than an impressive collection of machines.
It becomes a place where accuracy feels natural.
Great Cabinet Doors Begin with Well-Prepared Tools
The finest lumber and the most detailed plans can’t compensate for poorly tuned equipment.
Sharp blades, square fences, accurate measuring tools, and carefully maintained machines quietly contribute to every successful cabinet door you build.
When your tools are properly set up, woodworking becomes less about correcting mistakes and more about enjoying the process.
With your workshop prepared and your equipment ready, it’s finally time to transform rough boards into precision components.
In the next part, we’ll walk through the complete milling process—from inspecting rough lumber and flattening warped boards to jointing, planing, ripping, crosscutting, and organizing every rail, stile, and panel before the first piece of joinery is ever cut.
Part 6: Milling Lumber for Cabinet Doors — Turning Rough Boards into Precision Components
There’s a quiet moment in every woodworking project that often goes unnoticed.
A rough board rests on the bench. Its surface is dull. The edges are uneven. One face may be slightly cupped, another subtly twisted. To most people, it looks unfinished—far removed from the elegant cabinet door it’s destined to become.
An experienced cabinetmaker sees something entirely different.
They don’t see flaws.
They see potential.
Milling is the bridge between raw lumber and fine craftsmanship. It’s the stage where ordinary boards become perfectly flat, square, and dimensionally consistent. It isn’t the most glamorous part of cabinet making, but it may be the most important.
Almost every cabinet door problem can be traced back to one simple cause:
The lumber wasn’t prepared correctly.
Crooked stiles. Uneven joints. Panels that refuse to fit. Doors that twist after assembly. More often than not, the trouble began before the joinery was ever cut.
That’s why professionals never rush through milling.
They understand that every accurate cut made later depends on the quality of the preparation happening now.
Begin by Inspecting Every Board
Before switching on a single machine, slow down.
Lay each board on a flat surface and examine it carefully.
This isn’t wasted time.
It’s one of the smartest investments you’ll make during the entire project.
Look for:
- Bow
- Cup
- Twist
- Crook
- Knots
- Surface checks
- End splits
- Insect damage
- Resin pockets
Even premium hardwood can contain hidden defects.
The earlier you identify them, the easier it becomes to work around them.
Sometimes shifting a cut line by just a few inches preserves a beautiful section of grain while eliminating a weak area entirely.
Understanding Common Lumber Defects
Every board tells the story of how the tree grew.
Learning to read that story helps you decide whether a board belongs in a cabinet door—or somewhere else.
Bow
A bowed board curves along its length.
When viewed from the side, it resembles a gentle arch.
Minor bow is often manageable.
Severe bow usually requires trimming or selecting another section of the board.
Cup
A cupped board curves across its width.
Place it on a flat surface and the edges may lift while the center touches—or vice versa.
If ignored, cup creates serious problems during glue-up because joints struggle to close evenly.
Flattening one face is the first priority.
Twist
Twist is among the most challenging defects.
Each corner sits on a different plane, making the board resemble a propeller.
Even slight twist can prevent rails and stiles from fitting accurately.
Removing twist requires careful jointing before any additional milling takes place.
Crook
Crook affects the edge rather than the face.
Instead of running straight, the board gradually bends sideways.
Because cabinet door stiles depend on perfectly straight edges, crook must be corrected before ripping final dimensions.
Checks and End Splits
Small cracks near the ends of boards are common.
Fortunately, they’re usually easy to remove by trimming the affected section before milling begins.
Planning for this waste ensures your final parts remain strong and attractive.
Let Lumber Adjust to Your Workshop
Freshly purchased wood shouldn’t always go directly onto the machines.
Instead, allow it time to acclimate.
Wood continuously exchanges moisture with its environment.
Moving lumber from a humid warehouse into a dry workshop—or the other way around—can temporarily change its dimensions.
Stack boards with spacers between them so air can circulate freely.
That simple step helps stabilize the lumber before precision machining begins.
Patience here often prevents surprises later.
Follow the Professional Milling Sequence
Experienced cabinetmakers rarely change the order of operations.
They follow a proven sequence because every step prepares the wood for the next one.
The process typically looks like this:
- Flatten one face.
- Joint one edge.
- Plane to thickness.
- Rip to width.
- Crosscut to final length.
Skipping steps—or changing the order—usually creates more work rather than saving time.
Step One: Flatten One Face
Every accurate measurement begins with a reliable reference surface.
The jointer creates that surface.
Pass the board across the jointer until one face becomes completely flat.
Don’t rush.
Several light passes produce better results than one aggressive cut.
Once finished, mark the newly flattened face.
It becomes the reference for every remaining machining operation.
Step Two: Joint One Straight Edge
With one flat face complete, the next task is creating one perfectly straight edge.
Hold the flattened face firmly against the jointer fence.
The resulting edge should form a clean ninety-degree relationship with the reference face.
Now you have two surfaces you can trust:
- One flat face
- One perfectly square edge
Everything else will be measured from them.
Step Three: Plane to Final Thickness
Next comes the thickness planer.
Place the jointed face downward.
The planer removes material from the opposite face until both surfaces become parallel.
Consistency matters far more than removing material quickly.
Several light passes reduce stress on both the machine and the wood while producing smoother surfaces.
Continue until every board reaches the planned thickness.
Uniform stock makes assembly dramatically easier.
Step Four: Rip to Width
Now that the board is flat and parallel, it’s ready for the table saw.
Using the jointed edge against the fence, rip each component to its final width.
This stage transforms rough boards into recognizable cabinet parts.
Rails begin to appear.
Stiles take shape.
Every accurate rip cut simplifies the joinery that comes later.
Always use a sharp blade and steady feed rate.
A clean rip requires less sanding and preserves crisp edges.
Step Five: Crosscut to Length
The final milling operation brings every component to its finished length.
Use a crosscut sled or another reliable method that guarantees square ends.
Consistency is critical.
Even a slight variation between matching rails can affect the final fit of the cabinet door.
Measure carefully.
Cut deliberately.
Check frequently.
Accuracy at this stage pays dividends throughout assembly.
Pay Attention to Grain Direction
Milling isn’t only about dimensions.
It’s also your opportunity to arrange the wood thoughtfully.
Before cutting final lengths, examine the grain.
Whenever possible:
- Match neighboring pieces.
- Continue grain patterns naturally.
- Place the most attractive figure where it will be most visible.
These decisions may seem subtle, yet they contribute enormously to the finished appearance.
Beautiful cabinetry often feels effortless because someone invested time in details most people never consciously notice.
Bookmatching for Premium Cabinet Doors
If your lumber contains striking grain, consider bookmatching.
This technique places consecutive boards side by side so their grain patterns mirror one another.
The effect can be stunning.
Bookmatched panels add a sense of symmetry and refinement often associated with high-end custom cabinetry.
While not necessary for every project, it’s a technique worth learning whenever the wood offers the opportunity.
Keep Every Component Organized
By this stage, your workshop may contain dozens of nearly identical pieces.
Without organization, confusion arrives quickly.
Create separate groups for:
- Left stiles
- Right stiles
- Top rails
- Bottom rails
- Center rails
- Panels
Many cabinetmakers also continue using the large reference triangle drawn across each door during planning.
After milling, the triangle still makes every component easy to identify.
Simple organization prevents surprisingly costly mistakes later.
Prevent Tear-Out Before It Starts
Nothing interrupts momentum quite like discovering chipped grain on a carefully milled stile.
Fortunately, tear-out is often preventable.
Use these habits consistently:
- Keep blades sharp.
- Support the workpiece properly.
- Feed stock steadily.
- Observe grain direction.
- Take lighter cuts when necessary.
Good preparation usually eliminates the need for major repairs later.
Mill Extra Components
Professional cabinet shops rarely machine only the exact number of parts required.
Instead, they prepare a few extras.
Additional rails, stiles, or panels provide valuable insurance if:
- A defect appears later.
- A router setup goes wrong.
- A machining error occurs.
- Grain selection changes.
Having spare material already milled can save hours of additional setup.
Check Every Dimension Before Moving Forward
Once milling is complete, inspect every component.
Verify that:
- Thickness is consistent.
- Width matches the cut list.
- Lengths are accurate.
- Ends are square.
- Faces remain flat.
- Grain orientation is correct.
Now is the easiest time to correct small discrepancies.
Later, after joinery begins, those same corrections become much more difficult.
Dry Layout the Entire Door
Before cutting grooves or shaping profiles, assemble every component on the bench without joinery.
This final layout allows you to evaluate:
- Overall proportions
- Grain flow
- Color consistency
- Panel placement
- Visual balance
Sometimes swapping two rails or rotating a panel dramatically improves the appearance.
Those are easy decisions now.
They become impossible once glue enters the picture.
Milling Is Where Accuracy Begins
It’s easy to think of milling as preparation for the “real” woodworking.
In truth, milling is woodworking.
Every perfectly flattened face, every straight edge, every consistent thickness, and every carefully selected grain pattern lays the groundwork for the craftsmanship that’s about to follow.
When the lumber is prepared with patience and precision, the next stages feel almost effortless.
Joints fit naturally.
Frames assemble cleanly.
Panels slide smoothly into place.
That’s no accident.
It’s the reward for taking the time to prepare the material properly.
In the next part, we’ll begin transforming these precisely milled components into real cabinet doors as we explore frame joinery, cope-and-stick construction, mortise-and-tenon joints, routing techniques, and the methods professional cabinetmakers use to create cabinet door frames that are both exceptionally strong and beautifully crafted.
Part 7: Building Strong, Beautiful Cabinet Door Frames with Professional Joinery
After hours of planning, measuring, selecting lumber, and carefully milling every component, you’ve finally reached the stage many woodworkers look forward to most.
Now the cabinet door begins to take shape.
The pile of neatly prepared rails and stiles on your workbench is no longer just lumber. Within a few hours, those individual pieces will become a rigid frame capable of lasting for decades.
This transformation happens because of one thing.
Joinery.
Beautiful wood certainly attracts attention.
A flawless finish adds visual appeal.
But neither one determines how long a cabinet door survives years of daily use.
That responsibility belongs to the joints.
A cabinet door may be opened and closed tens of thousands of times throughout its lifetime. Every movement places small but repeated stresses on the frame. Poorly fitted joints eventually loosen. Well-made joints quietly endure, often lasting longer than the cabinets themselves.
That’s why experienced cabinetmakers spend far more time perfecting joinery than decorating the finished door.
Strength begins where two pieces of wood meet.
Why Cabinet Door Joinery Matters
At first glance, a cabinet door appears fairly simple.
Four frame pieces surround a center panel.
In reality, every corner must accomplish several jobs simultaneously.
The joint must:
- Resist twisting
- Stay square
- Hold glue securely
- Accommodate seasonal wood movement
- Maintain alignment for decades
A joint that’s even slightly loose during assembly rarely becomes stronger after the glue dries.
Precision during fitting is everything.
Good joinery isn’t forced together.
It slides together with quiet confidence.
Understanding Rails and Stiles
Every cabinet door frame consists of two basic components.
Rails
Rails run horizontally.
You’ll normally find:
- Top rail
- Bottom rail
- Occasionally center rails on larger doors
Stiles
Stiles run vertically from top to bottom.
Because they’re typically longer, they provide much of the frame’s overall strength.
Maintaining perfectly straight stiles is critical.
Even minor distortion can affect the appearance and operation of the finished cabinet door.
The Cope-and-Stick Joint: A Cabinetmaker’s Favorite
Ask professional cabinetmakers which joint they use most often for cabinet doors, and many will answer immediately.
Cope and stick.
It’s become the industry standard because it combines:
- Strength
- Efficiency
- Attractive profiles
- Accurate alignment
- Reliable glue surfaces
The “stick” profile forms the groove running along the inside edge of the frame.
The “cope” cut shapes the ends of the rails so they interlock perfectly with the stiles.
When routed accurately, the two pieces fit together almost like puzzle pieces.
The result is both structurally sound and visually seamless.
Setting Up Cope-and-Stick Router Bits
Success depends less on the router itself and more on careful setup.
Take your time.
Begin with scrap material that matches the thickness of your actual cabinet components.
Make several test cuts.
Adjust gradually until:
- Profiles align perfectly
- Grooves match exactly
- Faces remain flush
- Corners close tightly
Professional cabinetmakers often spend more time setting up than routing.
Once the setup is correct, every subsequent cut becomes remarkably consistent.
Test Cuts Save Expensive Lumber
Few habits separate experienced woodworkers from beginners more clearly than making test cuts.
Never assume yesterday’s router setup is still accurate today.
Instead:
- Use offcuts from the same species.
- Match the exact thickness.
- Check every profile.
- Assemble sample corners.
Ten minutes of testing can prevent hours of rebuilding later.
Mortise-and-Tenon Joinery: Built for Maximum Strength
Long before router bit sets became common, cabinetmakers relied on mortise-and-tenon construction.
Many still do.
A tenon extends from the end of the rail.
A matching mortise is cut into the stile.
The two pieces fit together with exceptional strength because of the large glue surface created inside the joint.
Mortise-and-tenon joinery is particularly well suited for:
- Large cabinet doors
- Furniture-quality projects
- Traditional craftsmanship
- Heavy hardwood construction
Although it requires additional time, the resulting strength is difficult to surpass.
Loose Tenons: Modern Precision
Loose-tenon systems combine many advantages of traditional mortise-and-tenon construction while simplifying the machining process.
Instead of cutting an integral tenon on the rail, matching mortises are created in both components.
A separate tenon joins them together.
Benefits include:
- Excellent strength
- Simplified machining
- Consistent alignment
- Repeatable accuracy
Many modern cabinet shops rely on loose-tenon joinery for both speed and precision.
Dowel Joinery: Simplicity with Surprising Strength
Dowels remain an excellent option for many cabinet doors.
When drilled accurately, multiple hardwood dowels create durable joints with impressive glue surface.
Advantages include:
- Affordable tooling
- Straightforward construction
- Reliable strength
- Minimal visible hardware
Success depends entirely on accurate hole alignment.
Even small drilling errors quickly become noticeable during assembly.
Pocket-Hole Joinery: Fast but Specialized
Pocket-hole screws have transformed many woodworking projects.
For cabinet doors, however, they require careful consideration.
While perfectly suitable for some utility cabinets or painted shop furniture, pocket holes generally aren’t the preferred choice for high-end frame-and-panel doors.
Traditional joinery typically provides:
- Better long-term strength
- Cleaner appearance
- Improved alignment
- Greater durability
Pocket holes still have their place, but understanding their limitations helps you choose wisely.
Cutting Perfect Grooves for the Center Panel
Nearly every frame-and-panel cabinet door requires grooves along the inside edges.
These grooves serve two important purposes.
They:
- Receive the floating panel.
- Increase glue surface for the frame.
Consistency matters enormously.
Every groove should:
- Match in depth.
- Match in width.
- Remain centered.
- Continue cleanly through every component.
Uniform grooves help the frame assemble effortlessly.
Routing Decorative Profiles
The inside edge of a cabinet door frame doesn’t need to remain square.
Router bits allow you to add subtle profiles that dramatically influence the finished appearance.
Popular choices include:
- Round-over
- Ogee
- Cove
- Bead
- Chamfer
These details may seem minor individually, yet together they define the visual personality of the cabinet door.
Simple profiles often age more gracefully than overly elaborate ones.
Preventing Tear-Out During Routing
Routing across end grain always presents challenges.
Fortunately, careful technique greatly reduces the risk.
Helpful habits include:
- Use sharp bits.
- Take light passes.
- Maintain steady feed.
- Support the workpiece.
- Use backing blocks when appropriate.
Sharp tooling and proper setup often eliminate problems before they begin.
Dry Fit Every Cabinet Door
Never introduce glue immediately after cutting joinery.
Instead, assemble every component dry.
A dry fit confirms:
- Joint accuracy
- Panel clearance
- Overall squareness
- Profile alignment
- Component orientation
If something feels forced during dry assembly, stop.
Properly machined joints should fit snugly without requiring excessive pressure.
This is your final opportunity to make adjustments before the assembly becomes permanent.
Check for Perfect Squareness
During every dry fit, verify that the frame is square.
Measure both diagonals.
Matching diagonal measurements indicate a square assembly.
If they differ, determine the cause before proceeding.
Common reasons include:
- Slightly inaccurate cuts
- Uneven shoulders
- Twisted components
- Debris inside joints
Correcting these issues now is dramatically easier than after glue-up.
Batch Production Improves Consistency
Building several cabinet doors?
Complete each operation for every component before moving to the next.
For example:
- Cut all grooves.
- Route all stick profiles.
- Cut every cope joint.
- Label each frame.
- Perform all dry fits.
This workflow minimizes machine adjustments while improving consistency across the entire project.
Professional cabinet shops rarely complete one door from start to finish before beginning another.
They work in carefully organized batches.
Keep Every Component Clearly Marked
As routing progresses, many pieces begin looking nearly identical.
Continue using your labeling system.
Mark:
- Matching rails
- Matching stiles
- Door numbers
- Grain direction
- Panel orientation
Clear organization reduces mistakes and makes final assembly considerably less stressful.
Small Details Separate Good Joinery from Great Joinery
Outstanding cabinet doors aren’t built through luck.
They’re built through habits.
Experienced cabinetmakers consistently:
- Clean dust from joints.
- Inspect every shoulder.
- Verify router setups.
- Check measurements repeatedly.
- Replace dull cutters promptly.
- Test-fit components before assembly.
None of these habits takes very long.
Together, they produce joinery that feels effortless because every detail has already been considered.
Every Strong Cabinet Door Begins with Exceptional Joinery
By now, your rough lumber has become precisely machined rails and stiles connected by carefully crafted joints.
Whether you’ve chosen cope-and-stick construction, mortise-and-tenon joinery, loose tenons, or dowels, you’ve built the structural foundation that gives cabinet doors their long-term strength.
The frame now fits together accurately, the grooves are ready to receive the floating panel, and every component has been tested before a single drop of glue is applied.
The exciting part is just ahead.
In the next section, we’ll bring everything together during assembly. You’ll learn how to glue cabinet door frames correctly, install floating panels without restricting natural wood movement, apply clamping pressure evenly, keep every door perfectly square, and avoid the subtle assembly mistakes that can compromise an otherwise flawless build.
Part 8: Assembling Cabinet Doors — Glue, Clamping, and Building a Frame That Lasts for Decades
There’s something deeply satisfying about watching a cabinet door come together.
For hours—or perhaps days—you’ve been measuring, milling, routing, and checking every component. The rails and stiles are precisely cut. The joinery fits beautifully. The center panel is ready. Every piece has been carefully labeled and dry-fitted.
Now comes the moment when dozens of individual decisions become one finished structure.
Assembly is where preparation reveals its value.
If you’ve worked carefully up to this point, the cabinet door almost seems to assemble itself. The joints slide together naturally. The panel fits without resistance. The frame closes evenly under light clamping pressure.
If something suddenly feels forced, however, don’t assume the glue will solve the problem.
Glue strengthens good joints.
It doesn’t fix poor ones.
Professional cabinetmakers understand this better than anyone. They know that assembly should feel calm and controlled—not rushed or stressful.
The goal isn’t simply to glue wood together.
The goal is to create a cabinet door that remains flat, square, and dependable for decades.
Dry Fit One Final Time Before Opening the Glue Bottle
Even if you’ve already completed a successful dry assembly, perform one more check immediately before gluing.
Why?
Because small things change.
A component may have been sanded.
A bit of dust may have settled inside a groove.
A rail might have been accidentally rotated.
A final dry fit takes only a few minutes and confirms that everything still fits exactly as intended.
Verify:
- Every joint closes fully.
- The center panel moves freely.
- Components remain correctly oriented.
- Grain patterns line up naturally.
- The frame sits flat on the workbench.
Once glue is applied, time becomes more valuable.
Preparation keeps the process relaxed.
Choosing the Right Wood Glue
Cabinet doors don’t require exotic adhesives.
High-quality woodworking glue is more than capable of creating joints that are stronger than the surrounding wood.
Several options are commonly used.
PVA Wood Glue
Polyvinyl acetate (PVA) glue remains the standard choice for most cabinet doors.
Its advantages include:
- Excellent bond strength
- Easy cleanup
- Reasonable open time
- Reliable long-term performance
For indoor cabinetry, it’s difficult to beat.
Water-Resistant PVA
For kitchens, bathrooms, laundry rooms, or other areas with elevated humidity, many woodworkers choose water-resistant versions of standard wood glue.
They provide additional protection without changing the assembly process.
Polyurethane Glue
Polyurethane glue expands slightly while curing and performs well under demanding conditions.
However, it generally requires:
- More careful cleanup
- Controlled moisture
- Additional preparation
For most cabinet doors, traditional PVA glue remains the simpler and more practical choice.
Apply Glue Thoughtfully—Not Generously
One of the most common beginner mistakes is using far too much glue.
More glue does not create a stronger joint.
In fact, excessive glue simply creates:
- Messy squeeze-out
- Longer cleanup
- More sanding
- Greater finishing challenges
Instead, apply a thin, even layer to every glue surface.
Cover the joint completely without flooding it.
Good woodworking values precision over excess.
Never Glue a Floating Panel into the Frame
This is one of the most important rules in cabinet door construction.
The center panel must remain free to move.
Solid wood naturally expands and contracts across its width as humidity changes throughout the year.
If the panel is glued into the grooves, that natural movement has nowhere to go.
The result may include:
- Cracked panels
- Split rails
- Broken joints
- Warped doors
Allow the panel to float exactly as its name suggests.
The frame provides structure.
The panel provides appearance.
Each has its own role.
Assemble the Frame Methodically
Rather than rushing to complete the entire door at once, assemble the frame in a logical sequence.
A typical workflow looks like this:
- Apply glue to the first stile.
- Install the rails.
- Insert the floating panel.
- Attach the second stile.
- Confirm all joints are fully seated.
Moving calmly through each step helps prevent mistakes while reducing unnecessary stress.
Assembly should feel organized—not hurried.
Check Panel Orientation Before Closing the Frame
Many woodworkers have experienced the same frustrating realization.
The frame is fully glued.
The clamps are tightened.
Then they notice the center panel is upside down—or the grain isn’t flowing the way they intended.
Avoid that disappointment.
Before adding the final stile, pause and verify:
- Grain direction
- Decorative face
- Figure placement
- Panel orientation
A quick inspection now prevents permanent regret later.
Applying Clamping Pressure Correctly
Clamps are designed to hold joints together.
They aren’t designed to force poorly fitting joints into submission.
Apply enough pressure to close the joints completely, but avoid excessive force that can:
- Distort the frame
- Bow rails
- Twist stiles
- Squeeze out too much glue
If a joint refuses to close naturally, investigate the cause rather than tightening the clamp further.
Well-machined joinery should require surprisingly little pressure.
Choosing the Right Clamps
Several clamp styles work well for cabinet door assembly.
Popular choices include:
- Parallel clamps
- Bar clamps
- Pipe clamps
- F-style clamps
Parallel clamps are particularly popular because they distribute pressure evenly across the frame, helping maintain alignment during glue-up.
Whatever style you use, place clamps thoughtfully rather than simply adding more of them.
Balance Clamping Pressure
Whenever possible, position clamps on alternating sides of the cabinet door.
This balances pressure across the frame and reduces the chance of introducing a twist.
For larger doors, multiple clamps spaced evenly along the frame produce more consistent results than concentrating all the pressure in one area.
The goal is uniform support from every direction.
Verify the Door Is Square
As soon as the clamps are lightly tightened, check the frame for squareness.
Measure both diagonals.
If the measurements match, the frame is square.
If one diagonal is longer, gentle adjustments can usually correct the alignment before the glue begins to set.
Never assume the frame stayed square simply because the dry fit was accurate.
Always verify.
Check for Flatness
A cabinet door can be perfectly square yet still contain a slight twist.
Place the assembled frame on a known flat surface.
Look carefully.
Does every corner touch the bench?
If one corner lifts noticeably, investigate immediately.
Correcting twist during glue-up is much easier than attempting repairs after the adhesive cures.
Cleaning Glue Squeeze-Out
Small amounts of glue squeezing from the joints are completely normal.
Remove excess before it hardens.
Several methods work well:
- Damp cloth
- Plastic scraper
- Chisel after partial curing
Avoid smearing wet glue across the surrounding wood, especially on open-grained species such as oak.
Clean surfaces make finishing significantly easier later.
Give the Glue Enough Time
Patience matters.
Although modern wood glues often develop handling strength fairly quickly, complete curing takes considerably longer.
Resist the temptation to:
- Remove clamps too early.
- Begin sanding immediately.
- Machine freshly glued joints.
Allowing adequate curing time produces stronger, more reliable cabinet doors.
Sometimes the best woodworking decision is simply waiting.
What If a Joint Doesn’t Close Completely?
Stop.
Don’t assume the clamps will solve the issue.
Instead, identify the source of the problem.
Common causes include:
- Sawdust inside the joint
- Incorrect router setup
- Misaligned shoulders
- Damaged tenons
- Oversized floating panel
Fixing the actual problem almost always produces better results than forcing the frame together.
Avoid These Common Assembly Mistakes
Even experienced woodworkers occasionally make assembly errors.
Fortunately, most are preventable.
Watch for:
- Forgetting the center panel
- Gluing the floating panel
- Uneven clamp pressure
- Overtightened clamps
- Skipping the squareness check
- Rushing glue cleanup
- Removing clamps prematurely
Developing a consistent assembly routine dramatically reduces these risks.
Building Multiple Cabinet Doors Efficiently
When assembling several cabinet doors, organization becomes even more important.
Many cabinetmakers prepare:
- One glue station
- One clamping area
- One inspection table
Each completed frame moves systematically through the same workflow.
This approach reduces confusion while helping every cabinet door receive the same level of attention.
Consistency often produces better results than speed.
The Quiet Habits of Professional Cabinetmakers
Professional-quality cabinet doors rarely come from dramatic techniques.
Instead, they result from dozens of small habits repeated consistently.
Experienced cabinetmakers:
- Lay out every clamp before applying glue.
- Keep a damp cloth within reach.
- Double-check grain direction.
- Measure diagonals immediately.
- Inspect every joint before walking away.
- Clean their workbench before starting the next assembly.
None of these habits seems remarkable on its own.
Together, they produce cabinet doors that feel remarkably well made.
Assembly Is Where Preparation Pays Off
The cabinet door sitting on your bench is no longer a collection of separate components.
It has become a single, unified structure.
Its strength comes not from the glue alone, but from the careful planning, precise milling, accurate joinery, and thoughtful assembly that led to this moment.
The frame is square.
The floating panel can move naturally.
The joints fit cleanly.
The clamps have done their job.
Now it’s time to transform solid construction into beautiful craftsmanship.
In the next part, we’ll focus on sanding and surface preparation. You’ll learn how to remove machining marks, smooth every surface without rounding crisp edges, prepare the wood for stain or paint, eliminate glue residue before it becomes visible under finish, and create the flawless foundation that separates professional cabinet doors from ordinary ones.
Part 9: Sanding and Surface Preparation — Creating a Finish Worth Admiring
The cabinet door is finally assembled.
The joints are tight.
The frame is square.
The glue has cured.
At this stage, it’s tempting to think the hard work is behind you.
Many woodworkers make that assumption.
Then they apply the finish.
Suddenly, tiny scratches appear that were invisible before. Glue residue reveals itself as pale blotches beneath stain. Slight machine marks catch the light from every angle. What looked flawless on the workbench now seems strangely unfinished.
That’s because wood has a remarkable ability to hide imperfections—right up until the finish goes on.
Sanding isn’t simply about making wood feel smooth.
It’s about revealing every flaw while you still have the opportunity to fix it.
Professional cabinetmakers understand this better than anyone.
They don’t sand because they have to.
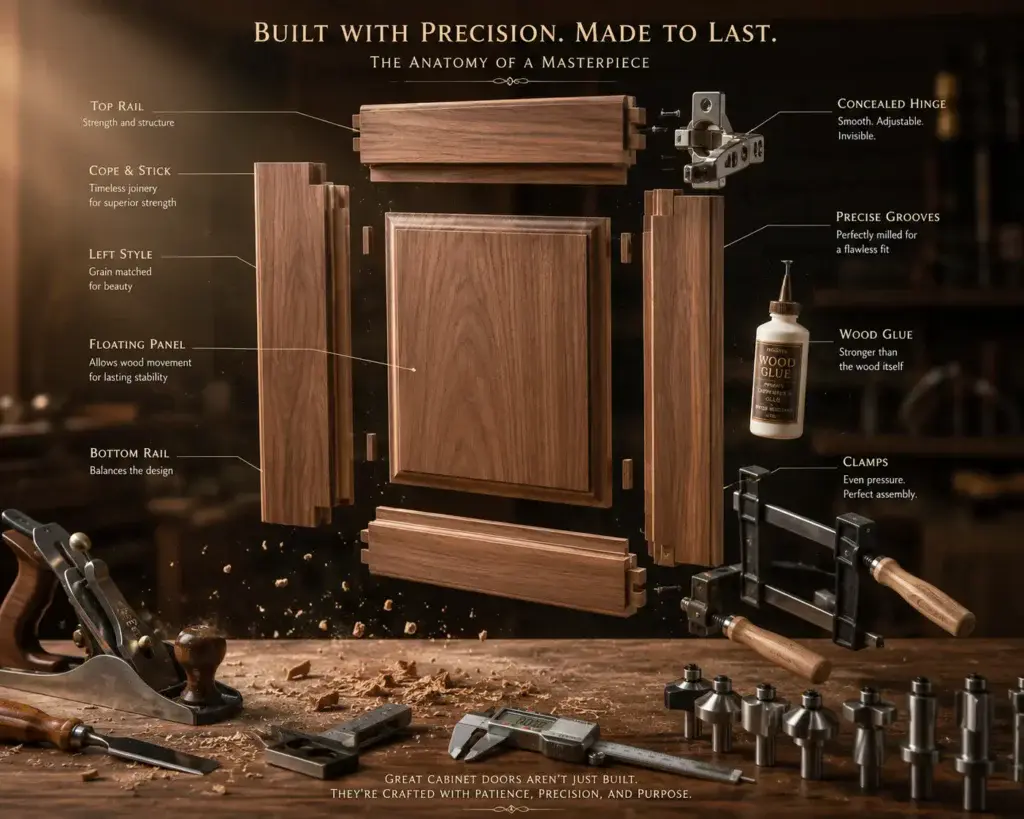
They sand because beautiful finishes begin long before the first coat is applied.
Why Surface Preparation Determines the Final Result
Imagine painting a luxury car without first smoothing the bodywork.
No matter how expensive the paint, every dent and scratch would still be visible.
Wood behaves the same way.
Stain, oil, lacquer, and polyurethane don’t hide imperfections.
They highlight them.
Every machining mark, sanding scratch, glue smear, and dent becomes more noticeable after finishing.
Surface preparation is your opportunity to make the wood look exactly the way you want it to look for years to come.
It’s far easier to spend an extra hour sanding now than to strip and refinish an entire cabinet door later.
Begin with a Careful Inspection
Before reaching for a sander, simply look.
Move the cabinet door beneath bright lighting.
View it from several angles.
Run your fingertips across the surface.
Sometimes your hands discover imperfections long before your eyes do.
Check for:
- Machine marks
- Router burn marks
- Tear-out
- Glue squeeze-out
- Small dents
- Raised grain
- Uneven joints
- Scratches
This inspection creates a roadmap for the sanding process.
You’re not sanding blindly.
You’re solving specific problems.
Remove Glue Completely Before Sanding
Glue left on the surface causes one of the most frustrating finishing problems in woodworking.
It blocks stain.
Even a nearly invisible film can create pale patches that remain obvious after the finish dries.
Inspect every joint carefully.
Look especially around:
- Rail-to-stile connections
- Panel grooves
- Inside profiles
- Corners
If glue remains, remove it before sanding begins.
Sharp chisels, cabinet scrapers, or careful scraping with a plastic tool often work better than trying to sand hardened glue away.
Clean wood accepts finish evenly.
Glue does not.
Start with the Right Sandpaper Grit
Many beginners assume rougher sandpaper works faster.
While that’s true, it also removes more material than necessary.
Always begin with the finest grit capable of removing the existing imperfections.
For most cabinet doors, the process starts with a medium grit before gradually progressing to finer abrasives.
Each successive grit removes the scratches left by the previous one.
Skipping several grit levels often leaves sanding marks that become visible only after finishing.
Patience produces smoother results.
Let the Sandpaper Do the Work
Pressing harder rarely improves sanding.
Instead, excessive pressure often creates:
- Swirl marks
- Uneven surfaces
- Rounded edges
- Premature abrasive wear
Allow the abrasive to cut naturally.
Move steadily.
Maintain even contact.
Replace worn sandpaper before it stops cutting efficiently.
Fresh abrasive saves both time and effort.
Random Orbital Sanders: Speed Without Sacrificing Quality
A random orbital sander has become one of the most valuable finishing tools in modern woodworking.
Its random motion greatly reduces visible sanding patterns while removing material efficiently.
It’s ideal for:
- Flat cabinet door panels
- Rails
- Stiles
- Large frame surfaces
- Finish preparation
Keep the sander moving continuously.
Stopping in one location while the machine runs may leave shallow depressions that become visible later.
Smooth, overlapping passes produce the most consistent results.
Hand Sanding Still Matters
Power sanders are excellent, but they can’t reach every surface.
Hand sanding remains essential for:
- Inside corners
- Routed profiles
- Decorative edges
- Beads
- Coves
- Chamfers
Wrapping sandpaper around a sanding block helps maintain crisp, flat surfaces while preventing uneven pressure.
For detailed profiles, flexible foam sanding pads often conform beautifully to the shape without damaging delicate edges.
Sand with the Grain Whenever Possible
Wood grain reflects light differently depending on how it’s sanded.
Whenever practical, finish each sanding stage by following the direction of the grain.
This simple habit minimizes visible scratches and creates a more natural appearance after finishing.
Cross-grain scratches may seem invisible on unfinished wood.
After stain or clear finish, they often become surprisingly obvious.
Protect Crisp Edges
Sharp, clean edges contribute greatly to the professional appearance of cabinet doors.
Aggressive sanding can quickly soften those carefully machined lines.
Use a light touch near:
- Frame corners
- Decorative profiles
- Panel edges
- Cope-and-stick joints
Your goal is to smooth the surface—not reshape the woodworking you’ve already completed.
Well-defined edges help cabinet doors look crisp and intentional.
Dealing with Router Burn Marks
Dense hardwoods such as maple and cherry occasionally develop dark burn marks during routing.
Don’t ignore them.
Although some may disappear beneath dark stain, many become even more noticeable under clear finishes.
Remove burn marks completely before moving to finer sanding grits.
It’s much easier now than after the finish has been applied.
Raise the Grain Before the Final Sanding
If your cabinet doors will receive a water-based finish, there’s one additional step worth considering.
Lightly dampen the surface with a clean cloth.
As the wood dries, tiny fibers stand upright.
A final light sanding removes those raised fibers before finishing begins.
The result is a smoother surface after the first coat of finish, reducing the amount of sanding required between coats.
Preparing Cabinet Doors for Paint
Paint reveals different imperfections than stain.
Because it covers the grain, painted cabinet doors demand exceptionally smooth surfaces.
Pay particular attention to:
- Filled nail holes
- Tiny dents
- Milling marks
- Surface scratches
- Joint transitions
Every flaw hidden beneath primer tends to become more noticeable after multiple coats of paint.
Smooth preparation leads to smoother paint.
Preparing Cabinet Doors for Stain
Stain tells a different story.
Instead of hiding the wood, it celebrates it.
That means surface consistency becomes especially important.
Uneven sanding often produces:
- Blotchy color
- Dark patches
- Light spots
- Visible scratch patterns
Take your time.
A consistent surface accepts stain consistently.
The reward is a finish that enhances the natural beauty of the wood rather than distracting from it.
Remove Every Trace of Dust
Fine dust settles everywhere.
If left behind, it mixes with the finish to create rough surfaces and tiny imperfections.
Before finishing, remove dust from every area, including:
- Flat surfaces
- Inside profiles
- Panel grooves
- Joinery corners
- Back sides of the door
Many cabinetmakers use a combination of:
- Vacuum
- Soft brush
- Microfiber cloth
- Tack cloth
- Compressed air where appropriate
A clean surface is one of the simplest ways to improve finishing results.
Inspect Under Different Lighting
Workshop lighting doesn’t always reveal every imperfection.
Move the cabinet door beneath different light sources.
Natural daylight often exposes flaws hidden under overhead shop lights.
Examine the surface from:
- Straight ahead
- Low angles
- Side lighting
- Bright reflected light
These changing perspectives make subtle scratches and uneven sanding much easier to spot.
Professional finishers inspect constantly because they know light never lies.
Perform One Final Quality Check
Before opening the finish, slow down one last time.
Inspect the entire cabinet door carefully.
Ask yourself:
- Are all glue marks gone?
- Do the joints feel smooth?
- Are the profiles clean?
- Are the edges crisp?
- Is the panel free of scratches?
- Has all dust been removed?
This final inspection often takes only a few minutes, yet it can dramatically improve the finished project.
Common Sanding Mistakes to Avoid
Even experienced woodworkers occasionally fall into bad habits.
Watch for:
- Skipping sanding grits
- Pressing too hard
- Sanding across the grain
- Rounding sharp edges
- Leaving glue residue
- Using worn-out sandpaper
- Forgetting dust removal
- Rushing into finishing
Most finishing problems begin here—not with the finish itself.
The Difference Between Good and Exceptional Cabinet Doors
Outstanding cabinet doors rarely look extraordinary because of expensive finishes alone.
They look extraordinary because the surface underneath has been prepared with care.
Every minute spent removing scratches, smoothing grain, protecting crisp profiles, and eliminating glue residue creates the foundation for everything that follows.
Finishing products don’t create beauty.
They reveal the beauty that’s already there.
With the sanding complete, the cabinet door is finally ready for its transformation.
In the next part, we’ll explore professional finishing techniques—from choosing between stain, paint, oil, lacquer, and polyurethane to applying flawless protective coats, avoiding common finishing defects, and bringing out the natural beauty of your cabinet doors with a finish that’s as durable as it is beautiful.
Part 10: Finishing Cabinet Doors Like a Professional — Beautiful, Durable Results That Last
At last, the cabinet door looks complete.
The joinery is tight.
The sanding is flawless.
The grain glows beneath the workshop lights.
It might even be tempting to stop here.
After all, unfinished wood has a beauty all its own.
But anyone who has built fine cabinetry knows the truth.
Without a proper finish, even the finest cabinet door remains unfinished.
Wood is constantly exposed to its environment. It absorbs moisture from humid air, releases it during dry seasons, collects fingerprints, encounters spills, and withstands thousands of hands opening and closing it over the years.
A quality finish isn’t simply decoration.
It’s protection.
Done well, it enhances the natural beauty of the wood while shielding it from everyday wear. Done poorly, it can hide beautiful grain beneath thick plastic-looking layers, develop runs and brush marks, or begin wearing away long before the cabinet doors should.
The difference rarely comes down to expensive products.
It comes down to thoughtful preparation, patience, and choosing the finish that matches both the wood and the way the cabinets will be used.
Decide What You Want the Finish to Accomplish
Before opening a single can, ask yourself one important question.
What do you want the cabinet doors to look like years from now?
Some finishes create a warm, natural appearance that allows you to feel the texture of the wood.
Others produce a deep, glass-like surface that reflects light beautifully.
Some prioritize durability above all else.
Others emphasize natural beauty.
The best finish is the one that fits your project—not simply the one that’s currently popular.
Clear Finishes: Let the Wood Speak for Itself
If you’ve invested in beautiful hardwood, chances are you’ll want people to see it.
Clear finishes preserve the natural character of species such as:
- Walnut
- Cherry
- Maple
- White oak
- Ash
Rather than hiding the grain, they deepen color, increase contrast, and highlight the unique figure within each board.
For many cabinetmakers, that’s the greatest reward of working with solid wood.
Polyurethane: Reliable Protection for Everyday Use
Polyurethane remains one of the most widely used cabinet finishes for a reason.
It offers an excellent balance of:
- Durability
- Moisture resistance
- Scratch resistance
- Availability
- Ease of application
Kitchen cabinet doors experience constant handling, making polyurethane an excellent choice for many homes.
It forms a tough protective layer capable of standing up to years of regular use.
Oil-Based Polyurethane
Traditional oil-based polyurethane produces a warm amber tone that gradually deepens with age.
Advantages include:
- Excellent durability
- Rich appearance
- Smooth leveling
- Long service life
It’s particularly attractive on woods such as cherry, walnut, and oak where the warmer color complements the natural grain.
The primary trade-off is a longer drying time.
Patience, however, often rewards the woodworker with a beautiful finish.
Water-Based Polyurethane
Water-based polyurethane has become increasingly popular, especially for contemporary cabinetry.
It offers:
- Fast drying
- Low odor
- Excellent clarity
- Minimal yellowing
Because it remains nearly colorless, it’s an outstanding choice for maple, birch, and painted cabinet doors where maintaining the original color is desirable.
Its quick drying time also allows projects to progress more efficiently.
Hardwax Oil: A Natural, Furniture-Like Feel
Some woodworkers prefer a finish that feels less like plastic and more like wood.
Hardwax oils provide exactly that experience.
Instead of creating a thick surface film, they penetrate the wood while leaving a thin protective layer.
Benefits include:
- Natural appearance
- Pleasant tactile feel
- Easy spot repairs
- Low sheen
- Beautiful grain enhancement
Many custom furniture makers appreciate hardwax oil because it preserves the character of the wood rather than covering it.
Lacquer: The Choice of Many Professional Cabinet Shops
Walk into a commercial cabinet shop and there’s a good chance you’ll find lacquer being sprayed.
Lacquer offers several advantages:
- Extremely fast drying
- Excellent clarity
- Easy repairability
- Smooth professional appearance
Its rapid drying allows multiple coats to be applied in a single day under proper conditions.
The trade-off is that lacquer typically requires spray equipment and careful ventilation.
Conversion Varnish: Built for Demanding Environments
High-end commercial cabinetry often relies on conversion varnish.
This professional-grade finish provides outstanding:
- Chemical resistance
- Moisture protection
- Scratch resistance
- Long-term durability
Because it requires careful mixing and specialized equipment, it’s generally reserved for professional production shops rather than occasional hobby projects.
Painted Cabinet Doors
Paint continues to dominate modern kitchen design.
It offers remarkable flexibility while allowing virtually any color palette imaginable.
Popular choices include:
- White
- Cream
- Sage green
- Navy blue
- Soft gray
- Charcoal
- Black
Paint also creates consistency across different wood species because the grain becomes far less prominent.
The secret to beautiful painted cabinetry isn’t the paint itself.
It’s the preparation underneath.
Prime Before You Paint
Primer creates the foundation for a durable painted finish.
A quality primer:
- Improves adhesion
- Seals the wood
- Reduces grain raise
- Promotes even color
- Minimizes blotching
Skipping primer often leads to uneven coverage and reduced durability.
Good paint begins with good primer.
Staining Cabinet Doors
Stain changes the color of the wood while preserving its natural grain.
It’s an excellent choice when you want additional warmth or deeper contrast without hiding the character of the lumber.
Different species respond differently.
For example:
- Walnut often requires little or no stain.
- Cherry develops rich color naturally over time.
- Oak accepts stain exceptionally well.
- Maple can become blotchy unless properly prepared.
Testing stain on scrap pieces from the same board is always worthwhile.
Wood has a way of surprising even experienced builders.
Gel Stains vs. Traditional Stains
Both products have their strengths.
Traditional Stain
Provides:
- Deep penetration
- Natural appearance
- Excellent grain definition
Gel Stain
Offers:
- Greater control
- Reduced blotching
- More consistent color
- Excellent performance on difficult woods
Choosing between them depends largely on the wood species and the appearance you’re trying to achieve.
Choosing the Right Sheen
Finish isn’t only about color.
Sheen dramatically changes how cabinet doors look.
Common options include:
Matte
- Soft appearance
- Minimal reflections
- Contemporary feel
Satin
- Gentle luster
- Easy maintenance
- Popular for kitchens
Semi-Gloss
- Noticeable shine
- Easy cleaning
- Bright appearance
Gloss
- Highly reflective
- Dramatic visual impact
- Reveals every surface imperfection
Many cabinetmakers prefer satin because it balances elegance with practicality.
Brushing vs. Spraying
Both application methods can produce excellent results.
Brushing
Advantages include:
- Minimal equipment
- Lower cost
- Excellent for small projects
- Easy touch-ups
Spraying
Provides:
- Exceptionally smooth finishes
- Faster production
- Uniform coverage
- Minimal brush marks
Spraying requires more equipment and preparation, but it often delivers the clean, factory-like appearance associated with custom cabinetry.
Apply Thin Coats
One of the biggest finishing mistakes is trying to build protection too quickly.
Heavy coats often create:
- Runs
- Sags
- Uneven drying
- Dust contamination
Instead, apply several thin coats.
Each layer builds upon the previous one while producing a stronger, more attractive finish.
Thin coats almost always outperform thick ones.
Sand Lightly Between Coats
Most film finishes benefit from gentle sanding between applications.
This step:
- Removes dust nibs
- Levels minor imperfections
- Improves adhesion
- Creates a smoother final surface
Use only enough pressure to smooth the finish.
The goal isn’t to remove the previous coat—only to prepare it for the next.
Create a Dust-Free Finishing Area
No finish dries well in a cloud of sawdust.
Before applying any finish:
- Vacuum the workspace.
- Clean nearby surfaces.
- Remove airborne dust.
- Wipe the cabinet doors carefully.
- Allow the air to settle.
Many finishing defects begin not with the finish itself, but with dust landing on freshly coated surfaces.
A clean environment dramatically improves results.
Give the Finish Time to Cure
Dry and cured are not the same thing.
A cabinet door may feel dry to the touch long before the finish reaches full hardness.
Avoid:
- Stacking finished doors.
- Installing hardware immediately.
- Heavy handling.
- Cleaning with chemicals.
Allow the finish to cure fully according to the manufacturer’s recommendations.
Patience during curing often determines long-term durability.
Common Finishing Problems—and How to Prevent Them
Even experienced woodworkers occasionally encounter finishing issues.
Fortunately, most are avoidable.
Watch for:
- Brush marks from overworking the finish.
- Runs caused by heavy coats.
- Dust nibs from poor shop cleanliness.
- Blotchy stain from uneven surface preparation.
- Bubbles caused by shaking the finish or brushing too aggressively.
- Uneven sheen from inconsistent application.
Most finishing defects begin before the finish dries—not after.
The Finish Protects More Than Appearance
A beautiful finish certainly makes cabinet doors more attractive.
But its greatest contribution is often invisible.
It helps protect against:
- Moisture
- Daily wear
- Household cleaners
- Food splashes
- Fingerprints
- Minor scratches
- Seasonal humidity changes
The finish becomes the cabinet door’s first line of defense.
Applied properly, it quietly preserves your craftsmanship year after year.
Beautiful Wood Deserves a Beautiful Finish
By this stage, you’ve transformed rough lumber into elegant cabinet doors through careful planning, precise joinery, thoughtful assembly, meticulous sanding, and patient preparation.
The finish is the final step that brings every decision together.
It enriches the grain, protects the wood, and gives the cabinet doors the appearance they’ll carry for years to come.
Whether you’ve chosen the warm glow of oil-based polyurethane, the crystal-clear protection of a water-based finish, the natural feel of hardwax oil, the smooth elegance of lacquer, or a flawlessly painted surface, your craftsmanship now has the protection it deserves.
In the next part, we’ll move from the workshop to the cabinet itself. You’ll learn how to install cabinet doors with precision, adjust concealed hinges for perfect alignment, create consistent reveals, mount knobs and pulls accurately, troubleshoot common installation issues, and achieve the clean, balanced appearance that makes custom cabinetry look truly professional.
Part 11: Installing Cabinet Doors — Perfect Alignment, Smooth Operation, and a Professional Finish
After countless hours of planning, milling, joinery, assembly, sanding, and finishing, the cabinet doors are finally ready for the moment they’ve been built for.
Installation.
It may seem like the easiest stage of the entire project.
After all, the woodworking is finished.
The cabinet doors are complete.
All that’s left is attaching them to the cabinet.
In reality, installation requires just as much patience as every stage that came before it.
A beautifully built cabinet door can look surprisingly ordinary if it’s slightly crooked. Uneven gaps immediately catch the eye. A hinge that’s only a fraction of a millimeter out of adjustment can prevent a door from closing smoothly. Hardware installed just slightly off-center can make an otherwise flawless project feel unfinished.
The encouraging news is that installation is also where small adjustments create dramatic improvements.
Professional-looking cabinetry isn’t the result of luck.
It’s the result of careful alignment.
Prepare the Cabinets Before Hanging the Doors
Before reaching for the hinges, inspect the cabinet itself.
The cabinet should be:
- Securely installed
- Level
- Plumb
- Square
- Properly anchored
Even perfectly built cabinet doors cannot compensate for cabinets that are twisted or out of alignment.
Take a few minutes to verify the cabinet structure first.
Doing so makes the installation process significantly easier.
Organize Every Door Before Installation
If you’ve built multiple cabinet doors, now is the time to make sure each one returns to its intended location.
Lay them out in order.
Double-check:
- Grain matching
- Door orientation
- Left and right pairs
- Finished surfaces
- Hardware locations
Labeling every component during construction pays off here.
Organization reduces mistakes and speeds up installation.
Choosing the Right Hinges
Cabinet hinges have evolved considerably over the years.
Today, concealed European-style hinges dominate modern cabinetry because they offer:
- Hidden appearance
- Smooth operation
- Multiple adjustment directions
- Soft-close compatibility
- Clean installation
Traditional exposed hinges still have their place in rustic, farmhouse, and period-style cabinetry, but concealed hinges provide unmatched flexibility during adjustment.
Understanding Concealed European Hinges
Modern concealed hinges allow adjustments in three directions.
This flexibility makes it possible to fine-tune cabinet door alignment long after installation.
Most hinges allow adjustment for:
- Side-to-side movement
- Height
- Depth
Rather than removing the entire door, you simply make small adjustments until the gaps become perfectly consistent.
This system has transformed cabinet installation.
Drilling Accurate Hinge Cup Holes
Concealed hinges require precisely positioned cup holes.
Accuracy matters.
A properly drilled hole allows the hinge to sit:
- Flat
- Centered
- Securely mounted
Using a drill press or a high-quality drilling jig greatly improves consistency, especially when building multiple cabinet doors.
Always verify measurements on scrap material before drilling finished doors.
One careful test can save an expensive mistake.
Mount the Hinges Before Hanging the Door
Most woodworkers find installation easier by attaching the hinges to the cabinet doors first.
Once secured, the complete door can be positioned against the cabinet before fastening the mounting plates.
Working in this sequence provides greater control while reducing the chance of accidental damage to freshly finished surfaces.
Supporting Larger Cabinet Doors
Large hardwood cabinet doors can become surprisingly heavy.
Instead of trying to support the entire weight by hand, use temporary support beneath the door during installation.
Helpful options include:
- Wooden spacer blocks
- Adjustable stands
- Cabinet lifts
- Scrap plywood supports
These simple aids make alignment much easier while preventing unnecessary strain on both the hinges and the installer.
Creating Consistent Reveals
One characteristic immediately distinguishes custom cabinetry from rushed installation.
Even reveals.
The reveal is the visible gap surrounding each cabinet door.
When those gaps remain consistent, the entire cabinet appears balanced and professionally built.
Uneven reveals create the opposite impression.
Check every side carefully.
Small adjustments often produce dramatic improvements.
Adjusting Concealed Hinges
This is where concealed hinges truly shine.
If the cabinet door appears:
- Too high
- Too low
- Too close
- Too far away
- Uneven between neighboring doors
Small hinge adjustments usually solve the problem.
Work methodically.
Adjust only one direction at a time.
After each adjustment, close the door and evaluate the result before making additional changes.
Patience produces remarkably clean alignment.
Aligning Double Cabinet Doors
Double doors require extra attention because viewers naturally compare them to one another.
Focus on:
- Equal height
- Matching reveals
- Center gap consistency
- Flush surfaces
- Parallel edges
Stand several feet away while evaluating alignment.
Small inconsistencies become easier to notice from normal viewing distance than from just a few inches away.
Soft-Close Hinges: A Small Upgrade with a Big Impact
Soft-close hinges have become one of the most appreciated cabinet upgrades.
They:
- Prevent slamming
- Reduce wear
- Improve longevity
- Create a premium feel
Installation is nearly identical to standard concealed hinges, making them an easy choice for many custom cabinet projects.
Installing Knobs and Pulls
Cabinet hardware should complement the design rather than compete with it.
Consistency matters more than style.
Before drilling mounting holes, verify:
- Height
- Horizontal alignment
- Vertical alignment
- Edge distance
- Symmetry
Many cabinetmakers rely on drilling templates or hardware jigs to maintain perfect consistency across every cabinet door.
Use a Hardware Jig for Repeatability
Measuring every knob individually invites small errors.
A hardware installation jig removes guesswork.
Benefits include:
- Faster installation
- Consistent placement
- Greater accuracy
- Reduced measuring
Especially on kitchens with dozens of cabinet doors, a quality jig quickly pays for itself.
Prevent Tear-Out While Drilling
Freshly finished cabinet doors deserve careful handling.
When drilling hardware holes:
- Support the back side with scrap wood.
- Use sharp drill bits.
- Drill steadily.
- Avoid excessive pressure.
Backing boards dramatically reduce chip-out around the exit hole.
Small precautions preserve hours of careful finishing work.
Check Every Door Through Its Full Range of Motion
A cabinet door should move effortlessly.
Open and close each one repeatedly.
Observe whether it:
- Rubs neighboring doors
- Contacts cabinet frames
- Binds during movement
- Closes completely
- Opens smoothly
Tiny adjustments now prevent years of daily annoyance later.
Troubleshooting Common Installation Problems
Even well-built cabinet doors occasionally require fine-tuning.
Common issues include:
Uneven Gaps
Usually corrected through hinge adjustments.
Door Won’t Stay Closed
Often caused by hinge alignment or magnetic catch placement.
Rubbing Cabinet Frame
Usually resolved by adjusting hinge depth or side positioning.
Misaligned Double Doors
Requires gradual adjustment of both doors rather than correcting only one.
Approach problems methodically.
Most installation issues have straightforward solutions.
Perform a Final Inspection
Once every cabinet door has been installed, step back.
Walk around the room.
Look from different angles.
Evaluate:
- Overall alignment
- Reveal consistency
- Hardware placement
- Door operation
- Visual balance
Sometimes a tiny adjustment becomes obvious only after viewing the entire cabinet rather than a single door.
This final inspection separates good work from exceptional craftsmanship.
Cleaning After Installation
Fresh installation often leaves behind fingerprints, pencil marks, and light dust.
Before calling the project complete:
- Remove fingerprints.
- Wipe away dust.
- Polish hardware.
- Vacuum cabinet interiors.
- Clean surrounding work areas.
The final presentation should reflect the same care that went into the construction.
Small Details Create a Luxury Appearance
Many people assume luxury cabinetry comes from expensive wood.
In reality, they’re often noticing something else.
Precision.
Cabinet doors align perfectly.
Reveals remain consistent.
Hardware sits exactly where expected.
Every door closes smoothly.
None of these details attracts attention individually.
Together, they create the unmistakable impression of quality craftsmanship.
Your Cabinet Doors Are Finally Home
The transformation is complete.
What began as rough lumber has become a set of carefully crafted cabinet doors that fit beautifully, operate smoothly, and enhance the character of the room.
Every measurement, every joint, every sanding session, and every finishing decision has led to this moment.
Yet quality craftsmanship doesn’t end with installation.
Like any finely made piece of woodworking, cabinet doors benefit from proper care over time.
In the final part of this guide, we’ll explore how to maintain and protect your cabinet doors for decades. You’ll learn the best cleaning practices, how to prevent moisture damage and warping, repair common wear and tear, refresh aging finishes, troubleshoot long-term issues, and keep your handcrafted cabinet doors looking as impressive years from now as they do today.
Part 12: Maintaining Cabinet Doors for a Lifetime of Beauty, Performance, and Everyday Use
The last screw has been tightened.
Every reveal is even.
The hinges are perfectly adjusted.
The finish has fully cured, and your cabinet doors swing open with the smooth, satisfying feel that only careful craftsmanship can deliver.
At this point, many woodworking projects reach their end.
In reality, your cabinet doors are just beginning their life.
Unlike furniture that may sit quietly in a corner, cabinet doors become part of your daily routine. They are opened every morning, closed every evening, wiped clean after meals, exposed to changing humidity, and touched thousands of times each year.
Over time, even the best-built cabinet doors begin to show signs of life.
The good news is that quality cabinetry is designed to age gracefully.
With a little regular care, your cabinet doors can continue looking beautiful—and functioning flawlessly—for decades.
Maintenance isn’t about constant work.
It’s about developing a few simple habits that protect the craftsmanship you’ve invested so much time creating.
Why Cabinet Door Maintenance Matters
Wood is a remarkable material because it’s alive in a sense.
Even after it’s been milled, assembled, and finished, it continues responding to its environment.
Seasonal humidity changes.
Temperature fluctuations.
Daily use.
Exposure to sunlight.
All of these influence how wood behaves over time.
Proper maintenance doesn’t stop these natural processes.
Instead, it helps your cabinet doors adapt without developing unnecessary wear or damage.
A few minutes of care several times a year often prevent repairs that could otherwise require hours of work.
Clean Cabinet Doors the Right Way
One of the simplest maintenance tasks is also one of the most important.
Regular cleaning.
Kitchen cabinets naturally collect:
- Fingerprints
- Dust
- Cooking oils
- Food splashes
- Water spots
Left untreated, these contaminants gradually dull the finish.
For routine cleaning, use:
- A soft microfiber cloth
- Mild soap diluted in warm water
- A clean dry cloth for drying
Gentle cleaning removes everyday dirt without damaging the protective finish.
Avoid Harsh Cleaning Products
Not every household cleaner belongs on fine cabinetry.
Avoid products containing:
- Ammonia
- Bleach
- Strong solvents
- Abrasive powders
- Steel wool
These materials can gradually damage both painted and clear finishes.
When in doubt, choose the gentlest cleaning solution capable of removing the dirt.
Your finish will last significantly longer.
Moisture Is Wood’s Greatest Long-Term Challenge
Cabinet doors are designed to handle normal humidity.
Standing water is another matter.
Always wipe away:
- Sink splashes
- Dishwasher steam condensation
- Beverage spills
- Wet towels
- Excessive cooking moisture
Allowing moisture to remain against wood for extended periods increases the risk of swelling, finish damage, and long-term movement.
A few seconds with a dry cloth often prevents much larger problems.
Keep an Eye on Seasonal Humidity
Wood naturally expands during humid weather and contracts during drier months.
Small seasonal changes are completely normal.
Maintaining a reasonably stable indoor environment helps reduce excessive movement.
If your home experiences dramatic humidity swings, a humidifier or dehumidifier may help create more consistent conditions throughout the year.
Stable environments promote stable cabinetry.
Protect Cabinet Doors from Direct Sunlight
Natural light brings warmth into a home.
It also affects wood.
Over time, prolonged exposure to direct sunlight can:
- Fade painted finishes
- Darken certain hardwoods
- Alter stain color
- Reduce finish longevity
Cherry, for example, naturally develops a deeper, richer tone as it ages, while other woods may lighten or change differently.
If strong sunlight reaches your cabinets every day, consider using blinds, curtains, or UV-filtering window films during the brightest hours.
Inspect Hardware Periodically
Cabinet doors experience constant movement.
Over time, screws may loosen slightly.
Every few months, inspect:
- Hinges
- Mounting plates
- Knobs
- Pulls
- Decorative hardware
A quick tightening often prevents unnecessary wear while keeping doors aligned correctly.
Routine inspection takes only minutes.
Adjust Hinges When Necessary
Even high-quality concealed hinges occasionally require minor adjustments after years of use.
If a cabinet door begins to:
- Rub adjacent doors
- Sag slightly
- Develop uneven reveals
- Fail to close properly
Don’t assume the cabinet has failed.
Small hinge adjustments usually restore perfect alignment.
One advantage of modern European hinges is that these corrections are quick and straightforward.
Repair Minor Scratches Before They Grow
Everyday life eventually leaves small marks.
Fortunately, many minor scratches are easy to address.
Depending on the finish, simple repairs may involve:
- Touch-up markers
- Wax repair sticks
- Matching stain
- Spot-applied clear finish
Repairing small imperfections early prevents them from becoming larger, more noticeable problems.
Refreshing Clear Finishes
Over many years, frequently touched areas may begin showing signs of wear.
Rather than waiting until the finish completely fails, consider refreshing it while the protective coating is still largely intact.
A light cleaning followed by careful maintenance coats—when appropriate for the original finish—can extend the life of cabinet doors considerably.
Preventive maintenance is almost always easier than complete refinishing.
Caring for Painted Cabinet Doors
Painted cabinetry benefits from many of the same maintenance habits as natural wood.
Keep painted surfaces looking their best by:
- Cleaning gently
- Avoiding impacts
- Touching up chips promptly
- Preventing prolonged moisture exposure
Modern cabinet paints are remarkably durable, but they still appreciate thoughtful care.
Repairing Small Dents
Minor dents don’t always require extensive repairs.
For solid wood cabinet doors, some shallow dents can often be reduced by carefully introducing moisture and controlled heat, allowing compressed wood fibers to swell back toward their original shape.
Always test repair methods in an inconspicuous area first, especially on finished surfaces.
Knowing when to repair—and when to leave natural character alone—is part of experienced woodworking.
Refinishing Cabinet Doors
Eventually, even the finest finishes may require renewal.
Fortunately, quality cabinet doors are built to be refinished.
Typical refinishing projects include:
- Light sanding
- Surface cleaning
- Minor repairs
- New stain if desired
- Fresh protective topcoats
Solid wood cabinetry often becomes even more beautiful after refinishing because the craftsmanship underneath remains unchanged.
Replacing a Damaged Center Panel
One advantage of traditional frame-and-panel construction is serviceability.
Because the center panel floats inside the frame, it can often be replaced without rebuilding the entire cabinet door.
This thoughtful design has allowed handcrafted cabinetry to remain repairable for generations.
It’s another reason frame-and-panel construction continues to stand the test of time.
Watch for Early Warning Signs
Small problems rarely remain small forever.
Periodically inspect your cabinet doors for:
- Loose joints
- Finish wear
- Moisture damage
- Warping
- Hardware movement
- Cracks
- Unusual gaps
Addressing issues early usually requires far less effort than major repairs later.
Common Problems and Their Solutions
Most long-term cabinet door issues have practical solutions.
Warped Door
Possible causes:
- Excess moisture
- Poor storage
- Improper finishing
Loose Joint
Often corrected through careful repair before significant movement develops.
Sticky Door
Usually caused by seasonal expansion or hinge adjustment rather than structural failure.
Worn Finish
Often resolved through cleaning, maintenance, or refinishing depending on the severity.
Most cabinet doors continue serving beautifully for decades with only occasional attention.
Cabinet Doors That Grow More Beautiful with Age
One of the greatest pleasures of woodworking is watching handcrafted pieces develop character.
Unlike disposable furniture, quality cabinetry doesn’t become obsolete.
It matures.
Tiny signs of use become reminders of family meals, celebrations, and everyday life.
The goal isn’t to keep cabinet doors looking brand new forever.
The goal is to help them age with dignity.
Well-maintained wood develops a warmth that manufactured materials often struggle to replicate.
Your Skills Don’t End with This Project
By completing this guide, you’ve followed the same journey that countless cabinetmakers have taken for generations.
You learned how to:
- Choose the right cabinet door style.
- Select appropriate wood species.
- Measure accurately.
- Plan every component.
- Prepare rough lumber.
- Build strong joinery.
- Assemble the frame correctly.
- Sand with precision.
- Apply professional-quality finishes.
- Install cabinet doors accurately.
- Maintain them for decades.
Those aren’t simply techniques for one project.
They’re woodworking skills you’ll carry into every future build, whether you’re crafting kitchen cabinets, bathroom vanities, built-in bookcases, furniture, or custom storage for your own home.
Every cabinet door you build from now on will benefit from the experience you’ve gained here.
Frequently Asked Questions
What is the easiest cabinet door style for beginners?
Shaker cabinet doors are generally considered the best starting point. Their clean, straightforward design allows beginners to focus on accurate measuring, solid joinery, and careful assembly without the added complexity of elaborate decorative profiles.
What wood is best for cabinet doors?
There isn’t a single perfect species for every project.
Maple is an excellent all-around choice for painted or contemporary cabinetry, white oak is prized for its strength and distinctive grain, cherry develops beautiful color as it ages, and walnut offers a naturally rich appearance. The ideal choice depends on your budget, design preferences, and the finish you plan to apply.
Should cabinet door panels be glued into the frame?
No.
Traditional frame-and-panel construction relies on floating panels that are free to expand and contract with seasonal humidity changes. Gluing the panel into the grooves can lead to cracks, warped doors, or failed joints over time.
What’s the strongest joint for cabinet doors?
Mortise-and-tenon joinery has long been regarded as one of the strongest methods. Cope-and-stick joints are also extremely durable and are widely used in professional cabinet shops because they combine strength, accuracy, and efficient production.
Is hardwood always better than softwood?
For most kitchen and bathroom cabinetry, hardwood provides better durability, stability, and resistance to everyday wear. Softwoods such as pine remain excellent choices for rustic, farmhouse, and painted projects where occasional dents contribute to the desired character.
Can I build cabinet doors with basic tools?
Yes.
Many beautiful cabinet doors have been built with a modest collection of well-maintained tools. While machines like jointers, planers, and router tables improve efficiency and consistency, careful measuring, sharp tools, and good technique are far more important than owning a large workshop.
How long should a quality cabinet door last?
A well-built solid wood cabinet door that’s properly finished and maintained can remain functional and attractive for several decades. Many handcrafted cabinet doors continue serving homes for generations with only minor maintenance and occasional refinishing.
What’s the biggest mistake beginners make?
Rushing.
Most problems stem from skipping careful preparation, inaccurate measurements, poorly milled lumber, or trying to hurry glue-up and finishing. Taking your time at every stage consistently produces better results than trying to work faster.
Bonus: Professional Cabinetmaker’s 15-Point Pre-Installation Checklist
Before you install your finished cabinet doors, take a few minutes to review this checklist. Professional cabinetmakers rely on routines like this to catch small issues before they become visible after installation.
✓ Construction
- All joints are tight and fully cured.
- The cabinet door is perfectly square.
- The frame sits flat without any twist.
- The floating panel moves freely inside the grooves.
✓ Surface Preparation
- All glue residue has been removed.
- Every surface has been sanded evenly.
- Decorative profiles are smooth and crisp.
- Dust has been completely removed.
✓ Finish
- The finish has fully cured.
- The sheen is even across the entire door.
- No runs, drips, dust nibs, or dry spots remain.
✓ Hardware Preparation
- Hinge cup holes are accurately drilled.
- Hardware locations have been carefully measured.
- Screws, hinges, and mounting plates are ready.
✓ Final Inspection
- Grain patterns are oriented correctly.
- The cabinet door has been checked under good lighting.
- Every measurement has been verified one final time.
Spending just a few extra minutes on this inspection can prevent hours of adjustment later. It’s a simple habit, but it’s one that consistently separates professional-quality cabinetry from projects that merely look finished.
Products / Tools / Resources
The right tools won’t replace careful craftsmanship, but they can make the process smoother, safer, and more enjoyable. If you’re planning to build more cabinet doors in the future, consider investing in quality equipment over time rather than all at once.
Useful additions to your workshop include:
- A reliable table saw with an accurate fence system
- A quality plunge or fixed-base router
- A router table with cabinet door bit sets
- Premium carbide saw blades
- Parallel clamps for glue-ups
- Random orbital sanders with quality abrasives
- Combination squares and precision measuring tools
- Moisture meters for checking lumber
- Drill guides or hinge boring jigs
- Dust collection equipment for a cleaner, healthier workshop
- High-quality wood glue and finishing supplies
- Protective equipment including safety glasses, hearing protection, and a dust respirator
Remember that the most valuable tool in any workshop isn’t the newest machine—it’s the knowledge and patience of the person using it. With the techniques you’ve learned throughout this guide, you’ll be well prepared to build cabinet doors that not only look professional on the day they’re installed but continue performing beautifully for many years to come.