
Long boards have a way of revealing a poor saw setup. One end dips, the mark slips out of view, and you find yourself trying to steady the work while lining up the cut.
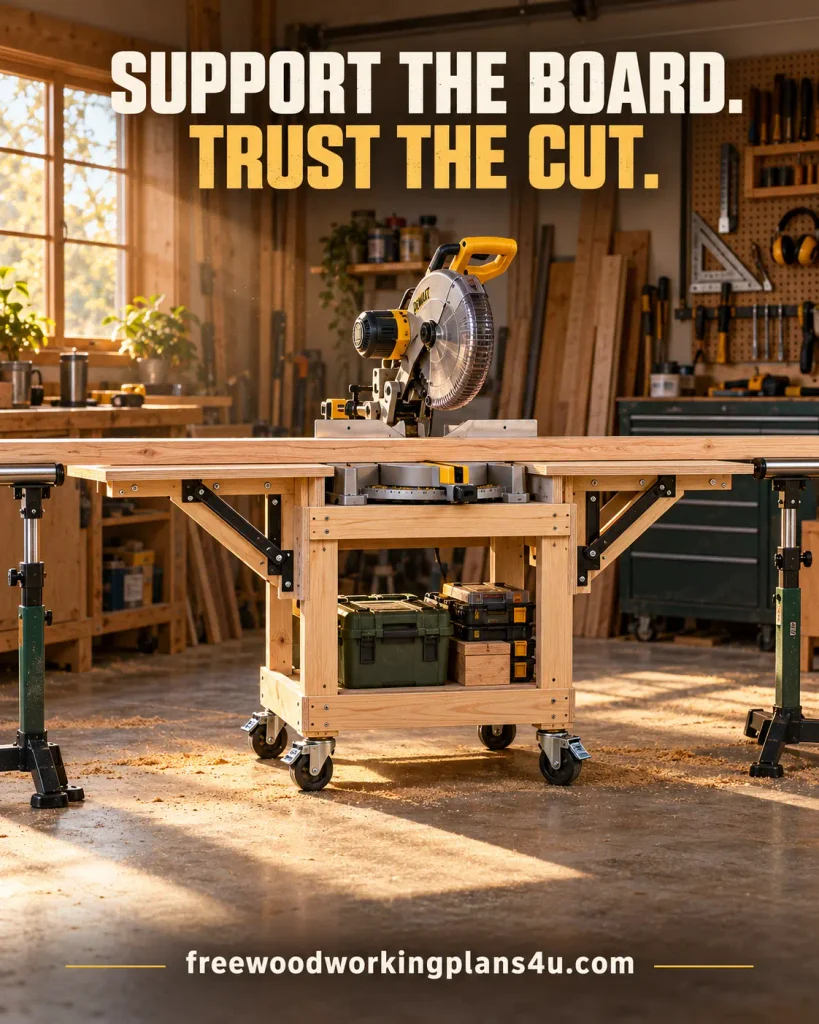
A rolling miter saw stand with folding wings gives the board a more dependable place to rest. Roll the saw where you need it, open the wings for longer stock, then fold them down when the floor needs to be clear. These free woodworking plans use a 36 × 24 in. (914 × 610 mm) base and two 24 × 24 in. (610 × 610 mm) wings. The saw tray is adjusted to your saw, since models differ in their mounting points, table height, and sliding clearance.
Fit your own saw before cutting. The dimensions below describe an adaptable layout, not a universal stand. Check your saw’s manual and measure its mounting footprint, full movement, and support requirements first.
The plan at a glance
| Feature | Reference size or detail |
|---|---|
| Base top | 36 × 24 in. (914 × 610 mm) |
| Folding wings | Two, each 24 × 24 in. (610 × 610 mm) |
| Total support span with wings open | About 84 in. (2,134 mm) |
| Working height | Choose for your saw and shop; 34 in. (864 mm) is an example |
| Saw tray height | Working height minus the measured height from the saw’s mounting surface to its table |
| Main materials | ¾-in. plywood, 2 × 4 lumber, locking casters, hinges, and folding brackets |
The important detail is the height relationship: the saw table and the open wings need to meet at the same level. The saw sits on a lower tray while the wings rest at the chosen working height.
Why choose a rolling stand with folding wings?
A fixed saw station can be a pleasure to use—until you need the floor space back. A compact portable stand can solve the storage problem, but it may leave long boards without enough support.
This design aims for a useful middle ground. Its cabinet-style base rolls around the shop, while the wings extend the working surface when you need them. They fold down when you do not.
The wings help support the stock; they do not replace a stable saw mount, a level setup, or additional stands for work that extends beyond the station. Before settling on the layout, think about the longest boards you typically cut and the space they need to extend on either side.
Measure your miter saw before you build
A few measurements now can spare you from rebuilding the saw tray later. Set the saw on a flat surface and check its dimensions with the blade unplugged or the battery removed.
Measure the mounting footprint
Measure the width and depth of the saw’s base or mounting feet. Locate the mounting holes, too. The tray must support the saw securely and leave room to reach the fasteners.
Find the tray height
Measure from the surface beneath the saw’s mounting feet to the top of its saw table. Call that measurement D.
Next, choose the height of the folding wings from the floor. Call that H. The top of the saw tray should be:
Saw tray height = H − D
For example, if you choose a 34-in. working height and the saw table is 3½ in. above its mounting surface, the tray top needs to be 30½ in. from the floor. Measure your own saw—the example is only a way to do the calculation.
Check the saw’s full movement
If your saw slides, move its rails through their full travel. Check its bevel and miter adjustments as well. The saw body, motor, dust port, or rails may need extra space behind or beside the table.
If the saw needs rear clearance, plan an opening or notch that gives it room. Reinforce around the opening so the top stays supported. Follow your saw’s manual for its specific mounting and operating instructions.
Materials and cut list
The base dimensions below are fixed reference sizes. The cabinet height and saw tray depend on your chosen working height, caster height, and saw measurements.
Sheet goods
| Part | Quantity | Size or sizing method |
|---|---|---|
| Base top | 1 | 36 × 24 in. (914 × 610 mm); cut the saw opening to fit your saw |
| Cabinet sides | 2 | 24 in. deep × side height S |
| Back panel | 1 | 34½ in. wide × side height S |
| Bottom panel | 1 | 34½ × 23¼ in. (876 × 591 mm) |
| Folding wings | 2 | 24 × 24 in. (610 × 610 mm) |
| Saw tray | 1 | Fit to the saw’s mounting points and tray supports |
For a cabinet with a ¾-in. bottom panel and ¾-in. top panel, calculate the side height like this:
S = H − C − B − T
Here, H is your finished working height, C is the installed caster height from the floor to the underside of the bottom panel, and B and T are the thicknesses of the bottom and top panels.
For example, if H is 34 in., C is 4½ in., and both panels are ¾ in. thick, S is 28 in. Measure your caster’s installed height; its wheel diameter alone does not give you that number.
Lumber and hardware
Gather:
- Straight 2 × 4 lumber for reinforcing the saw opening, supporting the tray, and stiffening the wings
- Four locking casters suitable for the loaded stand, saw, and workpiece
- Two hinges, one for each wing
- Four folding support brackets, two per wing, rated for the intended load
- Fasteners appropriate for the materials and bracket instructions
- Mounting bolts or clamps recommended for your saw
- Optional material for removable auxiliary fences
Add solid blocking where casters, hinges, and wing brackets attach. Do not rely on the plywood edge alone to hold hardware under load.
Build the rolling base
Assemble the cabinet
Cut the sides, back, and bottom panel to size. The bottom panel fits between the sides and back. Assemble the cabinet square, then add internal blocking at the corners for the caster mounts.
Check the case before fastening on the top. Measure both diagonals; matching measurements help confirm that the cabinet is square. Reinforce the upper edges so the top panel and saw opening have solid support.
Mark and reinforce the saw opening
Place the saw where you want it on the top panel. Mark an opening that provides access to the mounting points and enough room for the saw’s movement. Preserve as much supporting material as the saw allows, then add framing beneath the opening.
If the saw’s rails or motor extend behind its fence, allow for that travel. Add a rear notch or an open-back section if needed, but reinforce the remaining edges. The opening needs to fit the saw; it should not leave the tray or top unsupported.
Install the lower saw tray
Fit cleats or cross supports inside the cabinet. Set the tray so its top is at H − D, then check that it is level before mounting the saw.
The saw should sit flat on the tray, with secure fasteners that do not interfere with its moving parts. Bosch’s stand guidance also emphasizes firm mounting and balance; long workpiece overhangs can affect stability. ocsmedia.boschtools.com
Add the folding wings
Cut two ¾-in. plywood panels, each 24 × 24 in. Add 2 × 4 stiffeners underneath so the wings resist sagging. Leave clear space for the hinges and support brackets to move.
Attach a hinge along each side of the base. Fit the folding brackets beneath the wings, fastening them into reinforced framing. Follow the hardware maker’s instructions and check that each bracket locks securely in the working position.
With the wings open, compare their surfaces with the saw table using a straightedge. Adjust the bracket positions until the transition is level. A board should rest across the wing and saw table without tipping or dropping at the joint.
Align the fence and add a stop
A removable auxiliary fence can support stock and give you a surface for a stop block. Clamp a straightedge to the saw’s factory fence and align the wing fence sections to it.
Check the full blade path, guard, sliding rails, and bevel movement before using the fence. The stop block should help position the stock without trapping a cutoff against the blade. Follow your saw’s manual when setting up stops and making repeated cuts.
Mount, stabilize, and test the stand
Fasten the casters through the reinforced mounting areas. Lock them before use. Push gently against the stand to check for rocking or movement, and correct any loose joints before mounting the saw.
Place a board across the saw and both wings. Check that it lies flat and remains supported. If it extends beyond the wings, add separate supports. Miter-saw manufacturer guidance recommends supporting long workpieces with stands or similar supports; another person should not be used as a substitute.
Make a test cut in scrap. Watch the workpiece as the saw moves through the cut. The board should remain supported, and the wings, fence, stop, and hose should stay clear of the saw. Adjust the setup before using the stand for a project.
Add dust collection and storage
The open space below the saw can hold light accessories or offcuts. Keep heavier items low and secure them before moving the cart.
Dust collection is optional. If you add a shop-vac hose or dust port, move the saw through its full travel and bevel range. The hose should not catch on the rails or block the blade guard. A vacuum connection can help manage debris, but it does not replace cleanup or appropriate respiratory protection.
If you are planning a larger shop setup, read our guide to mobile workbenches with storage and our walkthrough on reading woodworking scale drawings.
Questions that come up while planning a miter saw stand
Will this plan fit my sliding miter saw?
It can be adapted, but measure the saw’s full slide path and rear clearance before cutting the opening. Some models need more room behind the body.
Can I just place the saw on top of the cart?
You can, but the saw table will likely sit higher than the wings. For level support, place the saw on a tray set lower by the measured distance between its mounting surface and table.
How high should the wings be?
The wings should be level with the saw table. Choose a working height that suits your setup, then use the H − D calculation to set the saw tray.
How do I keep the wings from sagging?
Stiffen each wing underneath and use properly rated folding brackets attached to reinforced framing. Check that the brackets lock before loading the wings.
Will the wings support long boards by themselves?
They support stock within the stand’s working span. Use additional stands for boards that extend beyond the wings, and check stability with the actual workpiece before cutting.
Do I need dust collection?
No. It is an optional addition. If you fit a hose or port, make sure it clears the saw’s slide, bevel, and guard through their full movement.
Products / Tools / Resources
- Materials: ¾-in. plywood, straight 2 × 4 lumber, and fasteners suited to the materials
- Mobility: Four locking casters sized and rated for the loaded stand
- Wing hardware: Two hinges and four load-rated folding support brackets
- Measuring and layout: Tape measure, square, straightedge, pencil, and clamps
- Cutting and assembly: Circular saw or track saw, drill/driver, and suitable bits
- Fit and safety checks: Your miter saw’s instruction manual, caster specifications, and folding-bracket installation instructions
- Related guides: Mobile workbenches with storage and reading woodworking scale drawings