
There is a peculiar pause before the first cut.
The pencil is sharpened. The lumber is stacked nearby. The plan looks perfectly clear—until you notice that the cabinet is too wide for the wall, the bench is too tall for the room, or the shelf needs to fit between two stubborn pieces of trim.
That is when a simple woodworking plan starts to feel less like instructions and more like a puzzle with consequences.
One changed number can affect the opening beside it, the shelf that fits inside it, the screw that joins it, and the hardware that has to move around it.
The safest way to modify woodworking plan dimensions is to treat the design as a connected system rather than a picture you can enlarge or shrink at will.
This guide shows what you can resize, what should remain fixed, how to calculate dependent parts, and how to rebuild the cut list before a saw turns an uncertain measurement into permanent waste.
Quick answer: To resize a woodworking plan safely, identify the dimension that must change first. Apply a scale factor only to genuinely proportional parts. Keep material thickness, joinery, hardware, clearances, and safety-critical dimensions fixed unless the redesign requires otherwise. Then redraw every affected view, rebuild the cut list, and verify the new design with a mockup or dry fit before cutting final lumber.
If plan symbols, views, or dimension lines still feel unfamiliar, begin with the companion guide to how to read woodworking plans. You will be modifying the plan more confidently once you know which measurements describe the finished object and which ones describe how its parts meet.
Why Modifying a Woodworking Plan Is More Than Scaling a Drawing
A woodworking plan is not a photograph of a finished project. It is a map of relationships.
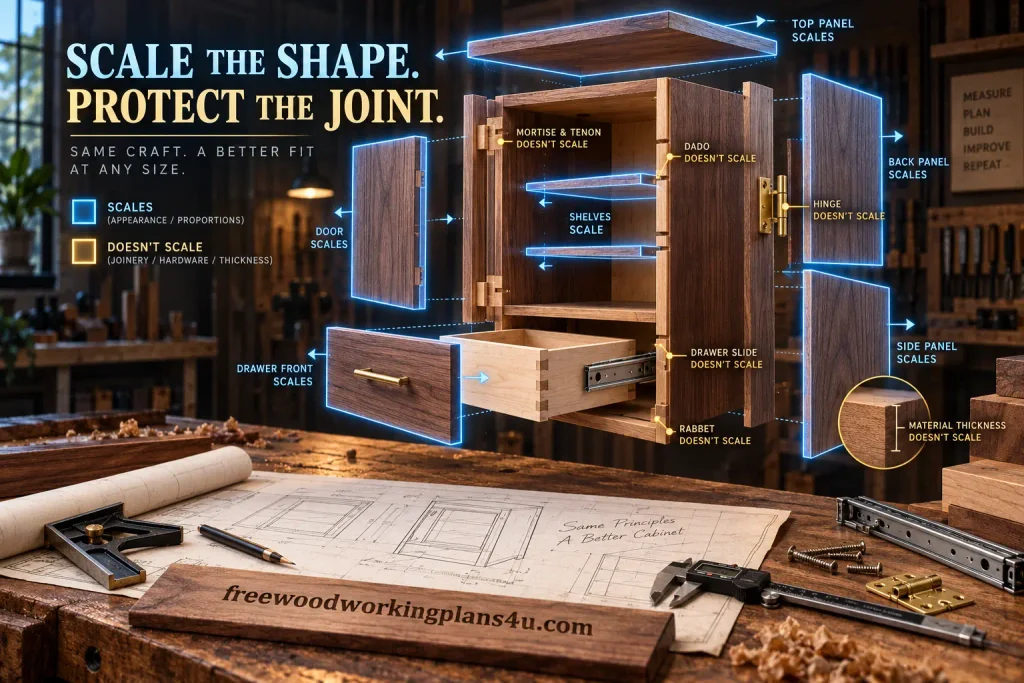
The outside width may control the shelf length. The shelf length may determine where a dado goes. The dado depends on the actual thickness of the shelf stock. The shelf stock may need to clear a door, a drawer slide, or a line of shelf pins.
Change one point and the pressure moves elsewhere.
That is why “make it 20 percent smaller” is often a dangerous instruction. It sounds precise, but it treats every measurement as though it has the same job. A decorative overhang and a mortise depth do not behave alike. Neither do a tabletop, a drawer box, a wall-mounted cabinet, and a child’s chair.
Before changing anything, ask a quieter and more useful question:
What is this dimension responsible for?
Some dimensions describe appearance. Others carry weight, create clearance, accept hardware, or make two pieces fit. The first group may scale. The others need to be recalculated deliberately.
The Five Dimension Groups You Must Identify Before Resizing
Print the plan or open it on a separate screen. Mark each important measurement with a simple code:
- O for overall
- S for structural
- F for fit
- J for joinery
- M for material-controlled
This small act of labeling slows the process down in exactly the right place. It turns a page full of numbers into a design you can reason about.
Overall dimensions: the silhouette of the project
These are the measurements someone notices first:
- Overall width
- Overall height
- Overall depth
- Leg length
- Top size
- Cabinet footprint
- Finished seat height
They define the object’s envelope. If a bookcase must fit into a 30-inch alcove, its outside width is the controlling dimension—even if several internal parts need to change to make that width possible.
Structural dimensions: the parts that keep it standing
Structural measurements determine strength, stiffness, and stability. They include:
- Span between supports
- Leg and stretcher dimensions
- Rail width
- Apron depth
- Panel thickness
- Shelf support spacing
- Bracing locations
- Wall-anchor positions
- Joinery proportions in load-bearing areas
A wider shelf may require a thicker panel, a front edge, a center divider, or an additional support. A taller cabinet may need better anchoring even if every individual board remains the same thickness.
Fit dimensions: the quiet measurements that prevent frustration
Fit dimensions are easy to overlook because they rarely make the finished project look dramatic. They are the reason a drawer opens, a door closes, and a shelf slides into place without scraping.
Look for:
- Drawer side clearances
- Door reveals
- Center gaps
- Panel allowances
- Sliding clearances
- Seasonal movement gaps
- Wall and floor clearances
- Hardware offsets
- Back-panel rebates
- Space for hands, hinges, and tool access
A change of one-sixteenth of an inch can matter more here than a change of two inches elsewhere.
Joinery dimensions: where the parts become one object
Joinery measurements describe the physical conversation between pieces:
- Dado width and depth
- Rabbet width and depth
- Mortise width, depth, and placement
- Tenon thickness and length
- Dovetail or box-joint spacing
- Pocket-hole locations
- Biscuit or domino positions
- Screw edge distance
- Glue surface and shoulder dimensions
Joinery is rarely decorative arithmetic. It is a set of tolerances. If the mating stock changes, the joint often changes with it.
Recommended reading: The 25 Best Woodworking Joinery Books Every Woodworker Should Own (From Beginner to Master Craftsman)
Material-controlled dimensions: numbers dictated by reality
These dimensions are governed by what you can actually buy and install:
- Nominal versus actual lumber thickness
- Plywood thickness
- Edge banding thickness
- Saw kerf
- Screw length
- Hinge cup depth
- Drawer-slide length
- Shelf-pin diameter
- Bracket dimensions
- Router-bit or dado-blade width
A plan may call for “3/4-inch plywood,” but the sheet in your shop may measure 23/32 inch, 18 mm, or something else entirely. That difference travels through every box, shelf, rabbet, and opening built around it.
| Dimension group | What it controls | Typical examples |
|---|---|---|
| Overall | Finished footprint and appearance | Width, height, depth |
| Structural | Strength and stability | Spans, legs, supports, braces |
| Fit | Movement and clearance | Drawer gaps, reveals, wall clearance |
| Joinery | How parts connect | Dados, rabbets, mortises, pocket holes |
| Material-controlled | Real-world compatibility | Stock thickness, screws, hinges, kerf |
For a deeper refresher on stock sizes, see nominal versus actual lumber dimensions. It is one of the most useful references to keep nearby when a plan’s numbers seem almost—but not quite—right.
Can You Scale Every Dimension by the Same Percentage?
Sometimes. Not often enough to make it a default.
If you are changing a genuinely proportional feature, use a scale factor:
[
\text{Scale factor}=\frac{\text{desired overall dimension}}{\text{original overall dimension}}
]
Then:
[
\text{New proportional dimension}=\text{original dimension}\times\text{scale factor}
]
Imagine a plan that is 36 inches wide, but your space requires a 48-inch version.
[
48 \div 36 = 1.333
]
The scale factor is approximately 1.333. An 18-inch proportional opening would become:
[
18 \times 1.333 = 23.994
]
You could record that as 24 inches after deciding how the surrounding construction will resolve the fraction.
But the 3/4-inch stock does not become 1 inch simply because the cabinet grew. The screws do not become 1.666 inches. A standard hinge does not stretch. A drawer slide still comes in its manufactured length.
Keep these fixed unless you have intentionally redesigned around them:
- Lumber and plywood thickness
- Standard hardware
- Screw and bolt sizes
- Drawer-slide lengths
- Hinge cup dimensions
- Shelf-pin diameters
- Minimum edge distances
- Joinery depths
- Drawer and door clearances
- Safety-related bracing and anchoring
A useful rule is:
Scale appearance-related dimensions carefully. Recalculate connection-related dimensions deliberately. Keep hardware-related dimensions tied to the hardware.
The furniture-scaling discussion at Popular Woodworking is a helpful reminder that visual proportion and structural proportion are not always the same thing.
When uniform scaling is appropriate
Uniform scaling works best when the project is visually simple and structurally forgiving:
- Decorative signs
- Simple wall art
- Uncomplicated boxes
- Planter boxes
- Basic trays
- Small display shelves
- Moldings and nonstructural trim
- A tabletop whose support system is redesigned separately
Even then, inspect the joinery and material thickness before cutting. A small box can still fail if its lid, hinges, or bottom panel depends on fixed dimensions.
When uniform scaling becomes dangerous
Be cautious with any plan involving:
- Drawers
- Hinged doors
- Long unsupported shelves
- Seating
- Beds
- Desks and workbenches
- Tall cabinets
- Wall-mounted storage
- Outdoor structures
- Children’s furniture
- Heavy tops
- Complex mortise-and-tenon frames
- Standard drawer slides or cabinet hinges
A narrow cabinet may be perfectly stable while a wider version sags or racks. A taller bookcase may look elegant until its center of gravity rises high enough to make tipping a concern. A chair that is scaled by eye can become uncomfortable—or unsafe.
The more a project carries people, resists force, or supports weight overhead, the less acceptable blind scaling becomes.
A Safe Workflow for Modifying Woodworking Plan Dimensions
The safest redesign usually feels slower at the beginning and much faster later. You spend a few minutes asking questions instead of spending an afternoon repairing a board that was cut from an obsolete measurement.
1. Define the exact change
Write the new requirement in plain language:
- “The cabinet must be no wider than 30 inches.”
- “The bench must fit beneath a 28-inch counter.”
- “The planter needs to be 6 inches deeper.”
- “The shelf must fit a 34-inch wall opening.”
Do not begin by changing every number in the plan. Begin with the problem the new dimension must solve.
2. Preserve the original plan
Save a clean copy. Print the original if possible. Use a different color or a new layer for revisions.
A plan with crossed-out dimensions and half-erased arrows becomes difficult to trust. Keep the original visible so you can compare the redesign against the designer’s starting relationships.
3. Record the original dimensions
Create a small worksheet with:
- Part name
- Quantity
- Length
- Width
- Thickness
- Grain direction
- Joint location
- Original purpose
This is the beginning of your revised cut list. It also exposes contradictions before they hide inside a pile of lumber.
For guidance on organizing the information, see [how to read woodworking cut lists].
4. Identify the controlling dimension
One dimension usually drives the rest.
It might be:
- The outside width of a cabinet
- The opening between two walls
- The finished height of a workbench
- The length of a drawer slide
- The diameter of a round tabletop
- The space available for a sink or appliance
Circle it. Every other affected measurement should be traced back to this number.
5. Trace connected parts
For every part touching the changed dimension, ask:
- Does its length change?
- Does its position change?
- Does its joint move?
- Does its grain direction remain sensible?
- Does it still fit the hardware?
- Does the assembly sequence still work?
This is where a design stops being a drawing and starts behaving like a three-dimensional object.
6. Classify the affected measurements
Mark each connected measurement as:
- Proportional
- Fixed
- Derived
- Hardware-controlled
- Safety-critical
Derived measurements deserve special attention. A shelf between two sides is not chosen independently; it is calculated from the opening, side thickness, and clearance.
7. Calculate revised dimensions
Use formulas instead of mental subtraction. Keep fractions visible until the design is stable.
For example:
[
\text{Shelf length}=\text{outside width}-\text{left side thickness}-\text{right side thickness}-\text{clearances}
]
If the plan uses a 1/8-inch reveal, write that reveal into the formula rather than trying to remember it later.
8. Redraw and annotate every view
Update:
- Front view
- Side view
- Top view
- Exploded view
- Joinery details
- Hardware locations
- Section views
- Cut-list references
A revised front view does not automatically update the hidden rabbet on the back edge. If a dimension changed, inspect the views that may carry its consequences.
Digital modeling can help here. Fine Woodworking’s discussion of resizing in SketchUp without redrawing illustrates how a model can expose connected changes—but software should support your reasoning, not replace it.
9. Rebuild the cut list
Do not edit the old list casually. Create a revised version with a new date or revision number.
Every part should have:
- Quantity
- Finished dimensions
- Material
- Grain direction
- Edge treatment
- Joint or hardware notes
- Rough-cut allowance, if applicable
- Verification status
10. Test before committing final lumber
Use cardboard, foam board, scrap plywood, or inexpensive construction lumber to check the new proportions.
For furniture with drawers, doors, or unusual clearances, perform a dry assembly. A mockup often reveals a problem that looked invisible on paper: a hand cannot reach the latch, a drawer feels too shallow, or a tall cabinet has become visually and physically top-heavy.
How to Make a Woodworking Plan Narrower
Narrowing is one of the most common modifications because rooms, alcoves, and existing furniture rarely respect the dimensions of a published plan.
Suppose a cabinet is originally 36 inches wide, built from 3/4-inch side panels, with three shelves installed between the sides.
The original shelf length is:
[
36-0.75-0.75=34.5\text{ inches}
]
If the new outside width is 30 inches:
[
30-0.75-0.75=28.5\text{ inches}
]
The side panels may remain unchanged if the height and depth stay the same. The shelves cannot. Their new finished length is 28 1/2 inches, assuming there are no additional clearances or face-frame deductions.
That one calculation is straightforward. The surrounding questions are where the redesign earns its keep.
Check doors, drawers, and reveals
If the cabinet has two doors, do not simply subtract six inches from both door widths. Recalculate the opening and preserve the intended reveals.
A useful starting formula is:
[
\text{Door width}=
\frac{\text{opening width}-\text{left reveal}-\text{right reveal}-\text{center gap}}{2}
]
Overlay doors introduce another layer of calculation because hinge overlay, edge clearance, and the face-frame layout may control the final dimension.
For drawers, check:
- Drawer-box width
- Side clearance
- Slide length
- Front overlay
- Opening height
- Handle placement
- The distance between adjacent fronts
A cabinet that is narrower but still uses the original drawer slides may lose useful storage depth or create awkward proportions.
Recheck shelf support
Narrowing generally reduces shelf span, which can improve stiffness. But do not assume the support details are irrelevant.
Confirm:
- Shelf-pin positions
- Dado locations
- Center dividers
- Fixed-shelf placement
- Back-panel support
- The clearance needed to install each shelf
If the original plan uses a center divider, the revised cabinet may no longer need it—or may need it moved to maintain balanced openings.
Confirm the face frame or edge treatment
A face frame may be assembled before the case or after it. That decision changes how rails and stiles are resized.
If the outside width shrinks, the top and bottom rails may change while the stiles remain the same height. If the plan uses a continuous edge band, the visible trim may also need a new length even when the underlying panel dimensions are correct.
How to Make a Woodworking Plan Deeper
Depth changes often look harmless because they do not alter the front silhouette. In a room, however, depth is where furniture begins to occupy real human space.
Before making a cabinet deeper, check:
- Wall clearance
- Door and drawer travel
- Walkway width
- Reach distance
- Shelf loading
- Back-panel placement
- Center of gravity
- Tip resistance
- Ventilation
- Cord or plumbing access
- The length of available drawer slides
A deeper bookcase may hold more books, but it may also make the back rows difficult to reach. A deeper desk may crowd a chair. A deeper wall cabinet may interfere with a door swing or feel unsafe above a work surface.
If you reduce depth, watch for the opposite problems:
- Drawers may become too deep for the slides
- Existing hardware may occupy too much of the available space
- The back panel may no longer sit in its rabbet
- Shelves may become too shallow for the intended objects
- A bench may lose front-to-back stability
- A cabinet may become easier to tip if its base is reduced
Depth is also tied to grain direction. A wide panel built from boards may need a different glue-up or reinforcement strategy when its dimensions change.
How to Make a Woodworking Plan Taller or Shorter
Height changes affect both ergonomics and stability.
For a workbench or desk, compare the new height with the user’s elbow position, stool height, or the tools used on the surface. A few inches can change whether the project feels comfortable after ten minutes or punishing after an hour.
For benches and seating, revisit:
- Seat height
- Seat depth
- Back angle
- Leg splay
- Foot clearance
- Rail position
- Fastener direction
- Load-bearing joints
For tall cabinets and shelving, inspect:
- Shelf spacing
- Side-panel slenderness
- Back bracing
- Wall anchoring
- Base width
- Center of gravity
- Installation clearance
Shortening a cabinet may allow fewer shelves or a different door layout. Making it taller may require additional fixed shelves, a stronger back, or an anti-tip bracket. If the furniture is tall, wall-mounted, load-bearing, or intended for children, treat anchoring and stability as safety-critical—not cosmetic details.
How Material Thickness Changes Affect a Plan
Changing stock thickness is not the same as changing overall size.
Imagine a case designed around two 3/4-inch side panels. You decide to build it from 1/2-inch plywood instead. If the outside width remains fixed, the interior becomes wider:
[
(0.75+0.75)-(0.5+0.5)=0.5\text{ inch}
]
That half-inch has to go somewhere. It may enlarge the shelf opening, alter a face frame, change door overlays, or create a visible gap at a back panel.
If the interior dimensions must remain fixed, the outside width changes instead.
Material-thickness changes can affect:
- Shelf length
- Shelf width
- Box interiors
- Drawer openings
- Door sizes
- Face-frame alignment
- Edge banding
- Dado and rabbet width
- Dado and rabbet depth
- Screw length
- Pocket-hole settings
- Back-panel offsets
- Panel reveals
- Hardware clearance
Measure the actual material with a caliper. Even “3/4-inch” plywood can vary by product and manufacturer. Write the measured thickness into your worksheet before recalculating.
For a related planning check, use how to estimate lumber from woodworking plans. Material quantity often changes in less obvious ways when a redesign introduces dividers, wider glue-ups, or additional supports.
How Dimension Changes Affect Joinery
Joinery is where a harmless-looking resize can become a weak joint, a poor fit, or an assembly that cannot physically happen.
Pocket holes
Pocket-hole screw length depends on the thickness of the material, the angle of the pocket, and the way the pieces meet.
If you change from 3/4-inch stock to 1/2-inch stock, do not keep the original screw length by habit. The screw may break through the face, fail to bite properly, or split the edge.
Recheck:
- Jig setting
- Screw length
- Screw spacing
- Edge distance
- Grain direction
- Clamp access
- Whether the joint is carrying meaningful load
Dados, grooves, and rabbets
A dado intended to receive 3/4-inch stock must match the actual stock. If the shelf is thinner, the joint may become loose. If the shelf is thicker, the part may not seat fully.
Recalculate:
- Joint width
- Joint depth
- Remaining wall thickness
- Distance from the edge
- Whether the joint shows through
- Whether the router bit or dado stack can produce the required size
A deeper dado is not automatically stronger. It can weaken the surrounding wall, especially in narrow rails or thin panels.
Mortise-and-tenon joints
When a rail becomes wider or a leg becomes thicker, the tenon may need a new width, length, or shoulder arrangement. When the member becomes smaller, blindly preserving the original tenon can remove too much supporting material.
Inspect:
- Tenon thickness
- Tenon length
- Mortise depth
- Shoulder width
- Remaining material around the mortise
- End-grain exposure
- Glue surface
- The direction of the expected load
The practical demonstrations in WOOD Magazine’s tenoning-jig guide are useful for thinking about repeatable tenon proportions and controlled setups.
A common starting principle is to keep the tenon substantial enough for the joint’s load while leaving adequate material around the mortise. The exact proportion depends on the stock, species, joint design, and force the piece must withstand.
Dovetails and box joints
These joints can be resized, but not every feature should be enlarged equally.
You may adjust:
- Number of pins or tails
- Spacing
- Pin and tail width
- Drawer height
- End margins
You must still account for:
- Router-bit or blade width
- Available stock thickness
- Minimum end distance
- Drawer-slide clearance
- Front and back alignment
- Assembly direction
A drawer that is wider may need more mechanical support even if the dovetail geometry remains attractive.
Hardware-driven joinery
Sometimes the hardware is the true controlling dimension.
Check the specifications for:
- Hinges
- Drawer slides
- Shelf pins
- Brackets
- Bed bolts
- Table leaves
- Casters
- Levelers
- Magnetic catches
- Soft-close mechanisms
Do not resize a cabinet around a drawing while ignoring the hardware that must live inside it.
Recommended reading: Woodworking Hardware Installation: The No-Guesswork Guide to Perfect Hinges, Drawer Slides, Knobs and Pulls
How to Rebuild the Cut List After Resizing
A cut list is more than a shopping list. It is the design’s audit trail.
When you rebuild it, give every part a reason for its new dimension. If a measurement changed because the outside width changed, write that down. If it stayed fixed because it is tied to hardware, record that too.
| Part | Quantity | Original size | Revised size | Change reason | Verification |
|---|---|---|---|---|---|
| Side panel | 2 | 30 × 12 × 3/4 in | 30 × 12 × 3/4 in | Height and depth unchanged | Confirm actual stock |
| Shelf | 3 | 34 1/2 × 12 × 3/4 in | 28 1/2 × 12 × 3/4 in | Cabinet narrowed from 36 to 30 in | Dry-fit between sides |
| Top | 1 | 36 × 12 × 3/4 in | 30 × 12 × 3/4 in | Outside width changed | Check construction style |
| Bottom | 1 | Plan-specific | Recalculate | Depends on inset or overlay construction | Confirm joinery |
| Back panel | 1 | Plan-specific | Recalculate from revised case | Rabbet, overlay, or nail-on back | Check all four edges |
For every part, clarify:
- Is the listed size rough or finished?
- Is the dimension length × width × thickness?
- Which edge receives joinery?
- Does grain direction matter?
- Is an edge band or trim included?
- Does the part need to be cut oversize and trimmed later?
- Has saw kerf been considered?
- Does the part need a dry fit before final sizing?
When nesting parts on a sheet or board, account for [how to account for saw kerf]. The blade removes material. That lost strip may be small, but it becomes significant across multiple cuts—especially when a revised plan leaves very little margin.
Also update your lumber estimate and board-foot calculations.
Recommended reading: How to Read Woodworking Cut Lists Without Costly Mistakes: Dimensions, Kerf, Grain Direction, and Cutting Order Explained
Worked Example: Making a Three-Shelf Cabinet Narrower
Start with a simple cabinet:
- Original outside width: 36 inches
- Original height: 30 inches
- Original depth: 12 inches
- Side thickness: 3/4 inch
- Three shelves between the sides
- No drawers
- No doors
- Same height and depth after modification
The original shelf opening is:
[
36-0.75-0.75=34.5\text{ inches}
]
The target outside width is 30 inches:
[
30-0.75-0.75=28.5\text{ inches}
]
The revised shelf length is therefore 28 1/2 inches, assuming the shelves still sit directly between the same side panels.
The side panels remain 30 × 12 × 3/4 inches because their height and depth did not change. Their shelf-pin rows or dado locations may also remain at the same height, but verify that the reduced width does not change the intended support arrangement.
The top and bottom depend on how the cabinet was built:
- If they cap the sides, their outside width becomes 30 inches.
- If they fit between the sides, their length follows the interior opening.
- If a face frame covers the front, its rails may need to be shortened while its stiles remain the same height.
- If the back sits in a rabbet, its width and rabbet ends must be recalculated.
- If the back is applied over the rear, its outside dimensions may follow the revised case instead.
The shelf spacing does not automatically change because the height stayed the same. Still, check whether shelf supports, fixed dados, and the back panel all remain accessible during assembly.
Before using final plywood, make a quick case mockup from cardboard or scrap. Mark the shelf positions. Look at it from the doorway where it will live. A cabinet can be structurally correct and still feel visually cramped once its proportions change.
How to Use Digital Tools Without Letting Them Make Decisions
A calculator can prevent arithmetic mistakes. It cannot tell you whether a cabinet now feels top-heavy.
Use simple tools in layers:
Graph paper
Graph paper is excellent for early proportion checks. Draw the original and revised front elevations side by side. The visual comparison can reveal a squat, stretched, or overly dense arrangement before you build anything.
Calculator and conversion tools
Use a calculator for:
- Scale factors
- Fraction subtraction
- Shelf openings
- Door and drawer widths
- Material-thickness offsets
- Metric conversions
- Board-foot estimates
Keep full precision during the calculation and round only when the construction method supports it.
Digital calipers
A caliper turns “nominal” material into a measured fact. Check plywood, hardwood, edge banding, dowels, and hardware when fit matters.
SketchUp or CAD
A digital model is useful for:
- Moving a controlling dimension
- Inspecting connected parts
- Checking clearances
- Comparing proportions
- Visualizing joinery
- Producing revised views
Use components and explicit dimensions where possible. A model can be geometrically consistent and still be structurally foolish.
Cut-list software
Cut-list tools can help optimize sheet goods and boards, but enter the revised parts from the new design. Do not assume the software knows which dimensions are finished, which edges need trimming, or which grain directions are important.
A full-size pattern can also be valuable for complex curves and joinery. Fine Woodworking’s guide to creating a full-size pattern from a plan offers a useful reference for transferring a design into a physical layout.
Common Mistakes That Turn a Small Resize Into a Large Repair
Scaling every number
This is the classic mistake. It creates oversized gaps, undersized joints, incorrect hardware locations, and strange proportions.
Measuring the drawing instead of using written dimensions
Printed plans can change scale when enlarged, reduced, or displayed on different screens. Written dimensions are authoritative unless the plan says otherwise.
Forgetting actual material thickness
A nominal 1/2-inch sheet may not measure exactly 1/2 inch. That discrepancy can affect every interior dimension.
Changing the outside width but not the interior parts
Shelves, drawers, doors, dividers, and face frames must respond to the new opening.
Changing depth without checking hardware
Drawer slides, hinges, brackets, and shelf standards have real manufactured dimensions.
Rounding too early
Premature rounding can turn several small errors into a visible gap or misaligned joint. Keep the fractions until the final cut list.
Ignoring assembly order
A part can be dimensionally correct and still be impossible to install. Ask whether the piece can pass through the opening, whether clamps can reach, and whether the joint can be assembled in the required direction.
Failing to test
A cardboard mockup or dry fit is cheap insurance. Final lumber is not.
Losing the revision history
Keep the original plan, revised drawing, calculation sheet, and final cut list together. Mark the revision date clearly.
Copying the old cut list
The old list is not a harmless reference once the geometry changes. Use it to compare—not to cut from.
The 15-Point Pre-Cut Audit
Before making a final cut, walk through these questions with the revised plan in front of you:
- What exact problem is the modification solving?
- What is the new overall width?
- What is the new overall height?
- What is the new overall depth?
- Which dimensions must remain fixed?
- Which dimensions are genuinely proportional?
- Which parts are derived from an opening or another part?
- Did you use the actual material thickness?
- Did every affected joint move or change appropriately?
- Do doors, drawers, shelves, and hardware still fit?
- Is grain direction still appropriate?
- Has saw kerf been included in the cutting layout?
- Does the revised cut list match every drawing view?
- Have you made a mockup, scrap test, or dry assembly where needed?
- Are any structural or safety questions still unresolved?
For a second set of checks, connect this section to [woodworking plan mistakes to check before cutting]. It can function as a companion audit page in the site’s internal linking structure.
How to Know When a Modification Has Gone Too Far
There is no universal percentage that separates a “modified plan” from a new design.
A five-percent change can be serious if it affects a hinge, a mortise, or a narrow load-bearing rail. A much larger change may be harmless in a decorative panel.
The modification deserves a fresh design review when:
- The proportions look unstable
- Supports have become unusually thin
- A joint no longer has enough surrounding material
- Standard hardware no longer fits
- The project needs improvised braces or reinforcements
- Assembly has become confusing
- The top or upper section feels heavy
- The intended use has changed
- A seating or sleeping surface is involved
- The project is wall-mounted and heavily loaded
- The piece must resist children climbing on it
- The structure approaches building, stair, or architectural work
At that point, begin from a tested plan that matches the new use or consult a qualified professional. A revised woodworking plan should not quietly become an engineering project.
FAQs From the Moment You Start Distrusting the Numbers
Can I change only one dimension?
Yes, if you understand what that dimension controls. Changing only the outside width may require new shelf, drawer, door, face-frame, top, bottom, and back-panel dimensions. The phrase “only one dimension” describes the starting change—not the total number of parts affected.
How do I resize a woodworking plan proportionally?
Divide the desired overall dimension by the original dimension to find the scale factor. Multiply genuinely proportional dimensions by that factor, then separately check material thickness, joinery, clearances, hardware, and structural support.
Should I scale lumber thickness?
Usually not. Standard stock thicknesses and plywood sizes are material-controlled dimensions. If you choose different stock, recalculate the spaces built around it.
How do I make a woodworking plan narrower?
Choose the new outside width, then recalculate every part spanning the width. For shelves between 3/4-inch sides, subtract 1 1/2 inches from the new outside width before allowing for any additional clearance.
How do I make a woodworking plan deeper?
Recalculate side panels, shelves, tops, bottoms, backs, doors, and drawer boxes. Then check wall clearance, reach, drawer-slide length, hinge space, center of gravity, ventilation, and tip resistance.
Can I resize a plan that includes drawers?
Yes, but drawers make the redesign more sensitive. Preserve the slide length and required side clearance, then recalculate the drawer box, opening, front overlay, handle position, and adjacent gaps.
Can I convert an imperial plan to metric while resizing it?
Yes. Convert the dimensions first, but do not round every number independently. Choose practical metric stock sizes and preserve the relationships that matter: openings, reveals, joinery, hardware, and actual material thickness.
Is it safe to enlarge a woodworking plan?
It depends on the project. Enlarging a decorative sign is different from enlarging a shelf, chair, bed, workbench, or wall cabinet. Larger spans may sag, taller pieces may tip, and load-bearing joints may need redesign.
Do I need CAD software?
No. Graph paper, a calculator, a straightedge, and a careful worksheet are enough for many projects. CAD becomes helpful when the design has many connected parts, unusual angles, curves, or repeated revisions.
Should I build a prototype?
If the modification affects proportions, ergonomics, doors, drawers, curves, or assembly order, a prototype is wise. Cardboard and scrap wood can expose problems before expensive material is cut.
What should I do if the drawing and cut list conflict?
Stop and investigate. Compare the plan views, written dimensions, material thickness, and construction notes. Do not choose whichever number is more convenient. If the discrepancy cannot be resolved, contact the plan designer or treat the project as a new design.
How much can I change before it becomes a new design?
There is no fixed cutoff. Once the modification changes the intended use, structural behavior, hardware system, joinery strategy, or safety requirements, treat it as a new design and validate it accordingly.
Products / Tools / Resources
The useful setup is modest. You do not need a shop full of specialized equipment to modify a plan responsibly; you need a few measuring tools you trust, a way to record revisions, and enough scrap material to test the parts that make you hesitate.
Products
- Tape measure with clear fractional markings
- Combination square or engineer’s square
- Digital caliper for checking actual stock thickness
- Mechanical pencil and fine marking knife
- Graph paper for proportion studies
- Painter’s tape for labeling parts
- Cardboard or foam board for full-size mockups
- Scrap plywood or construction lumber for test cuts
- Clamps for dry assembly
- Labels or numbered tags for revised parts
- Screws, hinges, brackets, drawer slides, shelf pins, and other project-specific hardware
- Safety glasses, hearing protection, dust protection, and appropriate workshop PPE
Tools
- Fraction calculator
- Metric and imperial conversion calculator
- Scale-factor calculator
- Straightedge and reliable level
- Digital caliper
- SketchUp or another CAD tool
- Cut-list optimizer that accounts for kerf and grain direction
- Saw with a known kerf
- Drill and appropriate bits
- Router or dado setup for confirmed joint dimensions
- Sanding tools for controlled final fitting