
Some mugs are too good to hide behind a cupboard door. This compact wall shelf puts three favorites within easy reach and gives you a little ledge above for more pieces from your collection.
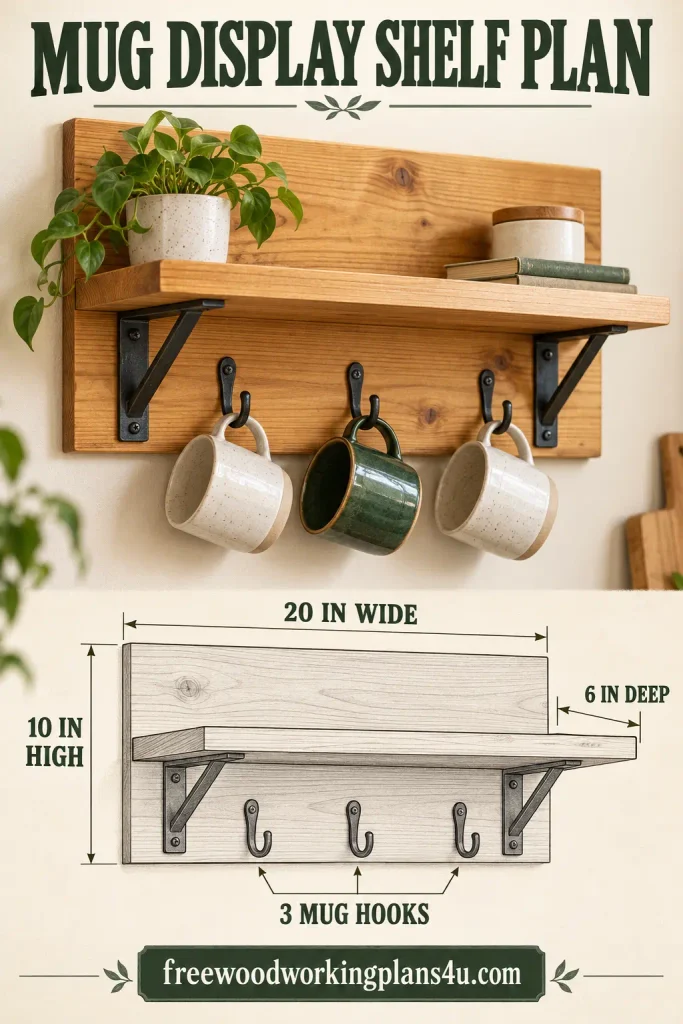
These woodworking plans use a 20-inch-wide backboard, a 20 × 6-inch shelf and three hooks underneath. The shelf is supported by two metal brackets mounted through the backboard into wall studs. Measure your mugs and check the stud locations before cutting or drilling; those two checks will tell you whether the standard layout suits your kitchen.
The plan, at a glance
| Feature | Dimensions or details |
|---|---|
| Backboard | 20 in. wide × 10 in. high × ¾ in. thick |
| Shelf | 20 in. wide × 6 in. deep × ¾ in. thick |
| Projection from the wall | About 6¾ in., including the backboard |
| Mug hooks | 3, spaced 5 in. apart |
| Shelf brackets | 2, with 6 in. support arms |
| Bracket spacing | 16 in. on center, once you’ve confirmed the stud locations |
The three hooks suit many standard mugs. If yours are wide or have generous handles, use two hooks and give each mug more breathing room.
The shelf’s safe load depends on the brackets, fasteners, wall and installation, so follow the hardware maker’s guidance rather than relying on a guessed weight limit.
Before you cut, check your mugs
Set the mugs you plan to hang next to one another. Look at the whole shape, including each handle—not just the diameter of the cup. The plan places the hooks 5, 10 and 15 inches from the shelf’s left edge, each 3 inches from the back edge.
That gives the hooks 5 inches between centers. If the mugs crowd each other or the handles are hard to lift off, switch to two hooks before drilling. It’s a small adjustment now; after the holes are in, there’s no easy way to move them without leaving marks.
Check the hook’s threaded shank against the ¾-inch shelf, too. It must not poke through the top. Use the pilot-hole size recommended by the hook maker and a drill stop to control the depth.
Materials and cut list
Use straight, sound stock that finishes at ¾ inch thick. Pine, poplar and ¾-inch plywood are all options for the backboard and shelf.
| Part | Quantity | Finished dimensions |
|---|---|---|
| Backboard | 1 | 20 × 10 × ¾ in. |
| Shelf board | 1 | 20 × 6 × ¾ in. |
Hardware and supplies
- Two metal shelf brackets with 6-inch support arms, suitable for the shelf and intended load
- Three cup hooks that fit your mug handles
- Fasteners specified for the brackets and your wall construction
- Sandpaper, wood finish and an applicator
- Stud finder, level, tape measure, square, drill and pilot-hole bits
The shelf’s back edge meets the front of the backboard. If your bracket design or wall finish changes that arrangement, dry-fit the pieces and adjust before drilling.
Recommended guide: 25 Best Woodworking Hardware Products Every Serious Woodworker Should Own (Ranked by Performance)
Build the mug display shelf
1. Cut and inspect the boards
Cut the backboard to 20 × 10 inches and the shelf to 20 × 6 inches. Check that both pieces are square and lie flat. If you’re using plywood, take time to smooth its exposed edges.
2. Mark the shelf position
On the backboard, draw a level line 3 inches below the top edge. This marks the shelf’s top edge. With ¾-inch stock, the shelf underside will sit 3¾ inches below the top of the backboard.
Lightly mark the shelf position, then erase or cover any pencil lines that will remain visible after assembly.
3. Find the studs and mark the brackets
The standard layout places bracket centers 2 inches and 18 inches from the left edge of the backboard—16 inches apart. That spacing can align with a pair of studs 16 inches apart, but stud locations vary. Find the studs in your wall before committing to the layout.
If the studs don’t line up with the marks, revise the bracket positions or the shelf layout before drilling. Don’t rely on drywall alone to support a shelf of mugs.
4. Sand and finish the wood
Sand the shelf and backboard smooth, moving through progressively finer grits. Ease the sharp edges a little; the shelf will feel better in the hand and look more finished.
Apply an indoor wood finish according to its label. Let it dry and cure fully before installing the hooks or putting mugs on the shelf.
Recommended guide: Woodworking Finishing Supplies for Beginners: 17 Essentials for a Smooth, Durable Finish
5. Install the cup hooks
On the shelf’s underside, mark hook centers at 5, 10 and 15 inches from the left edge, each 3 inches from the back edge.
Drill pilot holes using the size and depth recommended by the hook maker. A drill stop helps keep the bit from breaking through the shelf. Screw in the hooks and check that each one feels secure.
6. Mount the backboard and brackets
Hold the backboard at your chosen height and level it. Position the brackets over the stud locations, with their support arms level and aligned to the underside of the shelf.
Fasten the brackets using hardware suited to the brackets and your wall. Since the fasteners pass through the backboard and wall finish before reaching the studs, follow the bracket maker’s requirements for fastener type and length.
If the bracket holes don’t align with the studs, stop and revise the mounting plan before drilling.
7. Secure the shelf
Set the shelf on the bracket arms with its back edge against the backboard. Center it, check that it’s level, and make sure it’s fully supported. Fasten the shelf through the holes provided in the brackets. Choose screw lengths that won’t pierce the shelf’s top surface.
8. Check the finished shelf
Check for movement in the backboard, brackets and shelf before arranging your mugs. Add mugs gradually and make sure they hang freely without touching one another, the wall or the counter below.
Adjust the dimensions to suit your kitchen
The 20-inch width is a starting point. If your space, studs or mugs call for a different layout, make the changes before cutting.
- Wider mugs: Use two hooks or increase the distance between them.
- A wider shelf: Check that the bracket spacing and support suit the new span.
- A narrower wall space: Reduce the shelf width, then recheck the bracket and hook positions.
- A deeper shelf: Confirm that the brackets support that depth and the intended load.
Choose a height that feels comfortable to reach. Leave enough room for the mugs to hang without hitting the counter, nearby appliances or cabinet doors.
Questions you might have before building
Will the three hooks fit my mugs?
They’re spaced 5 inches apart, which suits many standard mugs. Measure your mugs and handles first. For wide mugs, use two hooks with more space between them.
How much weight can this shelf hold?
There isn’t one safe number for every installation. Capacity depends on the brackets, fasteners, wall and how they’re installed. Follow the bracket maker’s load guidance.
What if my studs aren’t 16 inches apart?
Use the actual stud locations to plan the bracket position. If they don’t work with this layout, change the shelf design or select a mounting system suited to your wall. Don’t force the 16-inch spacing or rely on drywall alone.
Can I make the shelf wider?
Yes, but a wider shelf may need different bracket spacing or additional support. Check the stud locations and bracket instructions before changing the cut list.
Recommended reading: How to Modify Woodworking Plan Dimensions Safely: What You Can Resize, What Must Stay Fixed, and How to Rebuild the Cut List
What wood should I use?
Straight pine, poplar and ¾-inch plywood can all work. Choose flat, sound boards without splits or loose knots near the fasteners.
Recommended reading: How to Buy the Right Lumber for Any Woodworking Project: Choose the Species, Grade, Thickness, and Quantity
Products / Tools / Resources
- Wood: Straight ¾-inch pine, poplar or plywood for the backboard and shelf.
- Brackets: Two metal shelf brackets with 6-inch support arms, chosen for your shelf and intended load.
- Cup hooks: Three hooks that fit your mug handles and won’t pierce through the shelf.
- Measuring and mounting tools: A stud finder, level, tape measure, square and drill with suitable bits.
- Fasteners: The type and length specified for your bracket and wall installation.
- Finishing supplies: Sandpaper and an indoor wood finish; follow the label and let it cure fully.