
At the back of a workshop, leftover wood has a way of becoming part of the scenery. A short board leans in a corner; a plywood rectangle waits beneath the bench. Then one day you notice that the little block is just right for a phone stand, or that those narrow strips could become garden markers. That is the quiet appeal of woodworking with scraps: the material is already there, waiting for a useful second life.
The first decision is not what to build. It is what the wood can safely become. A short solid block, a thin plywood offcut, and a long straight board each point toward different projects. Sort what you have, check its condition, then choose a plan that fits the pieces instead of forcing the pieces to fit the plan.
Quick answer: What can you make from scrap wood?
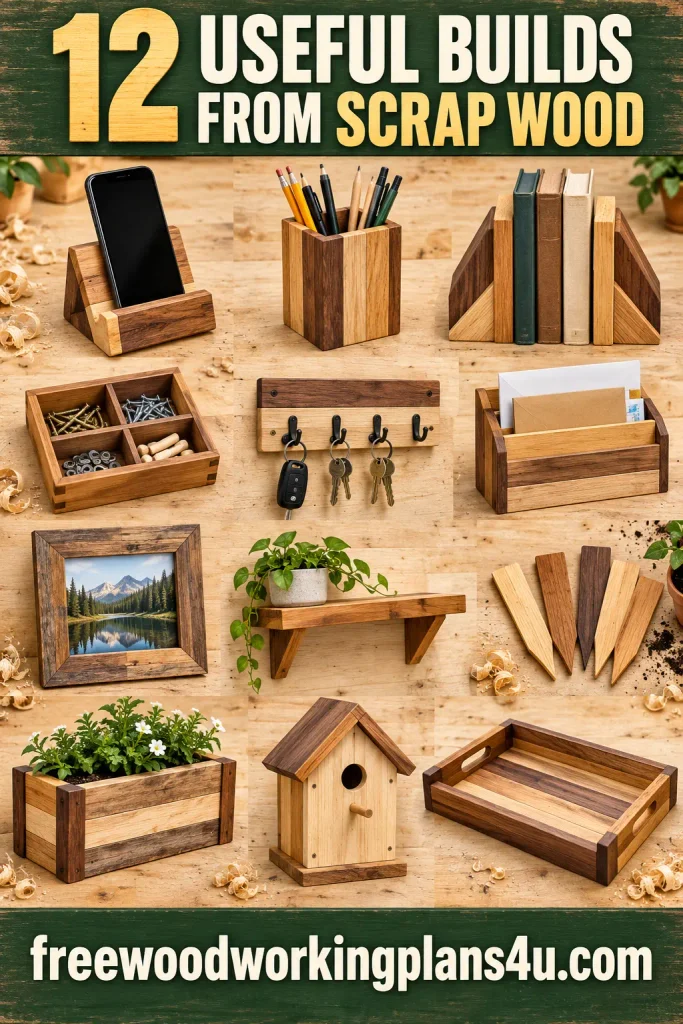
Easy woodworking projects from scrap wood include a phone stand, pencil holder, bookends, parts tray, key rack, mail organizer, picture frame, small wall shelf, garden markers, planter box, birdhouse, and serving tray. Match the project to the size and condition of the leftover wood, and adjust the plan before cutting.
Before you start: Give the scrap pile a careful sort
A scrap pile may look like one big collection of possibilities. In practice, its pieces have different jobs to offer. Sort by shape, thickness, and condition before you reach for a saw.
Set aside boards that are cracked, badly warped, rotten, or too small to hold securely while you work. Look for nails, screws, staples, and other hidden metal before cutting or sanding.
If you cannot identify a piece’s treatment or finish, choose a project where that uncertainty will not matter. For anything that will touch food, grow herbs, or be used by birds or other animals, stick with clean wood of known origin and follow a suitable plan.
A quick sort can turn a crowded pile into a useful inventory:
- Short blocks are good candidates for bookends, phone stands, and small trays.
- Narrow strips can become garden markers, picture-frame parts, or a simple key rack.
- Plywood offcuts work well for box bottoms, trays, and organizers.
- Longer boards may have enough length for a serving tray, planter box, or small shelf.
Before making the first cut, compare the plan with the actual wood in front of you. Scrap varies, and a project photo rarely shows every measurement that matters.
Recommended reading: How to Read Lumber Sizes in Woodworking Plans: Nominal vs. Actual Dimensions
12 easy woodworking projects from scrap wood
These projects use common leftovers and familiar woodworking methods. Treat the build notes as starting points: measure your own material, and use a complete plan when a design needs precise dimensions or must carry weight.
| Project | Useful scrap | Main tools | Good first skill |
|---|---|---|---|
| Phone stand | Short, solid offcut | Saw, square, drill, clamp | Angled support |
| Pencil holder | Plywood or narrow boards | Saw, square, glue, clamps | Square assembly |
| Bookends | Two solid blocks or board pieces | Saw, square, drill, screws | Making a stable base |
| Small parts tray | Plywood and short strips | Saw, glue, clamps, sandpaper | Simple butt joints |
| Key rack | Narrow, straight board | Drill, screwdriver, measuring tape | Predrilling |
| Mail organizer | Plywood and narrow strips | Saw, glue, clamps, drill | Adding dividers |
| Picture frame | Four straight strips | Saw, square, glue, clamps | Accurate corners |
| Small wall shelf | A sound board and support pieces | Saw, drill, level, fasteners | Secure mounting |
| Garden markers | Thin, clean offcuts | Saw, sandpaper, paint or marker | Smoothing edges |
| Planter box | Clean, suitable boards | Saw, drill, screws, liner | Drainage and outdoor use |
| Birdhouse | Untreated boards or plywood | Saw, drill, screws, sandpaper | Building to a species-specific plan |
| Serving tray | Flat board or plywood and strips | Saw, drill, screws, finish | Adding handles securely |
1. A wooden phone stand for the desk or bedside
A phone stand is small enough to come from a short offcut, yet handy beside a bed, at a desk, or on the kitchen counter. The basic shape is simple: a base, an angled support at the back, and a short lip at the front to keep the phone from sliding.
Cut and smooth the pieces, then check the viewing angle with your phone before you attach anything. Fix the support to the base, add the front lip, and make sure the stand sits firmly. If you charge your phone on it, leave room for the cable.
Scrap to look for: A flat piece for the base, plus smaller offcuts for the support and lip.
2. A plywood pencil holder that makes a tidy desk
This little organizer is a natural fit for plywood offcuts or a handful of narrow boards. Build a square or rectangular box from a base and four sides. For a straightforward desk holder, simple butt joints can do the job when the pieces are cut square and clamped while the glue sets.
Dry-fit the sides around the base first. Once they sit neatly, glue and clamp the box, then sand the edges smooth. Leave the top open, or add thin dividers if you have suitable scraps.
Scrap to look for: Four matching side pieces and one flat base, often easy to find among plywood remnants.
Why it works: It gives you practice measuring and assembling square corners without complicated joinery.
3. Bookends with enough base to stand steady
Bookends can be as simple as two solid blocks, or you can join pieces into an L shape. For the L-shaped version, each bookend needs a vertical back and a base wide enough to stay upright. Glue and screws can strengthen the joint; drill pilot holes first to reduce the chance of splitting the wood.
Put the pair together on a flat surface and check that both bases sit level. Smooth the corners, then test the bookends with a few books before loading them up. If the books are large or heavy, give the base more width.
Scrap to look for: Two similar blocks, or four pieces that can form two stable L shapes.
4. A small parts tray for all the bits that wander
A shallow tray gives screws, keys, clips, or workshop odds and ends somewhere to land. Use a flat scrap for the base and short strips for the sides. Butt joints keep the construction simple: apply glue along the edges, position the sides, clamp the assembly, and check that it stays square as it dries.
Keep the sides low if the tray is for a desk or workbench. If your scraps allow, add thin dividers for separate compartments. A little sanding in the inside corners makes it easier to pick up small pieces without snagging them on rough edges.
Scrap to look for: A plywood rectangle and several short, straight strips.
Good variation: Make a few trays in different sizes from the offcuts left after a larger build.
5. A simple wooden key rack for the entryway
A straight strip of wood can become a useful landing place for keys. Cut the board to a convenient length, sand it, and mark the positions for the hooks. Drill pilot holes before attaching the hooks; that small step helps lower the risk of splitting the wood.
Think about the mounting before the rack is finished. Choose fasteners that suit the wall and the weight the rack will carry. A small project still needs a secure attachment. If you want a shelf above the hooks, follow a plan with a support method suited to that design.
Scrap to look for: A narrow, straight board thick enough to hold the hooks.
Why it works: It is a satisfying first chance to practice layout and predrilling.
6. A mail organizer to give envelopes a home
A mail organizer can be little more than a back panel, a bottom ledge, and one or two dividers. Plywood works well for the back and dividers; narrow strips can make the front lip.
Lay the dividers out on the panel before attaching them. Dry-fit the pieces and check that envelopes will slide in and out easily. Then glue and clamp the assembly, and add a hanging method suited to the wall where it will live.
Scrap to look for: One flat panel, with strips for the ledge and dividers.
7. A basic picture frame with clean, even corners
A picture frame is a good use for straight strips that match in thickness. Start by measuring the picture or its backing, then plan the opening around it. A square-cut frame with butt joints is more approachable than a mitered frame, though either style rewards careful measuring. Even a small gap at a corner tends to catch the eye.
Cut two matching long pieces and two matching short ones. Dry-fit them around the picture, then glue and clamp the frame while checking that the corners are square. Add a backing and a hanging method suited to the frame’s size and weight.
Scrap to look for: Four straight strips wide enough for the frame profile.
Tip: Make a small test frame from less valuable scraps before using your best pieces.
8. A small wall shelf for light things
A leftover board and two support pieces may be enough for a small shelf. Keep its job modest: a shelf holding a few lightweight objects needs less support than one meant for heavy books or tools. The design, fasteners, and way it attaches to the wall all affect how well it performs.
Cut the shelf and supports to match the plan, assemble them on a flat surface, and check that the shelf sits level. Before mounting it, choose fasteners that suit both the wall type and the expected load. If you are unsure, follow a tested plan and ask someone qualified to assess the installation.
Scrap to look for: One sound board for the shelf and matching pieces for its supports.
9. Garden markers from the narrowest offcuts
Garden markers are among the simplest ways to use narrow scraps. Cut the pieces into stakes, smooth the ends, and write the plant names with paint or a permanent marker. If you want a pointed bottom, shape it carefully while keeping the piece secured.
Choose wood that can handle outdoor exposure, and avoid scraps with unknown coatings or treatments. A protective finish may help the markers last longer, but check the product label and let it cure as directed.
Scrap to look for: Narrow strips or thin boards that can yield several stakes.
Good variation: Make a matching set for herbs, vegetables, or flower beds.
10. A small planter box that makes use of longer boards
Longer scraps can become the sides of a planter box, with plywood or short boards for the bottom. Assemble the sides with screws and use suitable exterior-grade adhesive if the plan calls for it. The bottom needs drainage, and the whole box needs to cope with moisture.
Choose clean, known wood, especially if the planter will hold herbs or edible plants. A liner may suit the design, but it should not block drainage. Smooth rough edges and choose a finish meant for the conditions where the planter will sit; follow the manufacturer’s directions.
Scrap to look for: Longer pieces for the sides and smaller boards or a suitable panel for the bottom.
11. A simple birdhouse built to suit its future residents
A birdhouse is a rewarding small build, but its dimensions should suit the bird species it is meant for. The entrance size, interior space, and placement are all part of the design. Start with a reliable species-specific plan instead of guessing at measurements.
Cut the panels to match the plan, then drill the entrance and any required ventilation or drainage openings. Assemble the house and make sure the roof can be removed or opened if the plan calls for cleaning access. Leave the interior unfinished unless the plan or a trusted wildlife resource recommends otherwise.
Scrap to look for: Clean, untreated boards or suitable plywood with enough area for the panels.
Tip: Smooth the cut edges and check that no fastener points protrude inside.
12. A wooden serving tray with handles you can trust
A serving tray can start with a flat board or plywood base and narrow strips around the edges. Depending on the plan and the wood you have, the handles can be cut into the sides or attached separately.
Dry-fit the sides around the base, attach them securely, and check that the tray stays flat. Reinforce any handles and test the tray with a light load before carrying anything breakable. If food will touch the surface directly, use clean, known wood and a finish labeled for that use; follow its curing instructions.
Scrap to look for: A flat base and matching strips for the sides or handles.
Why it works: You get to practice straight cuts, assembly, and sanding while making something useful.
Match the project to the scraps already on your bench
If you have several pieces but no project in mind, make a quick inventory. Write down each board’s usable length, width, and thickness. Note whether it is solid wood or plywood, and whether its finish or treatment is known.
Then choose a build that fits the largest useful pieces. That usually means less waste and fewer awkward changes to a design. Keep a small bin for sound offcuts that may suit a later project, and discard or recycle wood that is damaged, contaminated, or too small to hold safely.
Tools and safety for scrap wood projects
Most of these builds call for familiar tasks: measuring, cutting, drilling, clamping, and sanding. The right setup depends on the plan. A hand saw and drill may be enough for a small build; power tools can save time, but only when they are set up and used with care.
Woodworking brings real hazards: moving blades, flying material, dust, noise, and finishing products. Keep guards in place, follow the tool maker’s instructions, secure the workpiece, and use eye, hearing, and dust protection suited to the job. OSHA’s woodworking safety guidance covers machine guarding and wood dust as hazards to manage.
Take extra care with small stock. It can be harder to control than a full board. Use a suitable clamp or jig when needed, keep your hands clear of the cutting path, and stop if the piece shifts or the tool no longer feels under control.
Common mistakes when building with leftover wood
Assuming the scrap will fit the plan
A project plan starts with particular dimensions. Measure your material first and adjust the plan before cutting. If a change affects a joint, support, or opening, choose a design that accounts for the difference.
Keeping wood that is damaged or unstable
Warped, split, rotten, or poorly supported pieces can make assembly frustrating and may weaken the finished build. Save sound wood for projects that need strength.
Forgetting where the finished project will live
A desk organizer, garden planter, and serving tray each face different conditions. Consider moisture, weight, food contact, outdoor exposure, and cleaning before choosing the wood or finish.
Spending more to save one small offcut
A build can stop being economical if it sends you shopping for several tools or materials. Check what you already have against the plan before you begin. If the missing pieces cost more than the project is worth to you, choose a simpler one.
Questions people ask before making something from scrap wood
What’s the easiest thing to make from scrap wood?
A garden marker, small parts tray, or basic phone stand can be a comfortable first project, depending on the scraps and tools you have. Pick a clear plan with manageable cuts and no complicated joints.
Can I use whatever leftover wood I find?
Not always. Check for cracks, rot, warping, nails, and finishes or treatments you cannot identify. For projects that touch food, grow edible plants, or will be used by animals, use clean, suitable material.
Which tools do I actually need for scrap wood projects?
Let the project plan decide. Many small builds use a tape measure, square, pencil, saw, drill, clamps, and sandpaper. Follow the plan and tool manuals, and use suitable safeguards and protective equipment.
Are these projects really free if I already have the wood?
The wood may be free to you, but hardware, glue, finish, tools, and time can still add up. Read the full materials list before starting and choose a build that makes sense with what you already own.
How can I adapt a plan to the pieces in my pile?
Measure each piece, then compare it with the plan. Change dimensions only when the joints, support, and intended use still work. For builds that carry weight or need species-specific measurements, use a tested plan instead of guessing.
Products / Tools / Resources
You do not need a fully stocked shop to make these projects. Start with what the plan calls for and what you already own; borrow or add tools only when they make the work safer or more manageable.
- Measuring and marking: A tape measure, square, and pencil help you check board dimensions, mark cuts, and keep box sides or frame pieces aligned.
- Cutting and drilling: Use a saw and drill suited to the plan, with the correct bits for pilot holes and hardware. Follow the tool manufacturer’s setup and safety directions.
- Clamping and sanding: Clamps hold small assemblies steady while glue cures. Sandpaper or a sanding block helps smooth edges before the project is handled or finished.
- Hardware and supplies: Depending on the build, you may need glue, screws, hooks, wall fasteners, a planter liner, or an appropriate finish. Check the full materials list first; for food contact or outdoor use, follow the product label and curing instructions.
- Protective equipment: Keep suitable eye, hearing, and dust protection available, and use machine guards and dust controls as directed for the tools and materials.
- Woodworking safety: OSHA’s woodworking safety guidance is a useful reference for machine guarding and wood dust hazards.