
There’s something deeply satisfying about building something with your own hands.
It starts with a single sheet of plywood leaning against the garage wall. At first glance, it doesn’t look like much—just a flat panel waiting for purpose. But with a handful of basic tools, a free afternoon, and a little patience, that ordinary sheet can become a bookshelf, a coffee table, a workbench, or the first piece of furniture you’ll proudly tell everyone you made yourself.
That’s why so many experienced woodworkers recommend starting with plywood.
Not because it’s the cheapest option—although it often is—but because it gives beginners room to learn without constantly fighting the material. It cuts predictably, stays remarkably stable, and opens the door to projects that look far more impressive than their difficulty would suggest.
If you’ve been searching for beginner woodworking projects with plywood, you’re already headed in the right direction.
This guide was created for people who want practical wins, not overwhelming perfection. Maybe you’ve never held a circular saw before. Maybe you’ve built one small project and caught the woodworking bug. Either way, you’re about to discover projects that teach real skills while producing furniture and storage you’ll actually use every day.
Along the way, you’ll learn how to choose the right plywood, avoid the mistakes nearly every beginner makes, and build confidence one project at a time.
Why So Many Beginners Start with Plywood—and Rarely Regret It
Walk through any woodworking shop and you’ll find stacks of hardwoods with beautiful grain patterns. Oak, walnut, maple, cherry—they’re undeniably attractive.
Yet if you ask seasoned furniture builders what they recommend for someone just starting out, the answer is surprisingly consistent.
Plywood.
That recommendation isn’t about lowering expectations. It’s about giving yourself the best chance to succeed.
Unlike solid lumber, plywood is engineered from multiple layers of wood veneer bonded together with alternating grain directions. This construction makes it exceptionally stable. It resists twisting, shrinking, and seasonal movement that often frustrate first-time builders.
In practical terms, that means fewer surprises while you’re learning.
Your measurements stay more consistent. Panels remain flatter. Shelves sag less. Cabinets fit together more easily. Every one of those advantages helps remove small frustrations that can quickly turn an exciting hobby into an expensive headache.
What Makes Plywood Such a Great Choice?
For beginners, plywood checks nearly every important box.
- It’s affordable enough to practice without worrying about costly mistakes.
- Large sheets allow multiple projects from a single purchase.
- It’s strong enough for bookshelves, cabinets, desks, and countless furniture pieces.
- Most home improvement stores carry several varieties, making it easy to find almost anywhere.
- Modern plywood accepts paint, stain, and clear finishes beautifully when prepared correctly.
Perhaps the biggest advantage, though, is psychological.
Knowing the material is forgiving makes you less afraid to make that first cut.
And in woodworking, confidence matters almost as much as skill.
Understanding Plywood Before You Buy Your First Sheet
Standing in the plywood aisle for the first time can feel surprisingly intimidating.
Rows of labels, different thicknesses, unfamiliar grades, and prices that vary dramatically leave many beginners wondering whether they’re about to buy the wrong thing.
The good news?
You don’t need to understand every type of plywood to build beautiful projects.
Learning a few basics will carry you through dozens of beginner-friendly builds.
Sanded Plywood
If you’re planning simple furniture, shelves, storage projects, or decorative pieces, sanded plywood is often the easiest place to begin.
Its smooth surface requires very little preparation before painting or finishing, which means you spend more time building and less time correcting imperfections.
Birch Plywood
Birch plywood has earned an outstanding reputation among DIY furniture builders.
It’s durable, attractive, and machines cleanly, making it ideal for projects where the finished wood will remain visible.
Many modern Scandinavian-inspired furniture designs rely heavily on birch plywood because of its clean, minimalist appearance.
Cabinet-Grade Plywood
When you’re ready to build kitchen cabinets, built-ins, or higher-end furniture, cabinet-grade plywood becomes a worthwhile investment.
The faces are smoother, internal voids are minimized, and finished projects often feel noticeably more refined.
Hardwood Veneer Plywood
Want the appearance of expensive hardwood without paying premium hardwood prices?
Hardwood veneer plywood offers exactly that.
Its core provides the stability of plywood while the outer veneer delivers the rich appearance of oak, maple, walnut, or cherry.
For many DIY furniture makers, it’s the perfect balance between cost and aesthetics.
Choosing the Right Thickness
Thickness matters more than many beginners realize.
Choosing material that’s too thin can leave shelves sagging under weight. Going unnecessarily thick increases cost, project weight, and cutting difficulty.
As a general guide:
1/4-inch plywood
Perfect for:
- Drawer bottoms
- Cabinet backs
- Decorative panels
- Lightweight craft projects
1/2-inch plywood
Excellent for:
- Small shelves
- Storage boxes
- Children’s furniture
- Wall organizers
3/4-inch plywood
This is the workhorse of beginner woodworking.
It’s strong enough for:
- Bookshelves
- Cabinets
- Coffee tables
- Workbenches
- Desks
- Storage furniture
- Entertainment centers
If you’re unsure where to begin, 3/4-inch plywood is rarely the wrong choice.
One Small Decision That Changes Everything
Many new woodworkers believe their first successful project depends on buying expensive tools or mastering advanced joinery.
It doesn’t.
More often than not, success comes from something much simpler.
Choosing the right material from the very beginning removes dozens of problems before they ever have a chance to appear.
Plywood does exactly that.
It gives you the freedom to focus on learning how to measure accurately, cut cleanly, assemble confidently, and enjoy the process instead of constantly correcting mistakes.
That’s a far better foundation than chasing perfection.
And once you’ve picked the right sheet of plywood, the next step becomes much more exciting—turning it into something you’ll actually be proud to use.
In the next section, we’ll cover the surprisingly short list of tools you need to start building, along with a few inexpensive items that can dramatically improve both your results and your confidence.
Part 2: The Essential Tools and Skills That Set Every Beginner Up for Success
A lot of people postpone woodworking for months—or even years—because they believe they’re missing one important thing.
Usually, it’s not motivation.
It’s the workshop they imagine they need.
Social media has a way of making woodworking look like an expensive hobby reserved for people with sprawling garages filled with gleaming machines. Massive table saws. Wall-to-wall clamps. Specialty jigs for every imaginable cut.
It’s an inspiring image, but it’s also misleading.
The truth is far more encouraging.
Some of the best woodworkers began with a borrowed drill, a circular saw, and a sheet of plywood balanced across two sawhorses. Skill came first. Fancy equipment came later.
If you’re building beginner woodworking projects with plywood, a modest collection of reliable tools is more than enough to create furniture you’ll be proud to keep for years.
Build Your Skills Before You Build Your Tool Collection
One mistake almost every beginner makes is buying tools faster than they develop the skills to use them.
There’s nothing wrong with expanding your workshop over time. In fact, that’s part of the fun. But buying everything at once often creates unnecessary expense without improving the quality of your projects.
A better approach is simple: let your projects decide what tools you need next.
Start with the essentials, learn them well, and add new equipment only when your growing experience demands it.
You’ll spend less money, make fewer mistakes, and become a more confident woodworker in the process.
The Basic Tool Kit Every Beginner Should Own
You don’t need dozens of tools to build shelves, cabinets, benches, or small furniture.
These essentials will handle nearly every project in this guide.
Circular Saw
If there were one tool to recommend above all others, this would be it.
A quality circular saw paired with a straightedge guide allows you to break down full sheets of plywood into accurate, manageable pieces. It’s affordable, versatile, and capable of producing surprisingly clean cuts when fitted with a sharp blade designed for plywood.
For many beginners, it replaces the need for an expensive table saw during the first stages of learning.
Recommended reading: Woodworking Without a Table Saw: 9 Better Alternatives for Every Cut, Project, and Workshop
Cordless Drill and Driver
Few tools get used more often.
From drilling pilot holes to driving screws and installing hardware, a cordless drill quickly becomes the workhorse of your workshop.
Look for one with variable speed settings and a comfortable grip. You don’t need the most powerful model—reliability matters more than raw strength.
Orbital Sander
Ask experienced woodworkers where professional-looking furniture really begins, and many will give the same answer:
Sanding.
An orbital sander saves countless hours while producing smoother, more consistent surfaces than hand sanding alone.
It’s also one of the easiest tools for beginners to master.
Tape Measure
Precision starts long before the saw blade touches the wood.
A sturdy tape measure with clear markings will become one of the most frequently used items in your shop.
Measure carefully.
Then measure again.
Those extra few seconds often prevent hours of frustration later.
Speed Square
Simple, inexpensive, and incredibly useful.
A speed square helps you:
- Mark perfectly square cut lines
- Check corners during assembly
- Guide your circular saw for short cuts
- Verify that projects stay aligned
It’s one of those tools you’ll reach for dozens of times during every build.
Clamps
If wood glue is the heart of strong woodworking joints, clamps are the hands that hold everything together.
Many beginners underestimate how many clamps they’ll eventually own.
Start with four medium-sized clamps. Before long, you’ll understand why experienced woodworkers joke that you can never have too many.
Wood Glue
Quality wood glue creates joints that are often stronger than the surrounding wood itself.
Applied correctly, glue distributes stress across the joint instead of concentrating it around screws or nails.
Always wipe away excess glue before it dries. Your future self will thank you when it’s time to sand and finish the project.
Don’t Overlook Safety
Every enjoyable woodworking session begins the same way—with a commitment to working safely.
It’s easy to get caught up in the excitement of a new project, especially when you’re eager to see progress. But a few simple habits protect both your health and your confidence.
Keep these essentials within reach every time you step into your workspace:
- Safety glasses to shield your eyes from flying sawdust and debris
- Hearing protection when using power tools
- A dust mask or respirator to reduce exposure to fine wood particles
- Work gloves when handling rough sheets of plywood (remove them when operating spinning tools)
- A clean, well-lit workspace free from trip hazards
Safe habits become automatic with repetition, and they make every future project more enjoyable.
Five Fundamental Skills Every Beginner Should Learn First
Owning the right tools is only part of the equation.
The real transformation happens when simple techniques become second nature.
Fortunately, you don’t need advanced joinery or years of experience to create beautiful plywood furniture.
Master these five skills, and you’ll have the foundation for nearly every project that follows.
1. Measuring with Purpose
There’s a saying every woodworker hears early:
Measure twice. Cut once.
It sounds almost cliché—until one incorrect cut turns a $70 sheet of plywood into expensive firewood.
Instead of rushing through measurements, slow down.
Read the tape carefully.
Mark clearly.
Double-check every dimension before making the cut.
The few extra moments spent verifying measurements often save hours of repairs later.
2. Making Straight, Clean Cuts
A straight cut isn’t about having extraordinary talent.
It’s about using the right guide.
Clamp a straightedge to your plywood before cutting, or use a dedicated cutting guide designed for circular saws.
This simple habit dramatically improves accuracy and helps eliminate wandering cuts that can ruin an otherwise beautiful project.
To reduce splintering along the plywood veneer:
- Use a sharp, fine-tooth blade.
- Support the sheet properly during cutting.
- Apply painter’s tape over the cut line when working with finished surfaces.
Small adjustments like these make a surprising difference in the final appearance of your work.
3. Sanding Without Rushing
Sanding isn’t the most exciting part of woodworking.
It’s also one of the most important.
Many beginners stop too soon, leaving scratches that become painfully obvious once stain or finish is applied.
Instead, work gradually through progressively finer grits.
A common sequence looks like this:
- 80-grit for rough shaping
- 120-grit to remove saw marks
- 180-grit for smoothing
- 220-grit before applying finish
Let the sander do the work.
Pressing harder rarely makes sanding faster—it usually creates uneven surfaces that require even more correction later.
4. Building Strong Assemblies
Simple projects don’t require complicated joinery.
In fact, many sturdy plywood furniture pieces rely on just a few reliable methods:
- Butt joints reinforced with screws
- Pocket-hole joinery
- Wood glue for added strength
- Countersunk screws for a cleaner appearance
Take your time during assembly.
Check that every corner is square before tightening fasteners.
A project assembled carefully almost always looks more professional than one built in a hurry.
5. Learning to Be Patient
This might be the most valuable woodworking skill of all.
Wood glue needs time to cure.
Finishes need time to dry.
Measurements deserve a second look.
The temptation to rush is strong, especially when you’re eager to admire the finished project.
Resist it.
Woodworking rewards patience in ways few hobbies do.
The slower, more deliberate approach often produces results that look years beyond your actual experience.
The First Success Isn’t About Perfection
One of the biggest misconceptions surrounding woodworking is that experienced builders never make mistakes.
They do.
The difference is that they’ve learned to expect them—and adapt.
A cut might be a fraction of an inch short.
A shelf may need a slight adjustment.
A finish might require another coat.
None of those moments mean you’ve failed.
They’re simply part of learning how wood behaves and how craftsmanship develops over time.
Every experienced woodworker can point to a first project that wasn’t perfect.
Most of them wouldn’t change a thing.
Because that project proved something far more valuable than flawless joinery:
It proved they could build.
And once you believe that, the possibilities multiply quickly.
In the next section, it’s time to put those tools and skills to work as we begin building the first collection of beginner-friendly plywood projects—simple, practical creations that deliver quick wins while teaching techniques you’ll use for years to come.
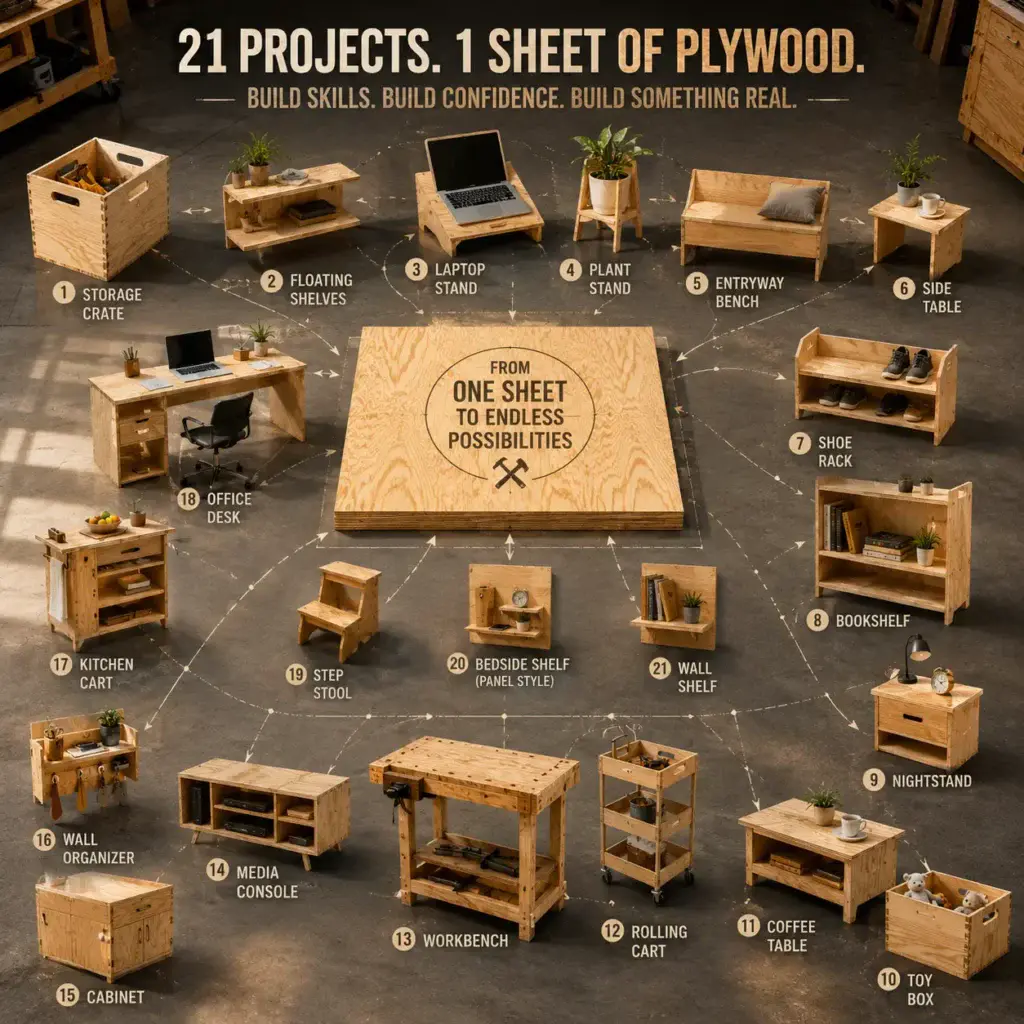
Part 3: Your First Seven Beginner Woodworking Projects with Plywood
Reading about woodworking is inspiring.
Actually building something is where everything changes.
The moment you make your first accurate cut, fit two pieces together, and watch an idea become something real, woodworking stops feeling like a skill other people have. It becomes something you can do, too.
That’s why your first projects matter so much.
They’re not just exercises—they’re confidence builders.
Each one introduces a handful of new techniques without piling on unnecessary complexity. By the time you’ve completed several of these beginner woodworking projects with plywood, you’ll notice something surprising: the tasks that once felt intimidating start to feel routine.
Let’s begin with projects that offer the biggest payoff for the smallest investment of time.
1. Simple Storage Crate
If there were a perfect “first project,” this would be it.
A plywood storage crate teaches nearly every foundational woodworking skill in a forgiving format. Straight cuts, square assembly, drilling pilot holes, sanding, and finishing all come together in a project that serves a practical purpose long after it’s finished.
Better yet, mistakes are easy to fix.
A storage crate doesn’t demand furniture-grade precision. Instead, it encourages experimentation without the pressure of perfection.
Skills You’ll Practice
- Measuring accurately
- Making straight cuts
- Drilling pilot holes
- Driving screws
- Sanding flat surfaces
- Applying a simple finish
Why It’s Worth Building
Storage never goes out of style.
Use one crate to organize power tools, stack several for garage shelving, or finish them with paint to create decorative storage inside the house.
It’s a simple project—but one you’ll probably build more than once.
2. Floating Shelves
Few projects offer a bigger visual transformation with less effort.
Floating shelves instantly make a room feel organized while giving you an opportunity to practice precision. Because shelves are mounted directly on the wall, accurate measuring becomes more important than ever.
A shelf that’s even slightly out of level is something you’ll notice every day.
Fortunately, this project teaches careful planning in a very rewarding way.
Skills You’ll Learn
- Leveling
- Wall mounting
- Hidden support installation
- Clean edge finishing
- Accurate layout
Great Places to Install Floating Shelves
- Living rooms
- Bedrooms
- Bathrooms
- Home offices
- Kitchens
- Garages
Simple plywood shelves can look surprisingly upscale with edge banding or a clear finish that highlights the wood grain.
3. Laptop Stand
Sometimes the smallest projects teach the biggest lessons.
A laptop stand requires only a modest amount of plywood, yet it introduces concepts like angled cuts, ergonomic design, and careful shaping.
It’s also one of those projects you’ll use every single day.
Whether you’re working from home, attending online classes, or simply browsing the internet more comfortably, a custom-built stand is a constant reminder of your growing skills.
Skills You’ll Practice
- Measuring angles
- Precision cutting
- Sanding edges
- Creating stable joints
Why Beginners Love It
It can often be completed in just a few hours, making it an ideal weekend confidence booster.
4. Entryway Bench
Now we’re moving into furniture.
An entryway bench looks impressive, but its construction is surprisingly approachable when built from plywood.
This project introduces stronger structural assemblies while remaining beginner-friendly. You’ll begin thinking about weight distribution, support, and overall stability—concepts that become increasingly important as your woodworking skills develop.
New Skills You’ll Develop
- Building load-bearing frames
- Reinforcing joints
- Keeping assemblies square
- Large-panel construction
A finished bench quickly becomes one of the most useful pieces in any home, offering a place to sit while putting on shoes and adding valuable storage beneath.
5. Small Side Table
Every woodworker remembers building their first table.
It’s a milestone.
Unlike storage projects, tables demand consistency. Legs need to align. Corners must remain square. Surfaces should feel smooth beneath your hands.
That challenge is exactly what makes this project so rewarding.
Don’t worry about creating a museum-quality masterpiece.
Focus instead on building something sturdy, functional, and uniquely yours.
Skills You’ll Strengthen
- Frame construction
- Surface alignment
- Structural assembly
- Fine sanding
- Applying protective finishes
Once completed, you’ll have a piece of furniture that guests may never guess was your first attempt.
6. Shoe Rack
Organization projects have a special advantage.
They solve real problems while teaching practical woodworking techniques.
A simple plywood shoe rack introduces repetitive measurements and evenly spaced shelves—excellent practice for larger furniture builds later on.
The design is flexible, too.
Need room for six pairs?
Make it taller.
Need storage for the entire family?
Simply extend the width.
Woodworking often becomes easier once you realize plans are starting points, not rigid rules.
Skills You’ll Practice
- Repeating identical measurements
- Shelf spacing
- Strong assemblies
- Efficient material use
It’s one of those projects you’ll appreciate every single morning.
7. Garage Tool Organizer
Every workshop, no matter how small, eventually needs organization.
Ironically, one of the best ways to improve your woodworking is by building something that helps you woodwork more efficiently.
A plywood tool organizer keeps drills, clamps, screwdrivers, measuring tools, and accessories within easy reach. It also encourages thoughtful design because you’ll be creating storage around your own collection of tools.
No two organizers look exactly alike.
That’s part of the fun.
Skills You’ll Learn
- Layout planning
- Custom spacing
- Wall mounting
- Practical design
- Efficient use of scrap plywood
You’ll quickly discover that organized tools don’t just save space—they save time and reduce frustration on every future project.
Small Projects, Big Lessons
At first glance, these seven projects might seem unrelated.
A storage crate.
A floating shelf.
A laptop stand.
A bench.
A table.
A shoe rack.
A tool organizer.
But beneath the surface, they’re all teaching the same essential habits.
You’re learning how to visualize a finished project before making the first cut.
You’re becoming more comfortable reading measurements without hesitation.
You’re discovering how plywood behaves when it’s cut, drilled, glued, and sanded.
Most importantly, you’re building confidence.
That’s a skill no tool can replace.
Each completed project makes the next one feel a little less intimidating and a little more exciting.
Before long, you’ll stop wondering whether you can build furniture.
You’ll start asking yourself what to build next.
In the next section, we’ll continue with Projects 8 through 14, where your skills begin to evolve from simple utility builds into functional furniture, cabinets, and storage solutions that look increasingly polished while introducing new techniques you’ll use for years to come.
Part 4: Beginner Woodworking Projects 8–14 That Build Real Furniture-Making Skills
There’s an interesting moment that happens after you’ve finished a few projects.
You stop thinking like someone who is “trying woodworking.”
Instead, you begin thinking like a builder.
The tape measure feels familiar in your hand. Setting up your saw takes less time. You notice small details—grain direction, clean edges, tighter joints—that probably escaped your attention just a few weekends ago.
This is where woodworking becomes more than a hobby.
It’s a skill that compounds.
Each project teaches something new, but it also reinforces everything you’ve already learned. That’s why the next group of plywood builds isn’t dramatically more difficult. They’re simply more complete. They ask you to combine familiar techniques in ways that produce furniture you’ll use every day.
Let’s keep building.
8. Wall Shelf Unit
A single floating shelf teaches accuracy.
A wall shelf unit teaches consistency.
Instead of installing one shelf, you’re creating an entire storage system where every level needs to line up perfectly. That repetition strengthens your measuring skills and helps you understand how even tiny errors can multiply over the course of a larger project.
Take your time with the layout.
Perfect spacing often matters just as much as the construction itself.
Skills You’ll Practice
- Consistent measurements
- Repetitive cuts
- Shelf spacing
- Vertical alignment
- Wall installation
Where It Works Best
- Home offices
- Garages
- Laundry rooms
- Bedrooms
- Living rooms
- Craft spaces
This project also introduces an important lesson in woodworking: functionality and design often go hand in hand.
9. Basic Bookcase
Ask experienced woodworkers which beginner project teaches the most useful lessons, and the humble bookcase frequently tops the list.
Why?
Because it combines nearly every foundational skill you’ve learned so far.
Straight cuts.
Square assembly.
Shelving.
Weight support.
Surface finishing.
Attention to detail.
Unlike decorative projects, a bookcase has a real job to do. It needs to support heavy loads while remaining perfectly stable.
Building one successfully is an enormous confidence boost.
Skills You’ll Strengthen
- Structural planning
- Shelf installation
- Preventing sag
- Reinforcing large panels
- Precision assembly
Choose quality plywood, and your finished bookcase can easily last for decades.
10. Plant Stand
Not every woodworking project needs to be large.
Some of the most satisfying builds are compact enough to complete in a single afternoon.
A plywood plant stand is a perfect example.
Its smaller size allows you to experiment with proportions, decorative details, and cleaner finishing techniques without committing an entire weekend to the project.
It’s also a wonderful opportunity to practice creating something that balances both beauty and function.
Skills You’ll Practice
- Decorative shaping
- Smooth edge finishing
- Surface preparation
- Compact furniture construction
Whether it holds a single houseplant or becomes part of a larger indoor garden, this project adds warmth and personality to almost any room.
11. Small Cabinet
This is where many beginners feel they’ve crossed into “real furniture.”
Building a cabinet introduces new concepts, but don’t let that intimidate you.
At its core, a cabinet is simply a carefully assembled box with added functionality.
The challenge isn’t complexity.
It’s precision.
Doors need consistent gaps.
Shelves should sit level.
Hardware must align cleanly.
Fortunately, plywood makes achieving those goals much easier because of its stability.
New Skills You’ll Learn
- Cabinet box construction
- Installing hinges
- Mounting shelves
- Hardware placement
- Door alignment
Once you’ve built one cabinet, countless future projects become much more approachable.
12. Children’s Bookshelf
Some projects carry a little extra meaning.
Building a bookshelf for a child isn’t just another woodworking exercise. It’s creating something that may become part of everyday family life for years to come.
Perhaps it holds bedtime stories.
Favorite picture books.
Treasured keepsakes.
Knowing something you built plays a small role in those memories makes the project feel especially rewarding.
Skills You’ll Develop
- Safe edge treatment
- Rounded corners
- Stable construction
- Furniture finishing
- Clean, attractive design
When building furniture for children, always prioritize smooth surfaces and eliminate sharp edges wherever possible.
13. Garage Storage Cabinet
Every woodworker eventually reaches the same conclusion:
The workshop somehow keeps getting smaller.
Not because the room shrinks—but because tools, supplies, hardware, and offcuts have a remarkable way of multiplying.
A garage storage cabinet solves that problem while introducing larger-scale cabinet construction.
Unlike smaller furniture pieces, this project encourages you to think about organization from the beginning.
Adjustable shelves.
Dedicated storage areas.
Efficient use of vertical space.
Those design choices make the cabinet more useful long after it’s finished.
Skills You’ll Practice
- Large panel assembly
- Cabinet reinforcement
- Adjustable shelving
- Door installation
- Efficient workshop organization
It’s a project that improves not only your storage but every woodworking session that follows.
14. Phone Charging Station
Sometimes the simplest ideas become everyday favorites.
A custom charging station keeps phones, tablets, smartwatches, earbuds, and charging cables neatly organized in one attractive location.
It may be one of the smallest projects in this guide, but don’t underestimate what it teaches.
Working on a compact piece requires careful planning because every measurement matters.
Small inaccuracies are often more noticeable than they are on larger furniture.
Skills You’ll Refine
- Precision layout
- Cable management
- Small-part assembly
- Decorative finishing
- Efficient use of scrap plywood
One added benefit?
This project is an excellent way to use leftover plywood from previous builds, reducing waste while creating something genuinely useful.
What These Projects Are Really Teaching You
At first glance, these seven projects seem very different.
A bookshelf has little in common with a charging station.
A cabinet doesn’t resemble a plant stand.
Yet every one of them is quietly reinforcing the same core principles.
You’re becoming more comfortable visualizing finished pieces before making the first cut.
You’re recognizing how careful planning simplifies assembly.
You’re beginning to understand that woodworking isn’t about memorizing hundreds of techniques—it’s about mastering a handful of fundamental skills and applying them in increasingly creative ways.
Even your relationship with mistakes starts to change.
Instead of seeing them as failures, you begin seeing them as information.
A shelf that’s slightly out of square teaches you to check alignment more often.
A visible screw hole reminds you to countersink before assembly.
A finish that dries unevenly encourages better surface preparation next time.
Those lessons stay with you far longer than any single project.
And that’s exactly how craftsmanship develops.
Not through perfection.
Through repetition, observation, and steady improvement.
In the next section, you’ll tackle the final group of projects—larger builds that combine everything you’ve learned so far. From a sturdy workbench to a rolling storage cart and a media console, these projects will challenge you just enough to reveal how far your skills have already come.
Part 5: The Final Seven Beginner Woodworking Projects That Bring Everything Together
By now, you’ve probably noticed something.
The projects aren’t just getting larger.
They’re becoming more intentional.
Earlier builds focused on learning individual skills—making a straight cut, assembling a simple frame, sanding a smooth surface. Those lessons were important, but they were only the beginning.
The projects in this section ask you to combine those individual skills into complete pieces of furniture and workshop essentials. You’ll think more about strength, balance, storage, proportions, and long-term durability.
This is where many beginners realize they aren’t just building projects anymore.
They’re building craftsmanship.
15. Coffee Table
Few furniture pieces see more daily use than a coffee table.
It holds books, drinks, laptops, family board games, holiday decorations, and sometimes even tired feet after a long day.
Building one from plywood is surprisingly approachable, yet it introduces a level of refinement that pushes your woodworking skills forward.
You’ll spend more time thinking about proportions, edge treatment, and the quality of your finish because this is a piece people actually notice.
Skills You’ll Strengthen
- Large tabletop assembly
- Keeping furniture square
- Reinforcing the base
- Smooth edge finishing
- Applying durable protective finishes
Take your time with the final sanding.
The smoother the surface feels beneath your hand, the more professional the finished table will look.
16. Nightstand
A nightstand may seem like a simple box with legs, but it teaches an important lesson in precision.
Everything is visible.
The top should sit perfectly level.
The shelves must be evenly spaced.
If you decide to include a drawer, alignment becomes even more important.
Unlike workshop projects, bedroom furniture often becomes part of your home’s décor, making attention to detail especially rewarding.
Skills You’ll Practice
- Furniture proportions
- Shelf placement
- Drawer openings
- Clean assembly
- Decorative finishing
It’s also one of those projects you’ll interact with every single day—a quiet reminder of what you’ve learned.
17. Toy Box
Some woodworking projects become family heirlooms without anyone planning for them.
A toy box often falls into that category.
Years from now, it may no longer hold toys.
Instead, it might store old photographs, blankets, holiday decorations, or keepsakes that carry far more value than the wood itself.
Building one introduces several useful woodworking concepts while creating something both practical and meaningful.
Skills You’ll Learn
- Large-panel construction
- Lid installation
- Reinforcing corners
- Safe hardware installation
- Smooth edge preparation
If you’re building for children, always choose soft-close hinges or lid supports designed to prevent accidental slamming.
Safety is every bit as important as appearance.
18. Rolling Storage Cart
Organization has a funny way of making every future project easier.
A rolling storage cart combines mobility with function, creating flexible storage that moves wherever your work happens.
Need extra space beside your workbench?
Roll it over.
Working outside on a sunny afternoon?
Take your tools with you.
This project introduces hardware installation in a practical, beginner-friendly way.
Skills You’ll Develop
- Installing casters
- Building rigid frames
- Weight distribution
- Shelf construction
- Functional workshop design
By the time you’re finished, you’ll wonder how you ever worked without it.
19. Step Stool
At first glance, a step stool seems almost too simple.
Don’t let that fool you.
Unlike decorative furniture, a step stool must support the full weight of a person. Every joint, every screw, and every piece of plywood contributes directly to safety.
That responsibility makes it an outstanding project for learning structural thinking.
Skills You’ll Practice
- Reinforced joinery
- Weight-bearing construction
- Structural stability
- Precise assembly
- Non-slip finishing techniques
Before calling the project complete, test it carefully on a flat surface to ensure there’s no rocking or movement.
Solid construction builds confidence—not only in the project but in your own growing abilities.
20. Mini Workbench
There’s a certain milestone every woodworker reaches.
Eventually, you stop building projects on makeshift tables, folding chairs, or the garage floor.
You build a workbench.
It doesn’t have to be massive.
It doesn’t need expensive hardwood.
What matters is that it’s flat, sturdy, and built specifically for the way you like to work.
Ironically, one of the most useful woodworking projects you’ll ever build is the one that helps you build everything else.
Skills You’ll Strengthen
- Structural framing
- Flat surface assembly
- Reinforcement techniques
- Practical workshop design
- Long-term durability
Expect this to become one of the hardest-working pieces in your workshop.
21. Simple Media Console
Congratulations.
You’ve reached the final project.
A media console brings together nearly every technique you’ve learned throughout this guide.
Large panels.
Shelving.
Precise measurements.
Cabinet-style construction.
Clean finishing.
Thoughtful design.
Unlike your first storage crate, this project asks you to think beyond simply making something functional.
Now you’re considering appearance, balance, proportions, and craftsmanship.
That’s a remarkable progression.
Skills You’ll Bring Together
- Furniture planning
- Cabinet construction
- Shelf installation
- Cable management
- Decorative finishing
- Overall project organization
Take your time.
There’s no prize for finishing first.
The goal is to create a piece you’ll enjoy seeing every day.
What Twenty-One Projects Really Teach
It’s tempting to look at this list as twenty-one separate builds.
In reality, they’re chapters in the same story.
Each project quietly prepares you for the next.
The storage crate teaches confidence.
The floating shelves teach accuracy.
The bench introduces structural thinking.
The cabinet develops precision.
The workbench reinforces durability.
The media console combines everything.
That’s how woodworking works.
Skills don’t arrive all at once.
They stack.
One careful cut.
One properly aligned shelf.
One finished project at a time.
If you were to compare your abilities before the first project and after completing the twenty-first, the difference would likely surprise you.
Not because you’ve mastered every woodworking technique.
But because you’ve developed something far more valuable:
The confidence to tackle projects that once seemed impossible.
And that confidence doesn’t come from reading about woodworking.
It comes from building.
In the next section, we’ll step away from individual projects and focus on the workflow that ties every successful build together—from planning and cutting to assembly, sanding, and finishing—so each future project becomes smoother, faster, and more enjoyable than the last.
Part 6: The Simple Building Process Every Successful Plywood Project Follows
If you’ve ever watched an experienced woodworker, you may have noticed something unexpected.
They rarely seem rushed.
There’s no frantic searching for tools. No guessing measurements. No cutting first and hoping everything works out later.
Instead, every movement appears deliberate.
That’s not because they’ve memorized thousands of woodworking techniques.
It’s because they’ve learned to trust a process.
Whether they’re building a small shelf, a custom cabinet, or an entire entertainment center, the workflow remains remarkably consistent. Once you understand that sequence, every project feels less intimidating because you always know what comes next.
Think of it as a roadmap.
No matter how different the destination may be, the journey follows familiar steps.
Step 1: Start with a Clear Plan
The temptation to dive straight into cutting wood is strong.
After all, that’s the exciting part.
But experienced builders know that the quality of a project is often determined before the saw is ever switched on.
Take time to understand exactly what you’re building.
Study the measurements.
Look over the project plans.
Visualize how every piece connects before making the first cut.
It may feel like you’re slowing down.
In reality, you’re saving yourself hours of frustration later.
Create a Simple Cut List
One habit separates organized builders from frustrated ones:
Write everything down.
Before touching the plywood, make a list that includes:
- Every individual part
- Finished dimensions
- Quantity required
- Material thickness
- Any special notes
Having a cut list beside you reduces mistakes and helps you use each sheet of plywood more efficiently.
It also minimizes waste—something both your wallet and the environment will appreciate.
Step 2: Plan Your Cuts Before Cutting Anything
Plywood is sold in large sheets.
Every cut changes what’s left.
That’s why experienced woodworkers rarely begin with the saw.
Instead, they spend a few minutes arranging all the required pieces on paper or using simple layout software.
This practice, often called cut planning, helps you:
- Reduce wasted material
- Avoid awkward leftover pieces
- Keep grain direction consistent
- Save both time and money
Even a rough sketch with a pencil can make a dramatic difference.
Step 3: Cut Slowly, Not Quickly
One of the biggest surprises for beginners is discovering that accurate woodworking has very little to do with speed.
Fast cuts often create:
- Splintered edges
- Wandering cut lines
- Burn marks
- Poor-fitting joints
Slow, controlled cuts almost always produce cleaner results.
Before each cut:
Support the plywood properly.
Secure it with clamps whenever possible.
Position yourself comfortably.
Then let the saw move at its own pace.
Forcing the blade rarely improves anything.
In fact, it usually creates extra work.
Label Every Piece Immediately
This tiny habit prevents enormous confusion.
As soon as each panel is cut, write directly on the wood with a pencil.
Simple labels like:
- Left side
- Right side
- Top
- Bottom
- Shelf A
- Back panel
can save you from accidentally assembling the wrong pieces later.
Many experienced woodworkers still do this on every project.
Step 4: Dry Fit Before You Reach for the Glue
Imagine completing every cut, applying glue, driving screws—and then realizing one panel is backwards.
It happens more often than you’d think.
That’s why dry fitting is so valuable.
Simply assemble the entire project without glue first.
Check:
- Do the pieces fit correctly?
- Are all corners square?
- Do shelves align properly?
- Are measurements still accurate?
Finding a mistake at this stage takes minutes to correct.
Finding it after glue has cured can take hours.
Step 5: Assemble Carefully
Once you’re satisfied with the dry fit, it’s time for permanent assembly.
This is where patience becomes one of your greatest tools.
Apply wood glue evenly.
Use just enough to cover the joint without excessive squeeze-out.
Clamp pieces together before driving screws whenever possible.
Then tighten fasteners gradually rather than forcing one side completely tight before the others.
This helps keep the project square as it comes together.
Check for Square Frequently
Don’t assume everything stayed aligned during assembly.
Use a speed square or measure diagonally from opposite corners.
Matching diagonal measurements usually indicate the project is square.
Tiny adjustments made now prevent much larger problems later.
Step 6: Sand Like the Finish Depends on It—Because It Does
Many beginners think the finish is what makes furniture beautiful.
In reality, sanding deserves most of the credit.
Paint, stain, and clear finishes don’t hide rough surfaces.
They reveal them.
Take your time.
Start with a coarser grit if needed, then work progressively toward finer grits.
Always sand with the wood grain whenever possible.
Pay special attention to:
- Plywood edges
- Corners
- Visible surfaces
- Areas around screw holes
Smooth preparation creates professional-looking results long before the first coat of finish is applied.
Step 7: Apply the Right Finish for the Project
The finish you choose depends on how the project will be used.
A bookshelf has different needs than an outdoor bench.
A workbench doesn’t require the same appearance as a coffee table.
Common beginner-friendly finishes include:
Paint
Perfect for colorful furniture and modern interiors.
Excellent at hiding plywood edge variations.
Water-Based Polyurethane
Clear, durable, and quick drying.
A great choice for furniture that sees daily use.
Oil-Based Polyurethane
Offers exceptional durability and a warm, rich appearance.
Ideal for tables and work surfaces.
Danish Oil
Easy to apply.
Enhances the natural beauty of wood without creating a heavy surface film.
Hardwax Oil
Increasingly popular among furniture makers because it’s attractive, durable, and easy to repair if damaged.
Whichever finish you choose, follow the manufacturer’s drying times carefully.
Rushing this final stage often undermines hours of careful craftsmanship.
Build Better Habits, Not Just Better Projects
The workflow you’ve just learned isn’t reserved for professionals.
It’s used by hobbyists, cabinetmakers, furniture builders, and experienced craftspeople around the world because it works.
Plan first.
Measure carefully.
Cut deliberately.
Test the fit.
Assemble patiently.
Sand thoroughly.
Finish thoughtfully.
Simple habits repeated consistently create remarkable results.
More importantly, they reduce stress.
Instead of wondering what to do next, you’ll move confidently from one stage to another, knowing every step contributes to a stronger, cleaner, and more attractive finished project.
In the next section, we’ll look at the mistakes nearly every beginner makes when working with plywood—and, more importantly, how to avoid them before they become expensive lessons.
Part 7: Common Beginner Mistakes When Working with Plywood (And How to Avoid Them)
Every experienced woodworker has a collection of stories.
Some involve beautiful projects they’re still proud of years later.
Others begin with phrases like, “I measured that twice…” or “I thought it would fit.”
Those stories aren’t signs of failure.
They’re reminders that woodworking is learned through experience, not perfection.
The encouraging news is that many beginner mistakes are surprisingly predictable. Once you know what they are, you can avoid most of them before they happen.
Let’s look at the lessons that save the most time, money, and frustration.
Mistake #1: Buying the Cheapest Plywood You Can Find
Everyone wants to save money, especially when starting a new hobby.
But there’s an important difference between buying affordable materials and buying poor-quality materials.
Low-grade plywood often hides problems that don’t become obvious until you’re halfway through a project.
You may discover:
- Large internal voids
- Thin face veneers
- Rough surfaces
- Warped sheets
- Weak glue layers
- Uneven thickness
Those issues make clean cuts harder, weaken joints, and create extra work during finishing.
A Better Approach
Choose the best plywood your budget reasonably allows.
For beginner furniture, cabinet-grade or quality birch plywood often delivers noticeably better results without dramatically increasing the overall project cost.
Remember, you’re investing hours of your time.
Good material helps those hours pay off.
Mistake #2: Ignoring Plywood Grain Direction
Many beginners assume plywood has no grain because it’s made from layers.
Technically, that’s not true.
The outer veneer still has a visible grain pattern, and how you position that grain affects the finished appearance.
Take a moment before cutting to think about what people will actually see.
For example:
- Vertical grain often looks best on cabinet sides.
- Horizontal grain creates wider visual lines on tabletops.
- Matching grain across adjacent panels gives furniture a more intentional, professional appearance.
This small design choice can completely change how a finished project feels.
Mistake #3: Forgetting About Tear-Out
One of the first surprises beginners encounter is splintering along the edge of plywood.
This happens because the thin outer veneer can chip as the saw blade exits the cut.
Fortunately, preventing tear-out is much easier than repairing it.
Simple Ways to Get Cleaner Cuts
- Use a sharp plywood blade with a high tooth count.
- Support the sheet fully during cutting.
- Apply painter’s tape over the cut line.
- Cut with the finished face positioned correctly for your saw.
- Let the blade do the work instead of forcing the cut.
These habits quickly become second nature and dramatically improve the appearance of your projects.
Mistake #4: Skipping the Dry Fit
Excitement has a funny way of speeding people up.
After spending hours cutting every piece, it’s tempting to reach for the glue immediately.
Resist that urge.
A dry fit gives you one final opportunity to confirm that everything fits exactly as planned.
Without glue, adjustments are easy.
After glue cures, even small corrections become far more difficult.
Experienced woodworkers rarely skip this step—not because they expect mistakes, but because they know catching one early is always easier.
Mistake #5: Using Too Much Glue
More glue doesn’t create stronger joints.
It usually creates more cleanup.
A thin, even layer is all you need.
Excess glue squeezes out, dries on the surface, and can interfere with stain or clear finishes if it isn’t removed completely.
Keep a damp cloth nearby while assembling your project.
Wiping away squeeze-out immediately saves a surprising amount of sanding later.
Mistake #6: Driving Screws Without Pilot Holes
It’s easy to think plywood won’t split because it’s engineered wood.
Sometimes that’s true.
Sometimes it isn’t.
Driving screws directly into plywood—especially near edges—can still cause splitting, mushrooming, or uneven joints.
Pilot holes solve most of those problems.
They also make assembly easier by guiding screws exactly where you want them.
For visible surfaces, countersinking creates an even cleaner result by allowing screw heads to sit flush with the surface.
Mistake #7: Rushing Through Sanding
Ask ten experienced furniture builders where beginners lose the most quality, and sanding will almost certainly make the list.
Many people stop sanding as soon as the wood looks smooth.
Instead, close your eyes.
Run your hand across the surface.
Your fingertips will often notice imperfections your eyes completely missed.
Work gradually through finer grits rather than jumping straight to the smoothest paper.
Patience here pays enormous dividends once the finish goes on.
Mistake #8: Applying Finish Too Soon
The excitement of seeing a completed project often leads to one common mistake:
Finishing before the wood is truly ready.
Dust left on the surface.
Glue residue around joints.
Small scratches hidden beneath sanding dust.
Every one of these becomes much more obvious after stain or polyurethane is applied.
Before opening the finish, take a few extra minutes to:
- Vacuum the surface.
- Wipe it with a clean cloth.
- Inspect under good lighting.
- Feel every visible area with your hand.
Those final checks can transform a good project into a great one.
Mistake #9: Trying to Build Something Too Advanced Too Soon
Ambition is a wonderful thing.
It’s also one of the quickest ways to become discouraged.
A beautiful dining table with intricate joinery might look inspiring online, but tackling it as a first project often leads to frustration rather than satisfaction.
There’s nothing wrong with dreaming big.
Just build the skills that support those dreams first.
Each shelf, bench, cabinet, and storage project teaches techniques you’ll eventually use on larger, more complex furniture.
Progress feels much faster when each project stretches your abilities without overwhelming them.
Mistake #10: Comparing Your First Project to Someone Else’s Hundredth
This may be the most common mistake of all.
The internet makes it easy to compare your first bookshelf to furniture built by professionals with decades of experience.
That’s an impossible standard.
Every skilled woodworker once struggled with crooked cuts.
Everyone has misread a tape measure.
Everyone has sanded through veneer, drilled a hole in the wrong place, or assembled something backwards.
Those moments aren’t evidence that you lack talent.
They’re evidence that you’re learning.
Woodworking isn’t a race.
It’s a craft.
The goal isn’t perfection.
The goal is improvement.
Small Improvements Create Remarkable Results
One of the most rewarding aspects of woodworking is how quickly small habits begin to compound.
Measure a little more carefully.
Sand a little more thoroughly.
Slow down during assembly.
Plan your cuts before making them.
None of these changes feels dramatic on its own.
Together, they completely transform the quality of your work.
You’ll start noticing tighter joints.
Cleaner edges.
Better-fitting parts.
Smoother finishes.
Projects that once took an entire weekend become easier because you’ve eliminated the mistakes that used to slow you down.
That’s how confidence grows—not through shortcuts, but through consistent practice.
And once your building process becomes more reliable, the final piece of the puzzle is learning how to protect and enhance your work with the right finish.
In the next section, we’ll explore the best finishes for plywood projects, how to choose the right one for each build, and the simple techniques that make beginner projects look polished, durable, and surprisingly professional.
Part 8: How to Finish Plywood Projects So They Look Like Professional Furniture
There’s a moment in every woodworking project when everything changes.
The cutting is finished.
The screws are tight.
The glue has cured.
The piece finally stands on its own.
And yet…it still doesn’t quite look finished.
That’s because construction and craftsmanship aren’t exactly the same thing.
A well-built project becomes a beautiful project during the finishing stage.
The finish isn’t there to hide mistakes. It highlights the care you’ve already put into every measurement, every joint, and every carefully sanded surface. Skip this step—or rush through it—and even an excellent project can look unfinished.
Take your time here.
The final few hours often have the biggest impact on the way your furniture looks for years to come.
Why Finishing Matters More Than Most Beginners Realize
A finish does far more than improve appearance.
It protects the wood from everyday life.
Without protection, plywood is more vulnerable to:
- Moisture
- Dirt
- Household stains
- Scratches
- UV exposure
- Daily wear
A properly finished surface is easier to clean, more durable, and far more enjoyable to use.
Think of the finish as the final layer of craftsmanship.
Prepare the Surface Before Opening the Finish
One of the biggest misconceptions in woodworking is that finishes fix imperfections.
They don’t.
They reveal them.
A tiny scratch that seemed invisible before finishing can suddenly become impossible to ignore.
The same goes for dried glue, uneven sanding, and rough plywood edges.
Before applying anything, slow down and inspect your project carefully.
Your Pre-Finish Checklist
- Sand every visible surface evenly.
- Remove dust with a vacuum or soft brush.
- Wipe the wood with a clean microfiber cloth.
- Check corners for glue residue.
- Inspect the project under bright lighting.
- Run your hand across every surface.
Your fingertips often detect imperfections long before your eyes do.
Paint: The Simplest Finish for Beginners
Paint is often overlooked by new woodworkers, but it’s one of the easiest ways to create clean, modern furniture.
It also hides many of the natural variations found in plywood.
Paint works especially well for:
- Bookshelves
- Storage cabinets
- Toy boxes
- Shoe racks
- Wall organizers
- Built-in furniture
For the best results:
Apply a quality primer first.
Lightly sand between coats.
Allow each coat to dry completely before applying the next.
Patience produces a smoother finish than rushing through multiple coats in one afternoon.
Clear Polyurethane: Durable and Beginner-Friendly
If you love the natural appearance of wood, polyurethane is one of the safest choices.
It forms a protective layer over the surface while allowing the wood grain to remain visible.
Water-Based Polyurethane
Many beginners prefer water-based finishes because they:
- Dry quickly
- Have minimal odor
- Stay crystal clear
- Clean up easily with water
They’re an excellent choice for light-colored plywood such as birch.
Oil-Based Polyurethane
Oil-based versions create a richer, warmer appearance.
They’re especially attractive on hardwood veneer plywood where enhancing the grain is part of the design.
The trade-off?
Longer drying times.
If you’re willing to wait, the results can be outstanding.
Danish Oil: A Natural Look That Feels Warm
Not everyone wants a glossy finish.
Danish oil offers something different.
Instead of sitting heavily on top of the wood, it penetrates the surface and enhances the grain from within.
The result feels natural.
Warm.
Comfortable.
It’s particularly well suited for:
- Coffee tables
- Side tables
- Decorative shelving
- Plant stands
- Accent furniture
One of its greatest advantages is easy maintenance.
If the finish becomes worn over time, another coat can often restore its appearance without stripping the entire piece.
Hardwax Oil: A Favorite Among Modern Furniture Makers
In recent years, hardwax oil has become increasingly popular among professional furniture builders.
It’s easy to see why.
It combines the natural appearance of oil with improved durability and excellent repairability.
Rather than forming a thick plastic-like layer, hardwax oil leaves the wood feeling authentic while providing reliable everyday protection.
It’s an excellent option for:
- Dining tables
- Desks
- Cabinets
- Media consoles
- Modern plywood furniture
Many premium handmade furniture makers rely on hardwax oils because they age beautifully instead of looking worn.
Don’t Forget the Plywood Edges
One detail separates many beginner projects from professional-looking furniture.
The edges.
The layered construction of plywood is part of its identity.
Some woodworkers celebrate that look.
Others prefer a cleaner, more seamless appearance.
There are several ways to finish plywood edges.
Sand Them Smooth
For workshop projects and modern minimalist designs, carefully sanded edges often look clean and intentional.
Apply Edge Banding
Edge banding covers exposed layers with a thin strip of matching wood veneer.
Once trimmed and sanded, the edge resembles solid hardwood.
It’s an excellent choice for:
- Cabinets
- Bookshelves
- Desks
- Entertainment centers
- Furniture with visible edges
Add Solid Wood Trim
For higher-end furniture, attaching narrow strips of hardwood creates a durable edge that can be shaped and finished beautifully.
It requires a bit more work but produces exceptional results.
Let the Finish Cure—Not Just Dry
This is where patience often disappears.
The finish looks dry.
The project looks finished.
Naturally, you want to start using it.
But drying and curing aren’t the same thing.
A surface may feel dry after a few hours while still taking several days—or even weeks—to reach full hardness.
Using furniture too early can leave:
- Fingerprints
- Dents
- Water rings
- Scratches
- Impressions from heavy objects
Always follow the manufacturer’s curing recommendations.
The extra waiting time protects all the effort you’ve already invested.
Simple Habits That Create Better-Looking Furniture
Professional-looking results rarely come from secret techniques.
More often, they come from ordinary habits practiced consistently.
Before calling any project complete:
- Inspect every corner.
- Remove every trace of sanding dust.
- Break sharp edges with light sanding.
- Apply thin, even coats instead of thick ones.
- Sand lightly between coats when recommended.
- Give each layer enough time to dry.
- Resist the temptation to rush the final step.
Those small decisions add up.
They create furniture that doesn’t just function well—it feels thoughtfully made.
And that’s something people notice immediately, even if they can’t explain exactly why.
In the next section, we’ll answer the questions nearly every beginner asks after finishing their first few plywood projects—from choosing the right plywood and essential tools to building stronger furniture, improving accuracy, and continuing your woodworking journey with confidence.
Part 9: Frequently Asked Questions About Beginner Woodworking Projects with Plywood
No matter how carefully you plan your first project, questions always seem to appear halfway through the build.
Is this the right plywood?
Should I use screws or wood glue?
Why did the edge splinter?
Did I sand enough?
If you’ve asked yourself any of those questions, you’re in good company. Every woodworker—whether they’re building a simple shelf or a custom dining table—started exactly where you are now.
The answers below cover the concerns that come up most often for beginners. More importantly, they’ll help you avoid common frustrations before they interrupt your next project.
Is plywood really a good choice for beginner woodworking?
Absolutely.
In fact, it’s one of the best materials you can start with.
Quality plywood is stable, affordable, widely available, and easier to work with than many solid hardwoods. Because it resists warping and seasonal movement, it’s more forgiving while you’re learning fundamental woodworking skills.
It also allows you to build practical furniture without spending a fortune on materials.
What type of plywood should I buy for furniture projects?
For most beginner furniture builds, 3/4-inch birch plywood or cabinet-grade plywood offers the best combination of strength, appearance, and durability.
If you’re building utility shelves or garage storage, sanded plywood is often an excellent value.
Projects like drawer bottoms or cabinet backs usually require only 1/4-inch plywood, while lighter shelving and storage boxes often work well with 1/2-inch material.
Choosing the right thickness is just as important as choosing the right grade.
Can I build furniture with only basic tools?
Yes.
Many beginners are surprised by how little equipment they actually need.
A simple workshop consisting of:
- Circular saw
- Cordless drill
- Orbital sander
- Tape measure
- Speed square
- Clamps
- Wood glue
is capable of producing an impressive range of plywood furniture.
As your skills grow, your tool collection naturally grows with them.
There’s no need to buy everything on day one.
What’s the easiest plywood project for someone with no experience?
A storage crate is often the perfect starting point.
It’s simple enough to complete in a single afternoon while teaching essential skills like measuring, cutting, drilling, assembling, and sanding.
Other beginner-friendly projects include:
- Floating shelves
- Plant stands
- Shoe racks
- Laptop stands
- Simple wall organizers
Each project builds confidence without becoming overwhelming.
How do I keep plywood from splintering when I cut it?
Splintering, often called tear-out, is common—but it’s also preventable.
To get cleaner cuts:
- Use a sharp blade designed for plywood.
- Support the sheet fully during cutting.
- Apply painter’s tape over the cut line.
- Cut slowly without forcing the saw.
- Replace dull blades before they begin tearing the veneer.
Even experienced woodworkers follow these same practices.
Should I use nails, screws, or wood glue?
For most beginner woodworking projects with plywood, the strongest results come from combining wood glue with screws.
Glue creates a strong bond across the entire joint, while screws provide immediate holding power during assembly.
As your woodworking skills progress, you’ll also begin using joinery techniques like pocket holes, dados, and rabbets to create cleaner, stronger furniture.
How do I make plywood furniture look more expensive?
Small details have the biggest impact.
Focus on:
- Careful sanding
- Consistent edge treatment
- Quality hardware
- Even finish application
- Accurate measurements
- Tight joints
- Matching grain direction
Adding edge banding or solid wood trim can also dramatically improve the appearance of plywood furniture.
Professional-looking work is usually the result of patience, not expensive materials.
Can plywood furniture last for many years?
Without question.
Properly constructed plywood furniture is remarkably durable.
Many kitchens, libraries, offices, and workshops rely on plywood cabinets and shelving that remain in excellent condition for decades.
The key is choosing quality materials, building strong joints, and protecting the finished piece with an appropriate finish.
What’s the biggest mistake beginners make?
Trying to move too quickly.
Woodworking rewards patience.
Most problems can be traced back to rushing:
- Cutting before measuring twice.
- Skipping the dry fit.
- Sanding too quickly.
- Applying finish before the surface is ready.
- Using furniture before the finish has fully cured.
Slow, thoughtful work almost always produces better results—and it’s usually more enjoyable too.
How can I continue improving after these projects?
The best woodworkers never stop learning.
Once you’ve completed a few beginner plywood projects, consider exploring new techniques one at a time.
You might learn:
- Pocket-hole joinery
- Dado joints
- Rabbets
- Edge banding
- Cabinet construction
- Drawer building
- Wood finishing
- Workshop organization
Every new skill expands the types of projects you can confidently build.
And perhaps more importantly, each one makes the next project feel just a little easier than the last.
Keep Building, Keep Learning
One of the greatest rewards of woodworking is that progress is easy to see.
Unlike many hobbies, every hour you invest leaves something tangible behind.
A shelf.
A cabinet.
A bench.
A workbench.
A media console.
Each project becomes proof that you’ve learned something new.
The confidence you gain isn’t abstract.
It’s sitting in your living room, your garage, your office, or your workshop—built with your own hands.
That’s what keeps so many people coming back to woodworking year after year.
Not because every project is perfect.
But because every project teaches something worth carrying into the next one.
In the final section, we’ll share a curated collection of tools, products, and learning resources that pair naturally with these beginner woodworking projects with plywood, helping you build more efficiently, work more safely, and continue developing your skills with confidence.
Part 10: Products / Tools / Resources
Every woodworker remembers the excitement of finishing that first successful project.
What often comes next is even more exciting.
You start seeing possibilities everywhere.
An empty corner could use a bookshelf. The garage needs better organization. The entryway would look great with a custom bench. Suddenly, you’re not just looking at furniture—you’re looking at future projects.
The right tools and resources won’t replace experience, but they can make the learning process smoother, more enjoyable, and far less frustrating. As your confidence grows, you’ll naturally expand your workshop and explore more advanced techniques.
Below is a collection of practical recommendations that pair perfectly with beginner woodworking projects with plywood.
Essential Hand Tools
These are the tools you’ll reach for on nearly every project.
- Tape measure
- Combination square
- Speed square
- Utility knife
- Carpenter’s pencil
- Marking gauge
- Claw hammer
- Rubber mallet
- Chisel set
- Screwdriver set
Even after years of woodworking, these simple tools remain everyday essentials.
Learn more: 25 Woodworking Projects With Hand Tools That Build Real Skills (Beginner to Advanced)
Recommended Power Tools
You don’t need a professional workshop to build beautiful furniture.
Start with a small collection of reliable tools and expand as your projects become more ambitious.
Recommended beginner power tools include:
- Circular saw
- Cordless drill and impact driver
- Random orbital sander
- Jigsaw
- Trim router
- Shop vacuum
- Compact miter saw (optional)
- Table saw (future upgrade)
Learning to use a few tools well is far more valuable than owning dozens you rarely touch.
Learn more: Woodworking Power Equipment Mastery: Build a Professional Workshop Without Buying the Wrong Tools
Measuring and Layout Equipment
Accurate measuring is one of the biggest differences between frustrating projects and satisfying ones.
Helpful layout tools include:
- Long straightedge
- Aluminum guide rail
- Digital angle finder
- Sliding bevel gauge
- Framing square
- Center punch
- Precision ruler
- Story stick for repeated measurements
These inexpensive tools improve consistency across every project you build.
Clamps You’ll Never Regret Buying
Ask any experienced woodworker what they wish they’d purchased sooner.
Chances are, they’ll say more clamps.
A good starter collection includes:
- Bar clamps
- F-style clamps
- Spring clamps
- Corner clamps
- Parallel clamps (future upgrade)
Clamps don’t just hold projects together—they give you time to work carefully and accurately.
Plywood Accessories Worth Keeping on Hand
Small accessories often solve big problems.
Consider stocking your workshop with:
- Edge banding
- Wood filler
- Sandpaper in multiple grits
- Painter’s tape
- Pocket-hole screws
- Quality wood glue
- Brad nails
- Shelf pins
- Cabinet hinges
- Drawer slides
Keeping these supplies nearby makes it easier to finish projects without unnecessary trips to the hardware store.
Safety Equipment Every Workshop Needs
Woodworking should be enjoyable from beginning to end.
Protecting yourself is part of becoming a skilled craftsperson.
Keep these essentials readily available:
- Safety glasses
- Hearing protection
- Dust mask or respirator
- Push sticks
- Work gloves for handling materials
- First-aid kit
- Fire extinguisher
- Bright workshop lighting
Safe habits become automatic with practice and allow you to focus on building with confidence.
Finishing Supplies
A great finish starts with the right materials.
Helpful supplies include:
- Tack cloths
- Foam brushes
- High-quality paint brushes
- Microfiber cloths
- Lint-free rags
- Water-based polyurethane
- Oil-based polyurethane
- Danish oil
- Hardwax oil
- Wood stain
- Paint primer
- Fine finishing sandpaper
Taking care during the finishing stage often makes the biggest visual difference in the final project.
Workshop Organization Essentials
A tidy workspace saves time, reduces frustration, and makes woodworking more enjoyable.
Consider adding:
- Wall-mounted tool storage
- Small parts organizers
- Hardware bins
- Clamp rack
- Lumber storage rack
- Mobile work cart
- Extension cord reel
- Magnetic tool holders
- Rolling storage cabinets
As your collection of tools grows, organization becomes just as important as the tools themselves.
Books That Help You Grow as a Woodworker
Hands-on practice is essential, but learning from experienced craftspeople can dramatically shorten the learning curve.
Look for books covering topics such as:
- Beginner woodworking fundamentals
- Furniture building
- Cabinetmaking
- Joinery techniques
- Wood finishing
- Workshop setup
- Project planning
- Tool maintenance
A well-chosen woodworking library becomes a valuable reference that you’ll return to again and again.
Skills to Learn After These Beginner Projects
Once you’ve completed the projects in this guide, you’ll have a strong foundation to explore more advanced woodworking techniques.
Some excellent next steps include:
- Pocket-hole joinery
- Dados and rabbets
- Mortise and tenon joints
- Box joints
- Dovetail joinery
- Cabinet construction
- Drawer building
- Face-frame assembly
- Wood bending techniques
- Veneering
- Furniture design
- Workshop workflow optimization
Adding one new skill at a time keeps the learning process enjoyable and prevents overwhelm.
Project Ideas for Your Next Build
Ready for a new challenge?
Here are some natural next projects after mastering beginner woodworking projects with plywood:
- Kitchen pantry cabinet
- Entryway storage bench with cubbies
- Farmhouse coffee table
- Floating entertainment center
- Garage workbench with storage
- Children’s reading nook
- Coffee bar cabinet
- Bathroom vanity
- Home office desk
- Murphy bed
- Closet organization system
- Outdoor storage bench
- Garden potting station
- Rolling tool chest
- Built-in bookshelves
Each project builds on the same core woodworking skills you’ve already developed while introducing new techniques and design possibilities.
Continue Expanding Your Woodworking Knowledge
As you gain experience, you’ll benefit from exploring related woodworking topics that deepen both your skills and your understanding of the craft.
Consider learning more about:
- Wood species and their characteristics
- Choosing the right plywood for different projects
- Cabinet-making fundamentals
- Wood finishing methods
- Workshop dust collection
- Hand tool woodworking
- Power tool safety
- Furniture design principles
- DIY home improvement projects
- Shop storage solutions
- Woodworking plans for beginners
- Weekend woodworking projects
- Small woodworking projects that sell
- Building furniture with plywood
- Setting up an efficient home workshop
Every project teaches something new.
Every mistake becomes experience.
Every completed build adds another layer of confidence.
Before long, you’ll realize that the most valuable thing you’ve created isn’t the bookshelf, the cabinet, or the workbench.
It’s the ability to look at a pile of plywood and see possibility.