
There is a moment, usually just after you come home, when the hallway tells the truth.
Shoes have gathered by the door. A bag has landed on the floor. Someone is balancing on one foot while trying to pull off a boot. The wall has enough room for a bench, perhaps, but not the kind of deep, heavy piece shown in most furniture catalogs. Put one of those in the wrong place and the entrance stops feeling like an entrance. It becomes a bottleneck.
That is the real challenge behind free woodworking plans for a narrow entryway bench. The goal is not simply to build a smaller bench. The goal is to build one that respects the few inches your hallway has available.
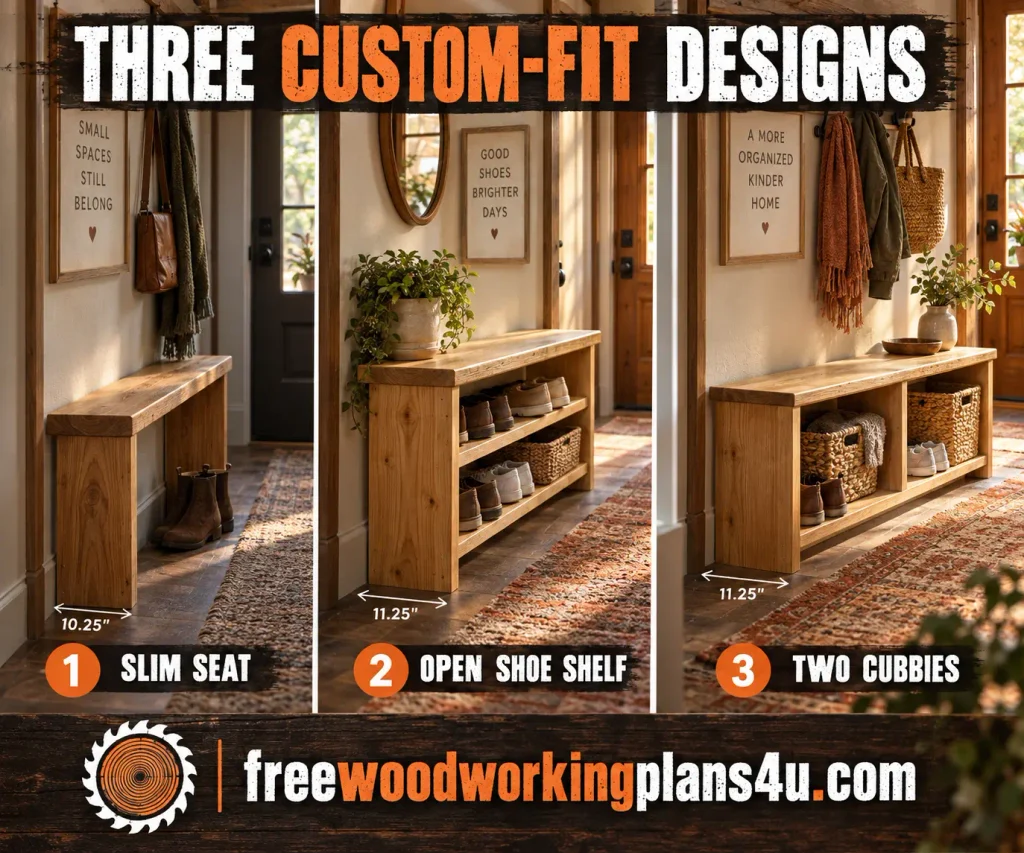
This guide gives you three ways to do that:
- A slim seat-only bench for the tightest hallway.
- An open shoe-shelf bench for daily storage.
- A compact two-cubby bench for a family entryway.
All three designs start with the same quiet discipline: measure the space before you fall in love with the plan. Once you know the usable wall width, the safe depth, the door swing, the baseboard projection, and the finished seat height, the cut list becomes far less mysterious.
If you are building a larger project list at the same time, you can also begin with our collection of 50 free woodworking plans plus The Art of Woodworking, a practical guide for learning tools, lumber, joinery, and step-by-step construction.
The narrow entryway bench answer, before the first cut
For many small hallways, a finished bench depth of roughly 10 to 12 inches (254 to 305 mm) is a sensible place to begin. A 10-inch bench works best as a short-term perch for putting on shoes. An 11- to 12-inch bench gives you a little more comfort and leaves room for a cushion without making the entrance feel crowded.
The right depth is not a number borrowed from somebody else’s hallway. It is the deepest bench that still allows the door to open, people to pass, shoes to be placed, and the rest of the home to remain easy to move through.
A finished seat height close to 18 inches (457 mm) is a useful starting point for an adult bench. Adding a thick cushion changes that calculation. If the cushion is 2 inches thick, build the wooden frame around a finished height of approximately 16 inches.
Safety note: These are adaptable woodworking plans, not a substitute for checking the actual lumber, joints, wall conditions, floor, and finished structure. Test the bench gradually before treating it as a seat. Anchor storage versions securely when children may climb, pull, or lean against them.
Three narrow entryway bench designs, three different kinds of relief
The plans share a compact footprint, but they solve different problems. One clears the walking path. One gives shoes somewhere to go. One divides the daily clutter into small, visible spaces so the doorway does not have to carry the entire burden of the household.
| Design | Approximate finished footprint | Best for | Storage | Difficulty |
|---|---|---|---|---|
| Slim seat-only bench | Custom width × 10.25 in deep × 18 in high | The tightest hallway | None | Beginner |
| Open shoe-shelf bench | Custom width × 11.25 in deep × 18 in high | Shoes, baskets, and daily use | Open lower shelf | Beginner to intermediate |
| Two-cubby bench | 36–48 in wide × 11.25 in deep × 18 in high | Family storage and organized footwear | Two open cubbies | Intermediate |
Choose Design 1 when every inch matters and sitting is the main purpose. Choose Design 2 when shoes are the thing that keeps spreading across the floor. Choose Design 3 when several people share the entrance and a little visual separation would make the room feel calmer.
Measure your entryway as if you were going to live with the result
The most expensive mistake in a small hallway is not a disappointing paint color. It is building a piece that technically fits but makes every trip through the doorway awkward.
Before buying lumber, mark the proposed bench footprint on the floor with painter’s tape. Cardboard works too. Walk past it in shoes. Open the nearest door. Carry a backpack, laundry basket, or shopping bag through the space. Stand in front of it and pretend to sit down.
The tape will tell you more than a quick glance at a ruler.
Find the usable wall width
Measure between the points where the bench could genuinely begin and end. The full wall length is not always usable. Allow for:
- Door casings and other trim.
- The space needed for a door to open completely.
- Radiators, switches, outlets, and vents.
- A small visual gap at one or both ends.
- Any irregular section of wall that would prevent a straight installation.
Use this planning formula:
Finished bench width = usable wall width − desired side clearances
For example, if the usable wall measures 48 inches and you want a 2-inch gap at each end, design for a finished bench width of approximately 44 inches.
That small gap is not wasted space. It gives the bench room to breathe and makes installation easier when the wall is not perfectly straight.
Test three depths on the floor
Mark 10.25 inches, 11.25 inches, and 12 inches from the wall. Walk through the entrance from both directions. Check the door’s opening arc. Place a pair of shoes near the front edge. Try turning sideways while carrying something.
Pay attention to the moment your body begins to compensate. If you find yourself twisting your shoulders or stepping around the tape, the bench is too deep for that location, regardless of how attractive the finished design might be.
The narrowest usable depth is not automatically the best choice. One extra inch can make a seat noticeably more comfortable. Two unnecessary inches can make the whole hallway irritating.
Look closely at the baseboard
A baseboard gives you two practical choices. You can let the bench stand slightly forward from the wall, or you can notch the rear legs and panels to fit around it.
Standing the bench forward is the gentler option for a first project. It avoids complicated cuts and makes the bench easier to move. Notching creates a closer fit, but the measurements have to be right. Record both the height and the projection of the baseboard before finalizing the cut list.
If you are unsure how to translate those measurements into a safe cut, read this guide: How to Check Woodworking Plans for Mistakes Before You Cut Any Wood: The 15-Point Pre-Build Audit
Decide the finished seat height
An 18-inch finished height is a sensible starting point for an adult entryway bench. With a 3/4-inch-thick top, the legs or side panels will normally finish at approximately 17.25 inches before the top is attached.
For a cushion, use this formula:
Wooden frame height = desired finished seat height − cushion thickness
Write the formula directly beside the cut list. It is a small habit that prevents a very common late-stage surprise: adding a beautiful cushion and discovering that the bench now feels too tall.
Materials: measure the wood in your hands
The plans use common North American nominal lumber sizes, but the cut list depends on actual dimensions. A board labeled 1×12 is usually closer to 3/4 inch thick by 11.25 inches wide after milling.
Typical actual dimensions include:
- 1×12: approximately 3/4 inch thick × 11.25 inches wide.
- 1×10: approximately 3/4 inch thick × 9.25 inches wide.
- 1×4: approximately 3/4 inch thick × 3.5 inches wide.
- 1×3: approximately 3/4 inch thick × 2.5 inches wide.
- 1×2: approximately 3/4 inch thick × 1.5 inches wide.
- 2×2: approximately 1.5 inches × 1.5 inches.
- 3/4-inch plywood: approximately 3/4 inch thick.
Measure the stock you actually bring home. If it is thinner, wider, or narrower than the dimensions above, update the formulas before cutting. Nominal dimensions have a way of creating very real problems when they quietly enter an otherwise accurate plan.
If you work in metric, convert the complete plan once and round to the nearest practical millimetre. Do not switch between inches and millimetres halfway through the cut list.
Which wood makes sense for this project?
Clear pine is affordable and easy to find, although knots and soft patches may need extra preparation. Poplar is often a smoother choice for paint. Paint-grade plywood can work especially well for the cubby design.
For a natural finish, choose boards for both strength and appearance. Look for a reasonably straight grain and avoid twists, deep splits, loose knots, or large defects. A board can be beautiful and still be the wrong board for a bench top if it wants to cup as soon as it comes indoors.
Recommended reading: How to Buy the Right Lumber for Any Woodworking Project: Choose the Species, Grade, Thickness, and Quantity
Design 1: When every inch matters, build the slim seat-only bench
This is the quietest of the three designs. No shelf. No cubby. No visual weight below the seat. Just a stable place to sit, put on shoes, or set down a bag for a moment.
It belongs in the narrow apartment hallway, the tight mudroom passage, or the entrance where a door needs every last inch of its swing.
Finished dimensions for the slim bench
- Finished width: custom width, usually 30 to 48 inches.
- Finished depth: approximately 10.25 inches.
- Finished height: approximately 18 inches.
- Top thickness: 3/4 inch.
- Leg stock: actual 1.5 × 1.5-inch legs.
At 10.25 inches deep, this is a perch rather than a lounge seat. That distinction matters. It is designed for a brief, useful moment—not for settling in with a cup of coffee.
If two people will sit at the same time, choose Design 2 or move the depth toward 11.25 to 12 inches if the hallway allows it.
Cut list for Design 1
Use W for your chosen finished width. Use D for the finished depth, approximately 10.25 inches.
| Part | Quantity | Stock | Cut size | Purpose |
|---|---|---|---|---|
| Bench top | 1 | 1×12 | W × 10.25 in | Rip the board or use a glued-up panel |
| Legs | 4 | 2×2 | 17.25 in | Supports an 18-inch finished height |
| Front and rear aprons | 2 | 1×4 | W − 3 in | Fits between the 1.5-inch legs |
| Side aprons | 2 | 1×4 | D − 3 in, approximately 7.25 in | Connects the legs across the depth |
| Rear anti-racking stretcher | 1 | 1×3 | W − 3 in | Strongly recommended on wider benches |
| Corner blocks | 4 | Scrap wood | Cut to fit | Optional reinforcement under the top |
If the bench will be wider than approximately 48 inches, do not simply stretch the aprons and hope for the best. Add a center support or redesign the frame to carry the longer span.
Build the slim seat-only bench
1. Sort, inspect, and label
Take a moment with every board. Mark the best face. Label the legs, front apron, rear apron, and side aprons in pencil.
That little bit of order pays for itself later. It is much easier to correct an orientation problem while the parts are lying on the floor than after glue has set and the frame has become one stubborn object.
2. Prepare the top
If you are using a 1×12 board, rip it to approximately 10.25 inches wide. If you do not have a safe way to make that cut, use a ready-made panel or glue up narrower boards.
Ease the corners lightly with sandpaper. The finished bench will live where coats, bags, and knees pass close by. A softly broken edge feels better than a sharp one.
3. Assemble the leg frames
Join each pair of legs with a side apron. Pocket holes on the inside faces keep the outside of the bench clean. Glue helps, but it should not be asked to do the entire job by itself.
Dry-fit both side frames before fastening them. Check that the legs sit in the same plane and that the aprons land at matching heights. If one frame looks wrong now, it will look even more wrong once the top is attached.
4. Connect the frames
Attach the front and rear aprons between the two side frames. Measure diagonally from corner to corner. When both diagonal measurements match, the frame is square.
Add the rear anti-racking stretcher below the rear apron or in another position that does not interfere with shoes. Its job is to resist side-to-side movement, not to make the bench deeper.
5. Attach the top
Center the top over the frame. A small, even reveal can make the design look intentional. A large overhang, however, places unnecessary leverage on the joints.
Fasten the top from below with screws short enough that they cannot break through the seat. Turn the bench over, check the corners, and sit on it carefully only after the joints have had the proper time to set.
Design 2: Give the shoes somewhere to go with an open-shelf bench
This is the design most likely to become part of the household routine.
The top provides a place to sit. The open shelf gives the shoes a boundary. The result is visually lighter than a cabinet and easier to clean than a deep storage compartment. You can see what is underneath, which means the shelf is less likely to become a dark second floor for forgotten clutter.
Finished dimensions for the shoe-shelf bench
- Finished width: custom width, usually 36 to 60 inches.
- Finished depth: approximately 11.25 inches.
- Finished height: approximately 18 inches.
- Shelf depth: approximately 9.25 inches.
- Shelf position: begin with the top of the shelf approximately 5 to 6 inches above the floor.
The shelf is slightly shallower than the seat. That setback creates a toe-friendly front edge and keeps the lower half of the bench from feeling too heavy.
Cut list for Design 2
| Part | Quantity | Stock | Cut size | Purpose |
|---|---|---|---|---|
| Bench top | 1 | 1×12 | W × 11.25 in | Main seating surface |
| Legs | 4 | 2×2 | 17.25 in | Supports the top |
| Front and rear aprons | 2 | 1×4 | W − 3 in | Main upper frame |
| Side aprons | 2 | 1×4 | D − 3 in, approximately 8.25 in | Connects the legs |
| Shoe shelf | 1 | 1×10 | W − 3 in × 9.25 in | Open storage platform |
| Side shelf cleats | 2 | 1×2 | D − 3 in | Supports the shelf ends |
| Rear shelf cleat | 1 | 1×2 | W − 3 in | Supports the rear edge |
| Optional shelf nosing | 1 | 1×2 | W − 3 in | Stiffens and finishes the front edge |
| Rear anti-racking stretcher | 1 | 1×3 | W − 3 in | Helps stabilize a longer bench |
The shelf length assumes that it fits between the legs. If your leg placement differs, measure the actual opening and subtract the clearance you want before cutting.
Build the open shoe-shelf bench
1. Start with the upper frame
Build the leg-and-apron frame first, using the same process as the slim bench. Square it before adding the shelf.
The shelf is not a correction tool. It should not be used to drag a twisted frame into alignment. If the frame is out of square, fix the frame.
2. Find the shelf height
Mark the same shelf-height line on all four legs. Begin with the top of the shelf 5 to 6 inches above the floor, then look at the footwear that will actually live there.
Tall boots need more room. Low shoes do not. A shelf designed around imaginary shoes is still the wrong shelf.
3. Install the cleats
Attach the side and rear cleats inside the leg frame. Use a level, and measure upward from the floor rather than assuming the top of every leg is identical.
A small error at one end becomes surprisingly visible when the shelf runs across the entire width.
4. Fit the shelf
Set the shelf on the cleats and check that it lies flat without twisting. Add the optional front nosing if the shelf feels flexible or you want a more finished edge.
Keep the storage open enough for dirt and moisture to be seen. A shelf that can be cleaned is more useful than a shelf that merely hides the problem.
5. Add the top and test it in place
Fasten the top from below. Move the bench to its actual floor and check for rocking there, not only in the workshop.
Felt pads can protect a finished floor, but they should not disguise a frame that is seriously out of square.
Make the open shelf useful, not crowded
The lower shelf can hold everyday shoes, a shallow basket, or a small tray for gloves. Keep objects from projecting into the walkway. The point is to give the entrance a little order—not to create a new obstacle with better woodworking.
Design 3: Create breathing room with a compact two-cubby bench
The two-cubby version gives each pair of shoes, basket, or household member a visible place. It does not make the entrance larger. It makes the clutter easier to understand.
This design uses panels rather than only legs and aprons, so the layout needs more care. Keep the width between approximately 36 and 48 inches unless you add another divider or reinforce the top for the longer span.
Finished dimensions for the cubby bench
- Finished width: 36 to 48 inches.
- Finished depth: approximately 11.25 inches.
- Finished height: approximately 18 inches.
- Lower deck top: approximately 4.5 inches above the floor.
- Two cubby openings: width depends on W.
For a 36-inch-wide bench, use this approximate formula:
Cubby width = (W − 2.25 inches) ÷ 2
The formula allows for two 3/4-inch side panels and one 3/4-inch center divider. Measure the plywood you actually use and update the formula if its thickness differs.
Cut list for Design 3
This version uses 3/4-inch plywood for the panels. W means the finished bench width.
| Part | Quantity | Stock | Cut size | Purpose |
|---|---|---|---|---|
| Bench top | 1 | 3/4-in plywood or glued-up panel | W × 11.25 in | Seating surface |
| Side panels | 2 | 3/4-in plywood | 17.25 × 10.5 in | Full-height sides |
| Center divider | 1 | 3/4-in plywood | 12.75 × 10.5 in | Divides the two cubbies |
| Lower deck | 1 | 3/4-in plywood | W − 1.5 in × 10.5 in | Supports stored items |
| Rear top rail | 1 | 1×4 | W − 1.5 in | Helps prevent racking |
| Front deck rail | 1 | 1×3 | W − 1.5 in | Supports and finishes the deck |
| Edge banding | As needed | Solid-wood edging | Cut to exposed plywood edges | Optional visual finish |
The divider height assumes that the top of the lower deck sits 4.5 inches above the floor and the underside of the 3/4-inch top sits 17.25 inches above the floor.
If you move the deck, recalculate the divider:
Divider height = underside of top − top of lower deck
For a 36-inch-wide example, the main parts would be approximately:
| Part | Example size |
|---|---|
| Top | 36 × 11.25 in |
| Side panels | 17.25 × 10.5 in, two pieces |
| Lower deck | 34.5 × 10.5 in |
| Center divider | 12.75 × 10.5 in |
| Approximate clear cubby width | 16.875 in each |
Treat those figures as starting dimensions, not permission to skip the measuring step. Confirm the actual plywood thickness and the real opening before fastening the divider permanently.
Build the two-cubby bench
1. Cut and label the panels
Mark the front edge of each piece. Plywood can look identical on both faces, and a panel turned around at the wrong moment can expose a damaged edge or put the better-looking face where nobody can see it.
2. Assemble the sides and top
Join the side panels to the underside of the top with glue and appropriately sized screws. Predrill the plywood to reduce splitting, bulging, and hurried-looking screw holes.
Keep the front edges flush. The front edge is what the eye reads first.
3. Install the lower deck
Support the deck on cleats or in a shallow dado, depending on your tools and experience. Position its top approximately 4.5 inches above the floor. Check it from side to side and front to back.
4. Set the divider
Center the divider across the opening. Do not rely on appearance alone. Measure both cubbies. A divider can look centered from across the room and still create two noticeably different openings.
Fasten it to the deck and the underside of the top.
5. Add the rails and finish the exposed edges
Install the rear top rail to resist side-to-side movement. Add the front deck rail if the lower panel needs extra support or a more finished edge.
Cover exposed plywood edges with edge banding or solid wood before sanding.
6. Anchor the finished bench
Storage furniture invites pulling, leaning, and climbing. Attach the bench to a wall stud or use suitable hardware for the wall construction. This matters particularly when children can reach the cubbies.
Joinery that keeps the first build approachable
There is no prize for choosing the most complicated joint. A well-fitted, properly secured simple joint is more valuable than an ambitious joint that leaves the frame loose.
Pocket holes
Pocket holes work well for aprons and cleats because they can be hidden on the inside faces. Match the screw length to the actual material thickness. A screw that is too long can break through the outside face and turn a clean project into a repair.
Screws and plugs
Screws driven from the underside or inside are straightforward when the parts are accurately fitted. If a screw must be visible, countersink it and fill the hole with a matching plug or filler.
Dowels
Dowels create clean-looking joints, but the centers must line up. They are a worthwhile upgrade if you already have a doweling jig and feel comfortable transferring marks from one part to its mate.
Glue
Wood glue likes clean, well-fitted surfaces. It is helpful, but it is not a substitute for a sound mechanical joint—especially on furniture that will carry a person.
Recommended reading:
15 Basic Woodworking Skills for Beginners—Master These Before Your First Serious Build
How to Read Woodworking Plans: A Beginner’s Guide to Symbols, Cut Lists and Diagrams
Fit the bench around baseboards and imperfect floors
Small homes rarely offer perfectly square walls and perfectly level floors. A good plan leaves room for the real house to show up.
The easy baseboard solution: stand the bench forward
Let the bench sit slightly forward from the wall, then use a rear rail or wall cleat to close the visual gap. It is simple, reversible, and forgiving for a first project.
The close-fitting solution: notch the rear legs
Measure the baseboard height and projection. Transfer those measurements to the rear legs or side panels and make a cardboard template first.
A cardboard template costs almost nothing. It can prevent a cut that cannot be put back.
Correct a small uneven-floor problem
Set the assembled bench on the floor where it will live before you apply the final finish. If it rocks, identify which leg is high. A small adjustable foot or carefully fitted leveling pad can solve a minor difference.
Do not shorten a leg until you have confirmed that the floor, rather than the frame, is the source of the problem.
Sanding and finishing: the point where it becomes furniture
Construction gives you a bench. Finishing gives it a place in the room.
Soften the edges
Break the sharp edges with a light sanding pass, especially along the front of the seat. That is where knees, clothing, and hands will meet the project most often.
Choose paint for a calm, coordinated look
Paint works well when you want the bench to echo the trim or disappear into the room. Fill visible holes, prime porous surfaces, and sand lightly between coats.
Do not forget the underside, rear edges, and end grain. Those areas still meet moisture and changing room conditions even when they are out of sight.
Choose stain when the grain deserves attention
A natural finish can make a simple design feel warm and substantial. It also reveals defects and uneven absorption. Test the stain on an offcut from the same board before committing to the bench top.
Different pieces of lumber can absorb the same stain differently, especially when they come from different parts of the tree.
Consider an oil or hardwax-style finish
An oil-based or hardwax-style finish can leave the bench with a warm, touchable surface. Follow the product’s drying, curing, and ventilation instructions. Let the finish cure before the bench begins its daily life by the door.
Learn more: Woodworking Finishing Supplies for Beginners: 17 Essentials for a Smooth, Durable Finish
The mistakes that make a narrow bench feel wrong
Copying a plan without measuring the hallway
“Narrow entryway bench” describes a category, not one universal size. Your wall, door, trim, floor, and walking path decide the dimensions.
Treating nominal sizes as actual sizes
If you design around a 2-inch leg but build with a leg that is actually 1.5 inches square, the aprons, openings, and proportions will all drift.
Adding a cushion after the height is fixed
A cushion changes the finished seat height. Apply the frame-height formula before cutting the legs or panels.
Making the bench longer without adding support
Longer spans create more movement and stress. Add a center support, additional divider, or stronger top construction when increasing the width.
Treating storage as decoration
A shelf or cubby changes the way the frame carries weight and resists racking. Include it in the original design instead of fastening it on later as an afterthought.
Skipping the dry fit
Dry-fitting catches reversed parts, uneven legs, incorrect shelf heights, and baseboard conflicts while the project is still easy to change.
Finishing before testing the structure
Test the frame, correct the wobble, soften the edges, and confirm the fit before applying the final finish. Fresh paint is not a pleasant place to discover a structural problem.
A printable checklist for the workbench
Keep this nearby while you work:
- Measure the usable wall width.
- Mark the proposed depth on the floor.
- Check the door swing and walking path.
- Record baseboard height and projection.
- Choose Design 1, 2, or 3.
- Decide whether a cushion will be used.
- Measure the actual lumber thickness.
- Rewrite the variable dimensions using W and D.
- Cut one test part if a measurement is uncertain.
- Label every part.
- Dry-fit the frame.
- Check both diagonal measurements.
- Install anti-racking support.
- Test the bench on its final floor.
- Sand and soften all exposed edges.
- Apply finish to every exposed surface.
- Anchor the bench when appropriate.
The questions most people ask before cutting
“Will a 10-inch-deep bench really be comfortable?”
It can be comfortable enough for putting on shoes or sitting briefly, particularly when hallway clearance is the limiting factor. It will not feel as relaxed as a deeper seat. If the space permits, 11 to 12 inches usually gives you a better balance between comfort and compactness.
“What height should I build for an adult?”
Approximately 18 inches is a useful starting point. The right height depends on the user, the floor, and whether a cushion will be added. Subtract the cushion thickness from the wooden frame height before cutting.
“Can I make these narrow entryway bench plans even narrower?”
Yes, but change the depth of the top, aprons, shelf, or panels together. Do not shorten only the top while leaving the frame at the original depth. Recalculate every part that controls the footprint.
“How wide can I make the open-shelf bench?”
Design 2 can stretch along a longer wall, but a wider seat needs additional support. Add a center support or redesign the frame rather than extending the front and rear aprons without reinforcement.
“Can I substitute 2x4s for the 2×2 legs?”
You can, but the bench will look heavier and the distance between the aprons, shelf opening, and finished proportions will change. Recalculate the cut list using the actual leg width.
“Is plywood strong enough for the two-cubby design?”
Quality 3/4-inch plywood is suitable for the side panels, divider, and lower deck when the parts are properly supported and fastened. Cover exposed edges with edge banding, solid-wood strips, or a carefully prepared painted edge.
“How much weight will the finished bench hold?”
There is no universal load rating. Strength depends on the wood, span, joint quality, fasteners, floor, and wall connection. Inspect every joint, test the bench gradually, and do not publish a specific maximum load unless the finished design has actually been tested.
“Should I anchor the bench to the wall?”
Wall anchoring is strongly recommended for storage versions and for any bench used where children may climb, pull, or lean against it. Use hardware appropriate for the wall material and attach to a structural point whenever possible.
“Can I attach coat hooks to the bench?”
Install coat hooks into the wall or a properly supported back panel rather than relying on the thin seat top. Keep hanging items from projecting into the walkway.
Products / Tools / Resources
Lumber and sheet goods
- Straight, stable pine for an affordable painted bench.
- Poplar when you want a smoother paint-grade surface.
- 3/4-inch plywood for the two-cubby sides, divider, and lower deck.
- A hardwood top when the bench will be a visible feature and the grain matters.
- A small amount of scrap wood for corner blocks, test pieces, and templates.
Hardware and assembly supplies
- Wood glue for clean, well-fitted joints.
- Pocket-hole screws sized for the actual material thickness.
- General-purpose wood screws for hidden underside and interior connections.
- Pilot and countersink bits to reduce splitting and surface bulging.
- Wall anchors or anti-tip hardware appropriate for the wall construction.
- Felt pads or suitable leveling feet for protecting the finished floor.
- Edge banding or solid-wood edging for exposed plywood edges.
Tools worth having nearby
- Tape measure, pencil, combination square, and a reliable level.
- Circular saw, track saw, or table saw for accurate panel and top cuts.
- Drill/driver with the correct bits for pilot holes and screws.
- Pocket-hole jig if you choose pocket-hole joinery.
- Clamps for holding frames square while fastening.
- Random-orbit sander or sanding blocks for smoothing the project.
- Eye protection, hearing protection, dust control, and a properly prepared work area.
You do not need to buy every tool before making the first cut. Borrow what you can, choose the simplest design that fits your space, and let the work itself show you which tools would genuinely improve the next project.