
There is a small thrill in making a useful piece of furniture do one more thing than it appears to do.
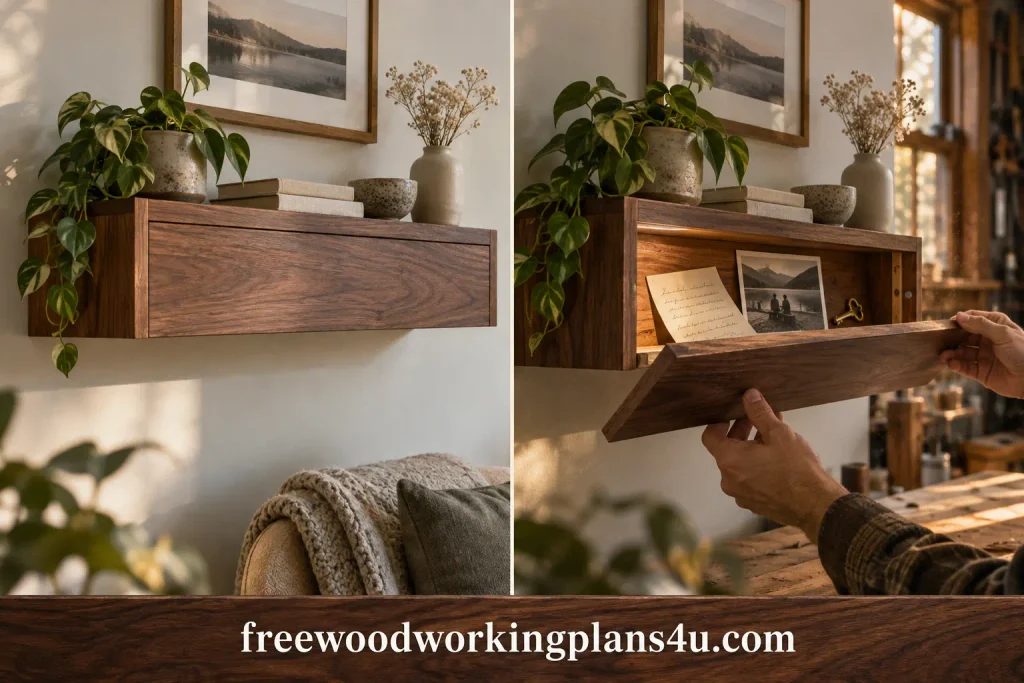
From across the room, this project looks like a straightforward wall shelf: clean lines, a quiet rectangle, enough room for a few books or small decorations.
Up close, it still looks ordinary. That is the point. The second space is tucked behind a removable false back, held in place with concealed magnets and sized for lightweight personal items, notes, keys, photographs, or keepsakes.
These free woodworking plans for a shelf with a secret compartment are built around a finished shelf measuring 760 mm wide by 200 mm high by 165 mm deep. In imperial measurements, that is approximately 29 7/8 inches wide by 7 7/8 inches high by 6 1/2 inches deep.
The hidden cavity is created by placing a false back 30 mm in front of a fixed back.
The construction is deliberately approachable. You need common sheet goods, a saw, a drill, a square, clamps, and patience with your measuring.
You do not need a complicated lock or an elaborate drawer-slide system.
One boundary matters before the first cut: this is concealed decorative storage, not a fireproof safe or theft-rated container. Do not use it for hazardous, illegal, flammable, temperature-sensitive, or excessively heavy items. Secure wall mounting matters more than the word “secret.”
The Plan at a Glance
| Feature | Specification |
|---|---|
| Finished width | 760 mm / approximately 29 7/8 in |
| Finished height | 200 mm / approximately 7 7/8 in |
| Finished depth | 165 mm / approximately 6 1/2 in |
| Main material | 18 mm plywood, hardwood, or furniture board |
| Fixed back | 6 mm plywood |
| Removable false back | 9 mm plywood |
| Hidden cavity | 30 mm before hardware and spacer clearance |
| Access | Removable false back with concealed magnets |
| Skill level | Beginner-friendly with careful measuring |
| Main tools | Saw, drill, square, clamps, sander, level |
| Best use | Small personal items and lightweight keepsakes |
The shelf has four structural layers:
- The visible outer box.
- The permanent fixed back.
- Spacer blocks that create the hidden depth.
- The removable false back that conceals the opening.
Once those layers are understood, the project stops feeling like a trick and starts feeling like what it really is: a small cabinet with a carefully disguised rear panel.
Why This Shelf Feels Ordinary Until It Does Not
The secret is not really the magnet. It is the familiar shape.
A shelf is one of the least suspicious objects in a room. People expect it to have a back. They expect that back to be recessed. They expect a little shadow around the edges. Those ordinary visual cues do most of the concealing for you.
The outer box is assembled like a compact wall cabinet. The top, bottom, and side panels establish the visible shape. The fixed back closes the cabinet permanently. Then the false back is set forward on spacers, leaving a shallow pocket between the two panels.
That simple arrangement gives you several practical benefits:
- The project can be built with a circular saw and straightedge guide.
- A table saw makes the cuts faster, but it is not required.
- The cavity depth can be changed by changing the spacer length.
- The false back can be painted, stained, or finished to match the interior.
- The plan is easy to check because each part has a defined relationship to the others.
It also gives you an honest limitation. Someone examining the shelf closely may eventually find the panel. The goal is a natural-looking piece of furniture and a satisfying hidden feature—not an impossible security device.
Materials and Hardware: Buy the Right Pieces Before You Cut
Main wood or sheet goods
For the main box, 18 mm plywood is the most predictable choice. Baltic birch plywood is especially pleasant to work with: its layers are consistent, its edges are clean, and it behaves well under paint or a clear finish.
Furniture board can also work if the edges are supported and the shelf will carry only a moderate load. Solid wood is possible, too, but it changes with humidity. Wide solid boards want to expand and contract across their grain. If you trap them rigidly inside a fixed box, seasonal movement can turn a neat reveal into a tight joint.
Use 6 mm plywood for the fixed back. Use 9 mm plywood for the false back so the removable panel feels solid in your hand and is less likely to flex when it is taken off and replaced.
Hardware
Set these pieces aside before assembly:
- Four to six neodymium magnets, approximately 10 mm in diameter and 3 mm thick
- Matching steel washers or opposing magnet pairs
- 40 mm wood screws for the outer box
- 25 mm screws for cleats and reinforcement
- Wood glue
- Sandpaper in 120, 180, and 240 grit
- Your chosen paint, stain, oil, or clear finish
- Wall anchors or structural screws rated for the wall type
- An optional spring-loaded push-to-open latch
The magnet system should hold the false back without making it feel glued shut. Too much pull turns a simple access panel into a wrestling match. Too little pull lets it rattle or shift when the shelf is bumped.
Recommended guide: 25 Best Woodworking Hardware Products Every Serious Woodworker Should Own (Ranked by Performance)
Tools
The basic tool list is modest:
- Circular saw with a straightedge guide, or a table saw
- Drill and drill bits
- Combination square
- Tape measure
- Marking knife or sharp pencil
- Clamps
- Sanding block or sander
- Level for installation
A router is useful for clean, flush magnet pockets. A drill press improves repeatability. Neither is essential to the plan.
Recommended reading: Best Woodworking Tools for Beginners: Build Your First 10 Projects With These Tools and Nothing More
Health, Safety, and Environment Before You Build
Woodworking becomes much more pleasant when the safety decisions are made before the saw starts.
Wear eye protection whenever you cut, drill, or sand. Use hearing protection around loud tools. Control dust with extraction when possible, and use suitable respiratory protection when the material, finish, or workspace calls for it. Keep the workpiece supported and clamped; do not balance a panel across an unstable surface while cutting.
Disconnect power before changing blades, clearing a jam, or adjusting a tool. Keep loose clothing, cords, and fingers away from moving blades. Follow the instructions for your glue and finish, and give solvent-based products proper ventilation and safe disposal.
The wall is part of the safety plan, too. A shelf that is perfectly square on the bench can still become dangerous if it is mounted to an unsuitable anchor or overloaded after installation.
Recommended reading: Beginner Woodworking Safety Checklist: 47 Things to Check Before You Make Your First Cut
Printable Cut List
The following cut list assumes 18 mm main stock, a 6 mm fixed back, and a 9 mm false back.
| Part | Quantity | Finished size | Material | Purpose |
|---|---|---|---|---|
| A. Top panel | 1 | 760 × 165 × 18 mm | 18 mm stock | Upper surface of shelf |
| B. Bottom panel | 1 | 760 × 165 × 18 mm | 18 mm stock | Lower surface of shelf |
| C. Side panels | 2 | 164 × 165 × 18 mm | 18 mm stock | Close the left and right sides |
| D. Fixed back | 1 | 724 × 164 × 6 mm | 6 mm plywood | Permanent rear wall |
| E. False back | 1 | 718 × 158 × 9 mm | 9 mm plywood | Removable access panel |
| F. Spacer blocks | 6 | 30 × 30 × 18 mm | 18 mm offcuts | Create the hidden cavity |
| G. Rear mounting rail | 1 | 700 × 60 × 18 mm | 18 mm stock | Reinforce wall mounting |
| H. Lower reinforcement rail | 1 | 700 × 30 × 18 mm | 18 mm stock | Optional additional support |
How the dimensions fit together
The inside opening is 724 mm wide by 164 mm high:
- Inside width = 760 − 18 − 18 = 724 mm
- Inside height = 200 − 18 − 18 = 164 mm
The false back is 6 mm smaller in both directions. That creates approximately 3 mm of clearance on every edge:
- False-back width = 724 − 6 = 718 mm
- False-back height = 164 − 6 = 158 mm
That narrow reveal is not wasted space. It gives the panel somewhere to go when the wood shifts slightly or when several coats of finish add a little thickness.
The measurement that saves the project
Measure the actual thickness of your stock before cutting the side panels.
The formula is:
Side-panel height = finished shelf height − twice the actual panel thickness
If your material measures 17.5 mm instead of 18 mm:
200 − 17.5 − 17.5 = 165 mm
This is one of those small checks that feels unnecessary until a panel is suddenly 1 mm too tall. Nominal dimensions are useful for shopping. Actual dimensions are what your saw has to work with.
Build Diagram 1: The Shelf From the Front
From the front, the project is intentionally simple.
| Area | Dimension or description |
|---|---|
| Overall width | 760 mm |
| Overall height | 200 mm |
| Top panel | 18 mm thick |
| Bottom panel | 18 mm thick |
| Side panels | 18 mm thick |
| Clear interior opening | 724 mm wide × 164 mm high |
| False-back reveal | Approximately 3 mm on all four sides |
The false back sits inside the opening. It does not cover the front edges of the top, bottom, or side panels. That recessed position is what lets it read as a normal shelf back rather than a separate door.
Build Diagram 2: What the Side Section Reveals
The side section is where the hidden space becomes clear. From front to back, the shelf contains:
- The visible display area.
- The 9 mm false-back panel.
- The 30 mm hidden cavity.
- The 6 mm fixed back.
The approximate visible display depth is:
165 − 9 − 30 − 6 = 120 mm
The cavity is intentionally shallow. That keeps the false back stable, leaves enough room for small objects, and avoids turning the shelf into a heavy box that is difficult to mount.
Build Diagram 3: Exploded Assembly Order
Think of the shelf as a sequence rather than a pile of panels:
- Top panel
- Bottom panel
- Left and right side panels
- Rear mounting rail
- Fixed back
- Spacer blocks
- False back
- Magnets or release hardware
- Finish and wall-mounting hardware
The order is important. Test the cavity while the wood is unfinished. A tight panel or misplaced magnet is a small correction on bare plywood and a frustrating repair after paint.
Step 1: Put Names on Every Part Before the Saw Comes Out
Cutting is only half the work. Knowing where every piece belongs is what keeps the project from turning into a puzzle later.
Label each part with the letters from the cut list: A for the top, B for the bottom, C for the sides, and so on. Mark the front edge of every panel. If one side has a better face, mark that face as well.
Before you cut the false back, look at the plywood surface. If you want it to blend into the shelf, choose a face whose grain, color, or pattern feels at home with the surrounding interior.
Inspect every piece for:
- Square corners
- Straight edges
- Splits near screw locations
- Warping that could interfere with the false-back fit
- Tear-out on visible surfaces
When using a circular saw, set up the guide so the finished face receives the cleanest cut. A small amount of tear-out around the false-back panel can remain visible every time the compartment is opened.
Step 2: Build the Outer Shelf Box
Dry-fit the top, bottom, and side panels on a flat surface. Put the side panels between the top and bottom, then look at the box from the front and rear.
Check five things before glue:
- The outside width is 760 mm.
- The outside height is 200 mm.
- The two diagonals are equal.
- The side panels are flush with the front edges.
- The rear edges form one straight plane.
Apply a thin, even film of glue to the mating edges. Clamp the box, predrill the screw holes, and drive the screws through the top and bottom panels into the side panels.
Do not rush the square check. A box that is only slightly out of square can make the false back look crooked, create an uneven reveal, and cause the magnets to miss their mating points. Tighten the clamps gradually while watching both diagonals.
Let the glue cure according to the manufacturer’s instructions before removing the clamps.
Step 3: Strengthen the Rear for Wall Mounting
The rear mounting rail gives the shelf something substantial to hold onto. The 6 mm fixed back is not meant to carry the entire weight of the shelf by itself.
Position the 700 × 60 × 18 mm rail inside the upper rear area of the shelf. It should connect securely to the top and side structure, leaving room for the fixed back and the false-back spacers.
Predrill through the top and side panels. Apply glue where the rail meets the structure, then use 40 mm screws. Keep screw heads below any surface that will remain visible.
If you want a French cleat, the rail can become the shelf-side cleat. Cut a matching wall-side cleat from the same stock and bevel the mating edges so the shelf locks onto the wall cleat.
For a heavier display load, install the optional 700 × 30 × 18 mm lower reinforcement rail in the lower rear portion of the box. Keep it behind the visible display area, and make sure it does not interfere with the false back or with the objects you plan to store.
For plasterboard, masonry, or an uncertain wall, choose anchors and fasteners rated for that exact wall type. A concealed compartment does not make an overloaded shelf safer.
Step 4: Set the Permanent Fixed Back
The fixed back measures 724 × 164 × 6 mm. It fits between the side panels and between the top and bottom panels.
Apply glue to the rear contact edges and position the panel flush with the back of the shelf. Use brads, screws, or both. If you use screws, predrill the 6 mm plywood so the edge does not split.
Before the glue sets, measure the two diagonals from the front opening once more. If the measurements differ, adjust the clamps gently until they match.
This panel is the permanent rear wall of the hidden cavity. It also gives the spacer blocks a solid surface to attach to, so take the time to make it flat and secure.
Step 5: Make the Space With Spacer Blocks
The six spacer blocks measure 30 × 30 × 18 mm. Together, they hold the false back 30 mm forward of the fixed back.
Place them like this:
- Two near the upper left and upper right corners
- Two near the lower left and lower right corners
- Two near the center, positioned to support the false back without swallowing useful storage space
The center blocks can move slightly depending on what you expect to store. What cannot change is their depth. Every block must hold the false back on the same plane.
Glue and screw the blocks to the fixed back. Check the screw length carefully; no screw tip should project through the rear where it could mark the wall.
Now place the false back against the blocks. It should lie flat, without rocking, and the 3 mm reveal should look even on all four sides. This is the first moment when the hidden compartment begins to feel real.
Step 6: Prepare the Removable False Back
The false back measures 718 × 158 × 9 mm. Sand its front face through 120, 180, and 240 grit. Ease the front edges lightly with a sanding block. Sharp corners are more likely to chip each time the panel is removed.
On the rear face, mark the magnet positions approximately 50 mm from each corner. Keep the marks away from the very edge. If you use six magnets, place the additional two near the middle of the long edges.
Drill shallow pockets so the magnets or steel washers sit flush. Use a depth stop, or wrap tape around the drill bit, so the bit cannot break through the panel.
Test the polarity before applying adhesive. One magnet installed backward can make a corner push away instead of holding.
Choose one release method:
- A small finger recess along the lower edge
- A spring-loaded push latch behind the panel
- A discreet access point concealed beneath a decorative object
A small finger recess is the simplest choice. Place it low and keep it modest. The panel should open when you know where to press, not announce itself from across the room.
Step 7: Make the Magnetic Release Feel Natural
Set the false back on the spacer blocks and mark the exact contact points for the steel washers or opposing magnets. Marking from the panel itself is more reliable than transferring measurements from a drawing.
Remove the panel and install the mating hardware. Let the adhesive cure fully before putting the release through repeated cycles.
Test it at least ten times:
- Press or pull at the intended release point.
- Lift the panel without flexing it.
- Confirm that each magnet makes contact.
- Replace the panel and check that it sits flush.
- Give the shelf a gentle bump and listen for rattling.
If the panel shifts, the magnets may be weak or the spacer blocks may not be coplanar. If it refuses to open, use fewer magnets, weaker magnets, or a push latch.
The best mechanism is the one you stop noticing after the first few uses. It should be deliberate, quiet, and repeatable.
Step 8: Sand and Finish Without Giving Away the Secret
Sand the visible surfaces without rounding the edges that define the box. Start at 120 grit, continue through 180 grit, and finish at 240 grit for paint, stain, or clear finish.
Give extra attention to:
- The front edges of the top and bottom panels
- The opening around the false back
- The face of the false back
- Exposed plywood edges
- The areas around the magnet pockets
Test stain or finish on an offcut first. The false back can disappear into the interior when it matches the surrounding wood, or it can become a deliberate design detail with a controlled contrast. What you want to avoid is an accidental color difference that points directly at the panel.
Finish the false back separately so it does not bond to the spacer blocks. Keep finish out of the magnet pockets; a buildup of dried product can prevent the panel from sitting flush or reduce the holding power.
Five Small Details That Make the Compartment Less Obvious
Let the grain travel
When the grain direction on the false back agrees with the rest of the interior, the eye has less reason to stop there. It becomes part of one continuous surface instead of a separate piece.
Keep the reveal even
A narrow, consistent gap looks intentional. A wandering gap looks like a mistake, and mistakes attract attention.
Remove the obvious handle
A knob or pull explains the mechanism immediately. A small lower-edge recess or push latch keeps the panel quiet.
Make the interior look complete
Even an empty shelf should look finished. A clean painted interior, a natural wood back, or a restrained arrangement of décor helps the false back feel like a normal part of the furniture.
Be honest about concealment
No decorative hidden compartment survives close inspection forever. Good woodworking makes the feature unobtrusive during ordinary use. It does not turn a shelf into a security system.
How to Resize the Plan Without Losing the Fit
The plan is adjustable, but change one dimension at a time. The false back, the cavity, and the visible display area all affect one another.
Changing the width
Use:
New side-panel length = new overall width − twice the actual stock thickness
The fixed back should match the new inside width. Keep the false back approximately 6 mm narrower than the opening so the 3 mm reveal remains on both sides.
Changing the height
Use:
New side-panel height = new overall height − twice the actual stock thickness
Keep at least 3 mm of clearance around the false back. A taller panel may need an extra center spacer or thicker material to prevent flexing.
Changing the cavity depth
Change the spacer length. A 20 mm spacer creates a shallower cavity. A 40 mm spacer creates more depth, but it also moves the false back forward and reduces the visible display area.
Changing the overall shelf depth
The visible display depth is reduced by three layers:
Visible depth = overall depth − fixed-back thickness − cavity depth − false-back thickness
For this plan:
165 − 6 − 30 − 9 = 120 mm
Keep enough visible depth for the objects the shelf is meant to display. A secret space is not useful if the ordinary shelf becomes awkward.
Mount the Shelf Like You Mean It
Once mounted, the shelf becomes part of the wall. Treat that connection as seriously as the joinery.
Before installation:
- Find wall studs, or choose anchors rated for the actual wall.
- Confirm that the wall can support the shelf and its contents.
- Use a level.
- Make sure the false back can still be removed after the shelf is mounted.
- Keep the shelf away from heat, moisture, and places where it could be struck.
Start with light items. Watch for movement, sagging, or fastener failure before adding more weight. The hidden compartment does not increase the load capacity of the outer box.
When the Fit Is Not Right: Troubleshooting From the Workbench
The false back will not go in
Measure the opening and the panel again. Finish buildup, a box that is slightly out of square, or spacer blocks positioned too far forward can steal the clearance. Remove material slowly with a sanding block. A few careful passes are better than one desperate cut.
The panel rocks
One or more spacer blocks are sitting at a different height. Lay a straightedge across them and find the high point. Sand or shim until the false back rests evenly.
The seam can be seen from across the room
Look at the reveal, the grain, and the finish color. A consistent 3 mm line is usually quieter than an uneven gap. Check that the panel is not sitting proud of the surrounding edges.
The magnets do not meet
Mark the real contact points after placing the panel. Do not rely only on measurements from the plan. Recut the shallow pockets if necessary, and confirm polarity before gluing anything permanently.
The shelf sags
Reduce the load, improve the rear reinforcement, or add a center support. Sag is a structural problem, not a secret-compartment problem.
The panel is too hard to remove
Reduce the number of magnets, choose weaker magnets, or install a push latch. Opening the compartment should feel controlled—not like you are prying open a crate.
What Belongs in the Hidden Space?
The cavity suits small, light objects:
- Personal notes
- Small keepsakes
- Spare keys
- Photographs
- Cards or letters
- Small craft items
- Remote controls or cables
Avoid anything hazardous, flammable, illegal, temperature-sensitive, or heavy enough to strain the shelf. If an item needs fire protection, theft protection, or a lockbox, use the right container for that job.
Frequently Asked Questions From the Workbench
“I am new to woodworking. Is this shelf really within reach?”
Yes, provided you are comfortable making straight cuts, checking for square, drilling pilot holes, and slowing down when a measurement does not make sense. The false-back approach is much more forgiving than a hidden drawer with slides or a complicated locking mechanism.
“What is the simplest secret mechanism here?”
The removable magnetic false back. It needs no drawer slides and no complicated joinery. Add a small lower-edge finger recess or a push latch, and the panel can open without a visible handle.
“How much room is actually behind the panel?”
The plan creates a 30 mm spacer gap. The usable space will be slightly less after the magnets, steel washers, and any reinforcement are installed.
“Can I build the shelf from solid wood?”
You can, but solid wood moves as humidity changes. Plywood is more predictable for the fixed back and false back. If you use solid wood for the main box, allow for seasonal movement rather than trapping wide boards rigidly.
“Do I need a router for the magnet pockets?”
No. A router produces tidy, repeatable pockets, but a drill with a depth stop, a steady hand, and careful sanding can do the job.
“Can I make the shelf wider or taller?”
Yes. Use the formulas in the resizing section, and keep the false-back reveal close to 3 mm on every side. Recalculate the side-panel height whenever the actual stock thickness changes.
“Will the compartment be completely invisible?”
No—and it should not be described that way. It is designed to look ordinary during normal use, not to resist close inspection. Accurate alignment, matching grain, even gaps, and a discreet release point make it less noticeable.
“How do I print the woodworking plan correctly?”
Print measured drawings at 100 percent when a full-size template is supplied. Do not choose “fit to page.” Check the printed dimensions against the written cut list before cutting your material.
“How much weight can the shelf carry?”
There is no safe universal number. Capacity depends on the material, joinery, fasteners, wall structure, and how the load is distributed. Mount into studs when possible, use anchors rated for the wall, and increase the load gradually.
Before You Hang It: Final Checks
Use this short checklist while the shelf is still on the bench:
- The outer box is square.
- The fixed back is secure.
- Every spacer block is the same depth.
- The false-back reveal is even.
- The magnets have the correct polarity.
- The panel opens without excessive force.
- The panel closes without rattling.
- The finish is fully cured.
- The mounting hardware suits the wall.
- The intended contents are light, safe, and appropriate for concealed decorative storage.
Products / Tools / Resources
Products
For the shelf itself, look for stable 18 mm plywood or straight, dry boards. You will also need 6 mm plywood for the fixed back, 9 mm plywood for the removable false back, small neodymium magnets, matching steel washers or opposing magnets, wood glue, screws, sandpaper, and a finish suited to the material.
Buy the material by its actual thickness, not only by its label. That one habit protects the cut list more effectively than any last-minute adjustment.
Tools
A circular saw with a straightedge guide is enough to break down the panels. A table saw speeds up repeated cuts. Add a drill, combination square, clamps, sanding block, level, and a reliable way to support the workpiece. A router and drill press are useful upgrades, not requirements.
Resources
For a broader understanding of the plan, cut list, and build process, read these guides:
- Woodworking Cut List vs. Materials List for the difference between parts and purchased materials.
- Saw Kerf Allowance in Woodworking for the thin strip of material removed by a saw blade.
- Saw Kerf Calculator for Woodworking Cut Lists when changing the shelf dimensions.
- How to Follow Woodworking Plans Step by Step for reading diagrams and checking assembly order.
- Woodworking Finishing Supplies for Beginners before choosing stain, paint, oil, or clear coat.
- Hand Tools vs. Power Tools Cost for Woodworking when deciding which equipment you actually need.
- The Cheapest Way to Start Woodworking if this is one of your first projects.