
A shelf can be full and still look busy. The books are useful, the keepsakes matter, but all those little shapes and colors stay in view.
This wall-mounted shelf gives them a place behind two sliding doors. The doors move sideways, so you don’t need room for a hinged door to swing open. Build the example from plywood, add a center shelf, and route the tracks into the top and bottom.
The measurements below give you a clear place to start. Before cutting the final door panels, check your actual plywood thickness and make a test fit. A small difference in the stock or groove can turn a smooth slide into a stubborn one.
At a glance: This example shelf is 30 × 16 × 8 inches (762 × 406 × 203 mm). It has a plywood case, one center shelf, a ¼-inch back, and two overlapping wood doors. The doors slide in routed grooves and the finished shelf fastens through a mounting rail into wall framing.
The example plan: compact shelf, sliding doors
The shelf is sized to fit above a desk, an entryway table, or a workbench. The doors cover the opening without taking up floor space. Inside, a center shelf divides the storage into two levels.
| Project detail | Example measurement |
|---|---|
| Overall width | 30 in. (762 mm) |
| Overall height | 16 in. (406 mm) |
| Overall depth | 8 in. (203 mm) |
| Opening between case sides | 28½ in. (724 mm) |
| Opening between top and bottom | 14½ in. (368 mm) |
| Number of doors | 2 |
| Door overlap when closed | About 1 in. (25 mm) |
| Center shelf | 28½ × 6 in. (724 × 152 mm) |
Treat these dimensions as a reference build, not a universal plan for every track or panel. If you change the shelf size or choose a different door system, recalculate the opening and check the manufacturer’s clearances.
Gather the materials and make the cuts
The case is made from ¾-inch plywood, with a ¼-inch plywood back. The example doors use ½-inch plywood, which makes a sturdier panel than thin sheet stock. Clear glass is also possible, but it needs a suitable track or framed-door design.
Materials
- ¾-inch plywood for the case, shelf, cleats, and mounting rail
- ¼-inch plywood for the back
- ½-inch plywood for the doors
- Wood glue
- Screws suitable for your joinery and wall-mounting method
- Sandpaper and an indoor furniture finish
Cut list
| Part | Qty. | Material | Cut size |
|---|---|---|---|
| Top and bottom | 2 | ¾-in. plywood | 30 × 8 in. (762 × 203 mm) |
| Sides | 2 | ¾-in. plywood | 14½ × 8 in. (368 × 203 mm) |
| Center shelf | 1 | ¾-in. plywood | 28½ × 6 in. (724 × 152 mm) |
| Shelf support cleats | 2 | ¾-in. stock | ¾ × ¾ × 6 in. (19 × 19 × 152 mm) |
| Mounting rail | 1 | ¾-in. stock | 28½ × 2½ in. (724 × 64 mm) |
| Back | 1 | ¼-in. plywood | 30 × 16 in. (762 × 406 mm) |
| Sliding doors | 2 | ½-in. plywood | Start at 14¾ × 14¾ in. (375 × 375 mm); test fit |
Plywood sold under the same nominal thickness can vary. Measure the stock you have before setting the router, and check the panel thickness with calipers if you have them. That measurement will help you set a groove that guides the door without pinching it.
Tools
Set out a saw for breaking down plywood, a router with a straightedge or a table saw for the grooves, a drill/driver, clamps, a square, a tape measure, and a sander. You’ll also need a stud finder and level when it’s time to hang the shelf.
Secure each workpiece before routing or sawing. Follow your tool’s instructions and use suitable eye and hearing protection.
Give the doors room to glide
The two doors run in parallel tracks across the top and bottom of the case. One sits closer to the front; the other slides behind it. To install the panels after assembly, the upper grooves need to be deeper than the lower grooves.
For this example, start with lower grooves about ⅛ inch deep and upper grooves about ⅜ inch deep. Make each groove roughly ¹⁄₁₆ inch wider than the measured panel thickness, then leave at least ¼ inch of wood between the parallel grooves. Rockler’s sliding-door guidance explains this deeper-top, shallower-bottom setup and recommends testing the fit so the door moves without excessive play.
Work out the door size
The clear opening between the sides is 28½ inches. With a 1-inch overlap where the doors meet, begin with two panels of equal width:
Door width = (opening width + desired overlap) ÷ 2
For this shelf:
(28½ in. + 1 in.) ÷ 2 = 14¾ in.
The vertical opening is 14½ inches. With a ⅛-inch lower groove and a little extra clearance for fitting the panels, 14¾ inches is a useful starting height. The exact fit depends on the grooves you cut, so make a mock-up or test the first door before trimming the second.
Mark the tracks
Mark the first track centerline about ¾ inch back from the front edge of the top and bottom panels. Mark the second track farther back, leaving enough wood between the grooves to keep the track area strong. Measure both from the same front edge so the upper and lower tracks line up.
The center shelf sits behind the rear door. In this plan, its front edge is 2 inches back from the case front. If your panel is thicker or your tracks sit farther back, adjust the shelf depth to keep the doors clear.
Build the case one square corner at a time
Cut the panels and route the grooves
Cut the top, bottom, sides, doors, center shelf, cleats, mounting rail, and back from the cut list. Label each piece and mark the front edge before routing; it’s easy to flip a panel and put a groove on the wrong side.
Route the tracks in the top and bottom panels before assembling the case. Clamp a straightedge securely and make test cuts in scrap from the same plywood. Adjust the groove until a door panel slides without binding or rattling.
If routing feels like the wrong approach for your tools, use a sliding-door track system instead. Follow its installation guide for the door dimensions and clearances; track systems may require different measurements from routed grooves.
Assemble the outer frame
The two sides fit between the top and bottom panels, making the case 16 inches high overall. Join the panels with glue and a method you can make accurately, such as pocket screws or dados. Check each corner with a square, then compare the two diagonals. When those measurements match, the case is square.
Fit the mounting rail between the sides, tight against the underside of the top and flush with the back edge. This rail gives the wall screws more material to pass through than the ¼-inch back panel alone.
Support the center shelf
Set the two support cleats level with each other on the inside faces of the sides. For the example dimensions, the tops of the cleats sit 7⅝ inches above the outside face of the bottom panel.
Rest the center shelf on the cleats. Its back edge should meet the inside back of the case, and its front edge should sit 2 inches behind the case front. Check that it’s level before fastening it to the cleats.
Attach the back
Check the case for square one more time, then attach the ¼-inch back over the rear. A square, well-fastened back helps hold the case in alignment, which also helps the door tracks stay parallel. Choose fasteners suited to the plywood and avoid placing them so close to an edge that the material splits.
Fit and tune the sliding doors
Once the case is assembled, lift the first door into its deeper upper groove. Lower it into the matching bottom groove, then fit the second panel in the other track.
Slide each door across the opening. It should move with light pressure. If a panel binds, inspect the case for square and check whether finish or debris has narrowed a groove. If it rattles, the groove may be too wide. Make small adjustments and test again rather than forcing the panel.
A ¾-inch finger hole near the outside edge of each door gives you a simple way to move the panels. Drill the holes before finishing, with scrap wood behind the panel to help prevent tear-out.
Finish the shelf, then mount it securely
Sand the case and doors, easing the sharp corners without rounding over surfaces that need to fit. Apply an indoor furniture finish according to its directions. Keep the finish thin around the tracks; a raised edge inside a groove can make a door drag. Let the finish cure before installing the panels.
Find the wall framing and mark the stud positions. Hold the shelf level, then drive suitable structural or cabinet screws through the back and mounting rail into the framing. A cleat or rail fastened into studs is a common way to mount a wall shelf.
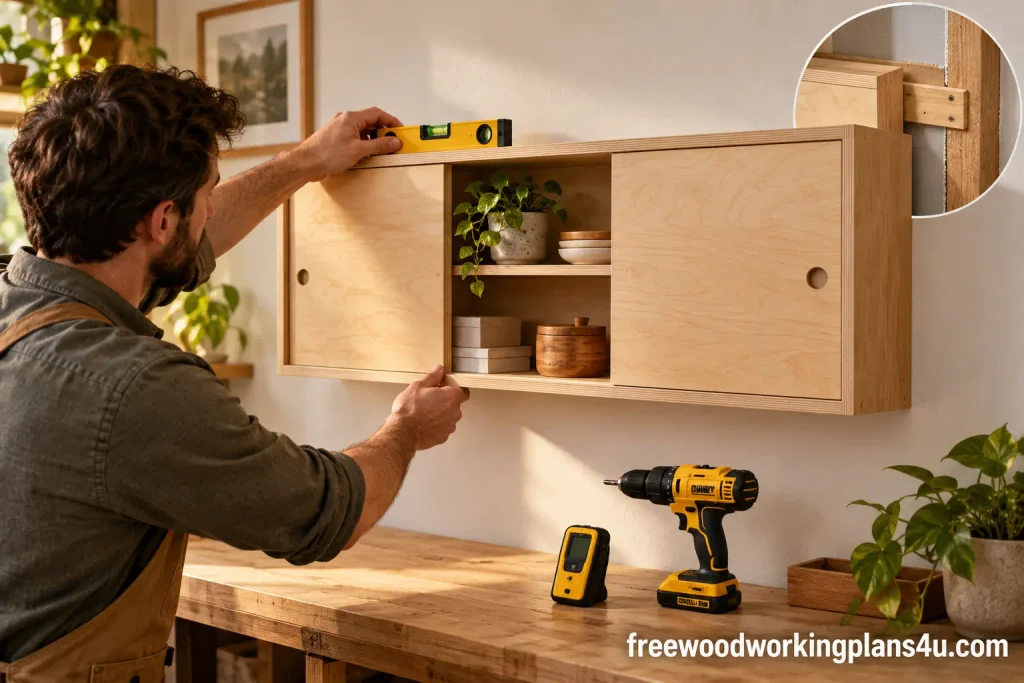
Choose fasteners for the wall type and expected load. If the studs don’t line up with useful screw positions, use a mounting system rated for your wall rather than guessing at drywall anchors. The safe load depends on the shelf, fasteners, wall material, and how the items are distributed. Start with light items and make sure the shelf stays secure.
When something doesn’t feel right
The doors bind. Check whether the case is square and whether finish has built up in the grooves. A groove that’s too narrow can pinch the panel; widen it only after testing the change on scrap.
The doors rattle. The grooves may be too wide. The panels need enough clearance to move, but too much space lets them wobble. Check the actual panel thickness and test a closer fit.
The doors don’t overlap enough. Recheck the opening and door widths. If there’s a gap where the panels meet, slightly increase the overlap when you make replacement panels.
The shelf shifts or pulls away from the wall. Remove the stored items and inspect the wall fasteners, mounting rail, and case. Reinstall it with fasteners suited to the wall structure before using it again.
Questions you may have before you start
“I’m new to woodworking. Is this too ambitious?”
It’s a manageable first cabinet-style project if you can cut square panels and take time with the track fit. You can make the job more forgiving by testing grooves on scrap and keeping the door panels oversized until you’ve checked how they slide.
“Could I put glass in the doors?”
Yes, but the track and door construction must be designed for glass. Use a suitable frame or track system and follow the supplier’s panel thickness and safety requirements. Don’t place bare glass in grooves intended for wood panels.
“Will the doors keep dust out?”
They’ll hide items and help shield them, but overlapping sliding doors usually leave small gaps. Think of them as a tidy cover rather than an airtight seal.
“What if I want a different shelf width or height?”
You can change the dimensions. Recalculate the opening after adjusting the case, then size the doors for that opening and the overlap you want. Track details affect the door height, so test the new dimensions with your actual panels before cutting the finished pieces.
Recommended guide: How to Modify Woodworking Plan Dimensions Safely: What You Can Resize, What Must Stay Fixed, and How to Rebuild the Cut List
“Where can I find more projects like this?”
For related small-space builds, see floating shelf plans, wall-mounted storage projects, and woodworking plans for cabinets.
Products / Tools / Resources
- Case material: ¾-inch plywood for the top, bottom, sides, shelf, support cleats, and mounting rail.
- Back panel: ¼-inch plywood, cut to cover the assembled case.
- Door panels: ½-inch plywood for the example build. Measure the actual thickness before routing.
- Track-making tools: A router with a straightedge, or a table saw if the grooves can be cut safely and consistently with your setup. Use scrap to test the groove width and depth.
- Alternative track: A sliding-door hardware system can simplify the track work. Follow its installation guide for required clearances and panel dimensions.
- Mounting tools and hardware: Stud finder, level, drill/driver, and structural or cabinet screws appropriate for the wall.
- Reference guides: Rockler’s guide to sliding-door grooves and WOOD Magazine’s wall-shelf cleat example.